What to Know
* The Phone 15 Pro models running iOS 17.2 or later can record spatial videos.
* Spatial videos look normal on your iPhone, but they look like 3D videos when viewed on the Apple Vision Pro or compatible AR/VR headsets.
Spatial videos look three-dimensional when viewed on the Apple Vision Pro or compatible third-party AR/VR headsets. They can be filmed due to the particular positioning of the camera lenses on the iPhone 15 Pro and iPhone 15 Pro Max. I'll teach you how to enable spatial video recording on your iPhone and start shooting!
Jump To:
* What is Spatial Video on iPhone
* How to Enable Spatial Video on iPhone
* How to Record Spatial Video on iPhone
* FAQ
What is Spatial Video on iPhone
Spatial video makes subjects look three-dimensional when viewed on the Apple Vision Pro (or third-party alternative). Because recording spatial videos uses two lenses, you can see your subject from several angles, making you feel like you are truly reliving the memory. The stereoscopic 3D video that can be filmed with your iPhone works because it consists of two images, one for each eye, instead of a single image being projected to both eyes. This is how most humans see the world, which makes this type of VR video so realistic looking. Videos that you film as spatial video on your iPhone 15 Pro can be viewed as 2D videos on other devices but will become 3D when viewed using an Apple Vision Pro.
How to Enable Spatial Video on iPhone
When you update your iPhone 15 Pro or iPhone 15 Pro Max to iOS 17.2 or later, you can automatically take spatial video on your phone. You can disable or enable it in your Camera settings to suit your needs:
* Open Settings.
* Tap Camera.
* Select Formats.
* Toggle Spatial Video for Apple Vision Pro on or off.
Warning
Please keep in mind that if you film a spatial video, the video will be recorded at 1080p at 30 fps, which is lower than my personal preference of 4k at 60 fps. It will also fill up your storage quickly because it takes up 130 MB per minute of filming.
Now you know how to enable or disable spatial video on your iPhone! You can also toggle on spatial video in the Preserve Settings in the Camera app if you want all or none of your videos to be automatically filmed as spatial videos. For more iPhone videography tips, check out our free Tip of the Day.
How to Record Spatial Video on iPhone
Once you are ready to record a spatial video, follow the steps below. Keep in mind that unless you have an Apple Vision Pro or a compatible AR/VR headset, it will be viewable as a regular video on whatever device you play it on. Here's how to record Apple Vision Pro videos:
* Hold your iPhone in landscape mode and navigate to video mode in your Camera app.
* Tap the spatial video icon to turn it yellow.
* Your iPhone will tell you if the subject is too close or too far.
* Tap the shutter button and film as you normally would.
Spatial videos will be labeled in your Photos app. They will also appear in their own album. The only edits you can make to spatial videos are muting the clip or trimming it.
Pro Tip
You will be able to edit spatial videos on your Mac using Final Cut Pro ($299).
Now you know how to film spatial videos on your iPhone 15 Pro and iPhone 15 Pro Max! If you want to view them on third-party devices, you may need to use an app or website to convert the format to something compatible. Next, learn how to turn a Live Photo into a video.
FAQ
* Is it spelled spacial vs spatial? Spatial is the correct spelling for spatial videos in most English-speaking countries.
* Is there an iPhone VR headset? Yes! The Apple Vision Pro came out in early 2024 and is the first device of its kind. It can be used to watch spatial videos filmed on the Pro models of the iPhone 15.
How-ToiPhoneCameraPhoto & VideoMaster your iPhone in one minute a day: Sign up here to get our FREE Tip of the Day delivered right to your inbox.
http://dlvr.it/T3mMyN
Latest Cell phone i-Phone,Samsung, Nokia, Motorolla, T-Mobile Sprint Latest Models info and News
Friday, March 8, 2024
How to Export Photos and Keep the Original Date
What to Know
* On a Mac, you can keep the original metadata, including the date, by selecting photo(s) and exporting it as an Unmodified Original(s).
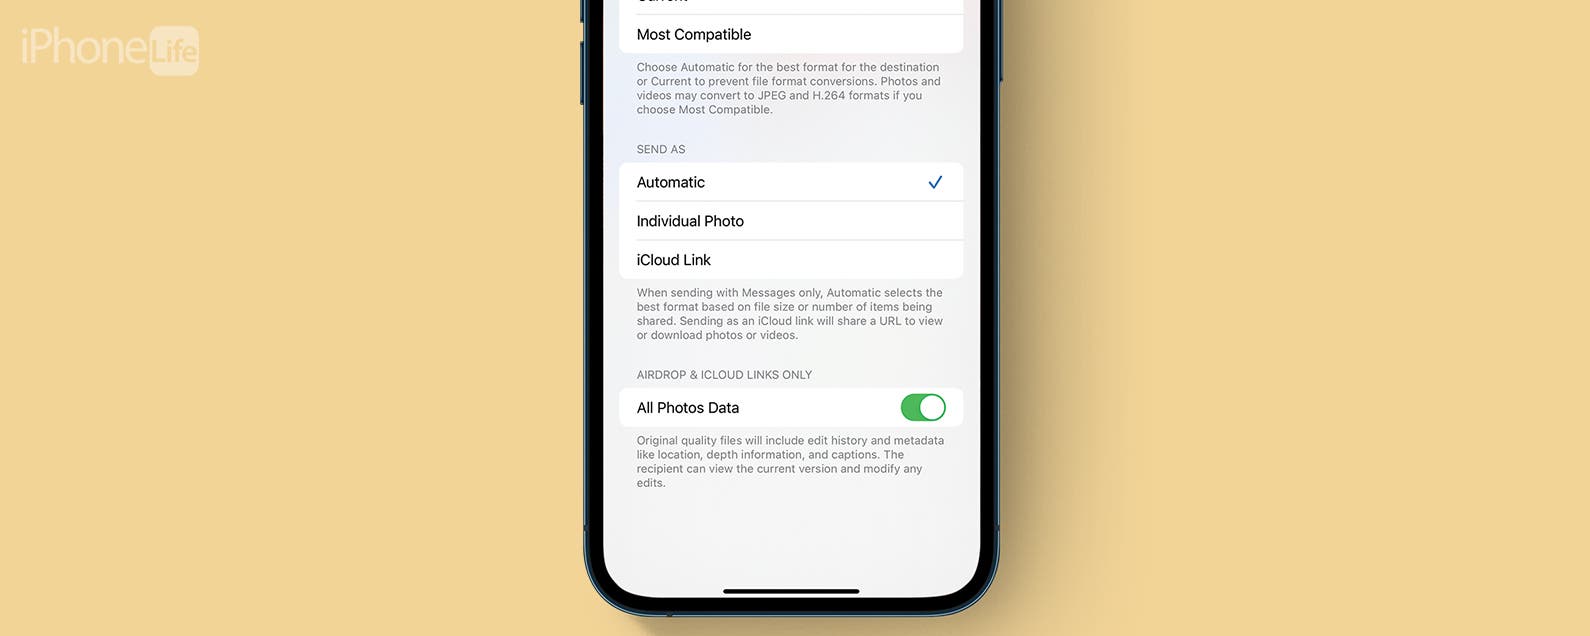
* On an iPhone, as long as you are AirDropping or sending an iCloud link, you can make sure to keep the original date with a Photos app setting.
Sometimes, when you export a photo or video from the Photos app, the metadata will not copy over. This means that the original date that the photo will be replaced with the date you exported it. There is a trick to save the original date when exporting on both Macs and iPhones.
Jump To:
* How to Export Unmodified Original Photos on Mac
* How to Keep Original Date on iPhone Photos
* FAQ
How to Export Unmodified Original Photos on Mac
When exporting photos on a Mac, you have two options. One is a regular Export, and the other is Export Unmodified Original. When you select Export Unmodified Original, you will lose any edits that you made using the Photos app, but your photo will retain all the metadata, including the original date and location taken. To do this:
* Open a photo in the Photos app and click on File.
* Hover over Export and select Export Unmodified Original.
* Click on Export.
* Select the location you wish to save the photos and click on Export Originals.
Now you understand the difference between Export vs Export Unmodified Original when exporting photos and videos on a Mac. For more Mac tips, sign up for our free Tip of the Day newsletter!
How to Keep Original Date on iPhone Photos
When sharing photos from an iPhone to another iPhone, the metadata is often preserved automatically. However, you can make sure you are keeping it there when sharing via AirDrop to other Apple devices and users or if you are sending an iCloud link that can be shared with non-Apple users. To do this:
* Open a photo in the Photos app and tap the share icon.
* Under the (Number) Photos Selected, tap Options.
* Toggle All Photos Data.
Pro Tip
You could also select iCloud Link under SEND AS if you would always like your photo to be sent as an iCloud link. This will keep the original date on photos you share with both Apple and non-Apple users.
We hope our tips have helped you export your content the way you want it exported. I like to keep the metadata, especially the original date and location where the photo or video was taken. Next, learn how to find every photo and video taken at a specific location.
FAQ
* How do you save an image on Mac? There are many ways to save images on Mac. Usually, there's a way to right-click (or Control + click on the touchpad) and then select Save.
* How can I remove a time stamp from a photo on iPhone? You can manually change the date and time a photo was taken in the Photos app.
How-ToiPhoneMacCameraPhotosPhoto & VideoMaster your iPhone in one minute a day: Sign up here to get our FREE Tip of the Day delivered right to your inbox.
http://dlvr.it/T3mMg6
* On a Mac, you can keep the original metadata, including the date, by selecting photo(s) and exporting it as an Unmodified Original(s).
* On an iPhone, as long as you are AirDropping or sending an iCloud link, you can make sure to keep the original date with a Photos app setting.
Sometimes, when you export a photo or video from the Photos app, the metadata will not copy over. This means that the original date that the photo will be replaced with the date you exported it. There is a trick to save the original date when exporting on both Macs and iPhones.
Jump To:
* How to Export Unmodified Original Photos on Mac
* How to Keep Original Date on iPhone Photos
* FAQ
How to Export Unmodified Original Photos on Mac
When exporting photos on a Mac, you have two options. One is a regular Export, and the other is Export Unmodified Original. When you select Export Unmodified Original, you will lose any edits that you made using the Photos app, but your photo will retain all the metadata, including the original date and location taken. To do this:
* Open a photo in the Photos app and click on File.
* Hover over Export and select Export Unmodified Original.
* Click on Export.
* Select the location you wish to save the photos and click on Export Originals.
Now you understand the difference between Export vs Export Unmodified Original when exporting photos and videos on a Mac. For more Mac tips, sign up for our free Tip of the Day newsletter!
How to Keep Original Date on iPhone Photos
When sharing photos from an iPhone to another iPhone, the metadata is often preserved automatically. However, you can make sure you are keeping it there when sharing via AirDrop to other Apple devices and users or if you are sending an iCloud link that can be shared with non-Apple users. To do this:
* Open a photo in the Photos app and tap the share icon.
* Under the (Number) Photos Selected, tap Options.
* Toggle All Photos Data.
Pro Tip
You could also select iCloud Link under SEND AS if you would always like your photo to be sent as an iCloud link. This will keep the original date on photos you share with both Apple and non-Apple users.
We hope our tips have helped you export your content the way you want it exported. I like to keep the metadata, especially the original date and location where the photo or video was taken. Next, learn how to find every photo and video taken at a specific location.
FAQ
* How do you save an image on Mac? There are many ways to save images on Mac. Usually, there's a way to right-click (or Control + click on the touchpad) and then select Save.
* How can I remove a time stamp from a photo on iPhone? You can manually change the date and time a photo was taken in the Photos app.
How-ToiPhoneMacCameraPhotosPhoto & VideoMaster your iPhone in one minute a day: Sign up here to get our FREE Tip of the Day delivered right to your inbox.
http://dlvr.it/T3mMg6
Thursday, March 7, 2024
Capture the Perfect Shot Every Time With Galaxy’s ProVisual Engine
In the world of mobile photography, amateur and seasoned photographers alike are often at the mercy of their phone camera’s capabilities. Despite remarkable
http://dlvr.it/T3lCxh
Wednesday, March 6, 2024
How to Send Video from iPhone to Android
What to Know
* You cannot send a video from an iPhone to an Android via Bluetooth.
* If your video is too large to send via text, you can try sending the video via email.
* If the file is still too large, you can use iCloud to send a video to an Android.
If you need to send a video from your iPhone to an Android, you will not be able to use the AirDrop feature. Instead, you will have to send the video in the old-fashioned way, like text or email. However, there are a few ways you can go about sending a video from iPhone to Android. We'll cover the best way to send videos from iPhone to Android below.
Jump To:
* Send Videos to Android from iPhone
* How to Send Video to Android from Email
* Use iCloud to Share Large Files
* FAQ
Send Videos to Android from iPhone
The first way to send videos from iPhone to Android is via SMS texts. Just because a person doesn't use iMessage, or uses the green texts, doesn't mean they can't receive a video in a text message.
* On your iPhone, open the Photos app.
* Tap the video you want to send.
* Tap the Share button.
* Tap Messages,
* Type the Android user's number or name into the "To:" field.
* Tap the Send button.
How to Send Video to Android from Email
If the video file is large or the person needs to be able to access it on their computer, it will definitely be more useful to send a video from iPhone to Android via email. That way, they have the ability to access it on their phone or their computer and take up less storage on their phone. Depending on which mail client you use, the steps will be slightly different. The important part is to know how to attach a file to an email. Here's how to do it in the Mail app.
* Open the Mail app.
* Tap the Compose New button.
* Type in the Android user's email address.
* Compose your email and then tap the arrow on the top right of the keyboard.
* Tap the Photo button.
* Find the video and tap it to attach it to the email. It may take some time to download.
* When you're done, tap Send.
Use iCloud to Share Large Files
Pro Tip: If your camera roll is backed up to the iCloud, you can bypass this section by tapping Copy iCloud Link. However, this only works if your Photo app is already backed up to iCloud. Learn how to back up your camera roll to iCloud.
Another way to send large video files from an iPhone to an Android is through iCloud. You can upload the file to your iCloud account and then share that link. Learn all the ways to send large files from your iPhone.
* Open the Photos app and navigate to the long video you want to send.
* Tap the Share button.
* Tap Save to Files. It may take a few minutes to save, depending on how long the video is. If your Photo Library is backed up to iCloud, you can skip this step and go straight to step 6.
* Choose where in your iCloud account you'd like to save the video. Tap Save. This may also take a few seconds to complete.
* Now, tap the Share button again.
* Tap Copy iCloud Link. You can send this link via email or text. The person should be able to download it from there.
And those are the best ways to send a video from an iPhone to an Android. If you like learning about using Apple devices, be sure to sign up for our free Tip of the Day!
FAQ
* Why can't I send a video from iPhone to Android? The biggest reason your video is failing to send is because the file size is too large. Additionally, you may run into problems sending videos from iPhone to Android if you have a poor cellular or Wi-Fi connection, low battery, low storage, or a video format incompatibility.
* How to share multiple videos or photos from an iPhone to Android? If you want to share more than one video or photo, you can share an entire album on your iCloud account by sending someone a link. Learn how to share an iCloud album with an Android.
* Can you send a video from iPhone to Android via Bluetooth? No, you cannot send a video from iPhone to Android via Bluetooth. AirDrop is not compatible with Android phones, and Quick Share is not compatible with Apple devices.
Until the Apple ecosystem and the Android user interface can come to an agreement about how to share files wirelessly, these are the best options for sending large files like videos to an Android user from an iPhone. Luckily, they don't take too much time to do. But hopefully, one day, we will see Apple and Androids sharing files using Bluetooth.
How-ToiPhoneAppsApple AppsFilesMessagesPhotosEmailPhoto & VideoMaster your iPhone in one minute a day: Sign up here to get our FREE Tip of the Day delivered right to your inbox.
http://dlvr.it/T3gtQ4
* You cannot send a video from an iPhone to an Android via Bluetooth.
* If your video is too large to send via text, you can try sending the video via email.
* If the file is still too large, you can use iCloud to send a video to an Android.
If you need to send a video from your iPhone to an Android, you will not be able to use the AirDrop feature. Instead, you will have to send the video in the old-fashioned way, like text or email. However, there are a few ways you can go about sending a video from iPhone to Android. We'll cover the best way to send videos from iPhone to Android below.
Jump To:
* Send Videos to Android from iPhone
* How to Send Video to Android from Email
* Use iCloud to Share Large Files
* FAQ
Send Videos to Android from iPhone
The first way to send videos from iPhone to Android is via SMS texts. Just because a person doesn't use iMessage, or uses the green texts, doesn't mean they can't receive a video in a text message.
* On your iPhone, open the Photos app.
* Tap the video you want to send.
* Tap the Share button.
* Tap Messages,
* Type the Android user's number or name into the "To:" field.
* Tap the Send button.
How to Send Video to Android from Email
If the video file is large or the person needs to be able to access it on their computer, it will definitely be more useful to send a video from iPhone to Android via email. That way, they have the ability to access it on their phone or their computer and take up less storage on their phone. Depending on which mail client you use, the steps will be slightly different. The important part is to know how to attach a file to an email. Here's how to do it in the Mail app.
* Open the Mail app.
* Tap the Compose New button.
* Type in the Android user's email address.
* Compose your email and then tap the arrow on the top right of the keyboard.
* Tap the Photo button.
* Find the video and tap it to attach it to the email. It may take some time to download.
* When you're done, tap Send.
Use iCloud to Share Large Files
Pro Tip: If your camera roll is backed up to the iCloud, you can bypass this section by tapping Copy iCloud Link. However, this only works if your Photo app is already backed up to iCloud. Learn how to back up your camera roll to iCloud.
Another way to send large video files from an iPhone to an Android is through iCloud. You can upload the file to your iCloud account and then share that link. Learn all the ways to send large files from your iPhone.
* Open the Photos app and navigate to the long video you want to send.
* Tap the Share button.
* Tap Save to Files. It may take a few minutes to save, depending on how long the video is. If your Photo Library is backed up to iCloud, you can skip this step and go straight to step 6.
* Choose where in your iCloud account you'd like to save the video. Tap Save. This may also take a few seconds to complete.
* Now, tap the Share button again.
* Tap Copy iCloud Link. You can send this link via email or text. The person should be able to download it from there.
And those are the best ways to send a video from an iPhone to an Android. If you like learning about using Apple devices, be sure to sign up for our free Tip of the Day!
FAQ
* Why can't I send a video from iPhone to Android? The biggest reason your video is failing to send is because the file size is too large. Additionally, you may run into problems sending videos from iPhone to Android if you have a poor cellular or Wi-Fi connection, low battery, low storage, or a video format incompatibility.
* How to share multiple videos or photos from an iPhone to Android? If you want to share more than one video or photo, you can share an entire album on your iCloud account by sending someone a link. Learn how to share an iCloud album with an Android.
* Can you send a video from iPhone to Android via Bluetooth? No, you cannot send a video from iPhone to Android via Bluetooth. AirDrop is not compatible with Android phones, and Quick Share is not compatible with Apple devices.
Until the Apple ecosystem and the Android user interface can come to an agreement about how to share files wirelessly, these are the best options for sending large files like videos to an Android user from an iPhone. Luckily, they don't take too much time to do. But hopefully, one day, we will see Apple and Androids sharing files using Bluetooth.
How-ToiPhoneAppsApple AppsFilesMessagesPhotosEmailPhoto & VideoMaster your iPhone in one minute a day: Sign up here to get our FREE Tip of the Day delivered right to your inbox.
http://dlvr.it/T3gtQ4
Tuesday, March 5, 2024
[Infographic] From the World’s First Watch Phone to Galaxy Ring: The History of Samsung’s Wearable Devices
Samsung Electronics unveiled the Galaxy Ring, a ring-shaped wearable device, at Mobile World Congress (MWC) 2024 in Barcelona, Spain — signaling a new wave of
http://dlvr.it/T3dGdc
Discover the Award-Winning Odyssey Neo G9 and Elevate Your Gaming Experience
Samsung Electronics continues to redefine the boundaries of immersive gaming with the Odyssey Neo G9 (G95NC), which has garnered widespread acclaim and
http://dlvr.it/T3clD5
How to Recover Deleted Notes on iPhone in Seconds
Everyone has accidentally deleted notes from their iPhones at some point. Luckily, there is an easy way to get your missing notes back. Read on to discover how to recover deleted notes on iPhone.
Why You’ll Love This Tip:
* If you accidentally delete a note, you can get it back in seconds.
* Find notes after you later realize you didn’t want to delete them.
How to Restore Notes on iPhone
System Requirements
This tip works on iPhones running iOS 17 or later. Find out how to update to the latest version of iOS.
Did your iPhone notes disappear? No problem! You can recover deleted notes on your iPhone with ease. For more tips and tricks for recovering deleted data, check out our free Tip of the Day newsletter. Now, here’s how to recover deleted notes on your iPhone:
* Open the Notes app.
* If you see a list of your Notes, tap the Folders button in the top left.
* Tap Recently Deleted. If you do not have any recently deleted notes, this folder will not appear for you.
* Tap the Edit button.
* Tap the note. If you have more than one note, you can select multiple notes at once.
* Tap Delete to delete it, or tap Move to recover it.
* After tapping Move, tap the folder where you want to move the note.
That’s how to restore notes on your iPhone after you delete them. Recently Deleted notes are stored for 30 days and are deleted completely after that. If you don’t see the note you’re looking for in this folder, it is most likely permanently lost.
How-ToiPhoneAppsApple AppsNotesProductivity & BusinessMaster your iPhone in one minute a day: Sign up here to get our FREE Tip of the Day delivered right to your inbox.
http://dlvr.it/T3cDVX
Why You’ll Love This Tip:
* If you accidentally delete a note, you can get it back in seconds.
* Find notes after you later realize you didn’t want to delete them.
How to Restore Notes on iPhone
System Requirements
This tip works on iPhones running iOS 17 or later. Find out how to update to the latest version of iOS.
Did your iPhone notes disappear? No problem! You can recover deleted notes on your iPhone with ease. For more tips and tricks for recovering deleted data, check out our free Tip of the Day newsletter. Now, here’s how to recover deleted notes on your iPhone:
* Open the Notes app.
* If you see a list of your Notes, tap the Folders button in the top left.
* Tap Recently Deleted. If you do not have any recently deleted notes, this folder will not appear for you.
* Tap the Edit button.
* Tap the note. If you have more than one note, you can select multiple notes at once.
* Tap Delete to delete it, or tap Move to recover it.
* After tapping Move, tap the folder where you want to move the note.
That’s how to restore notes on your iPhone after you delete them. Recently Deleted notes are stored for 30 days and are deleted completely after that. If you don’t see the note you’re looking for in this folder, it is most likely permanently lost.
How-ToiPhoneAppsApple AppsNotesProductivity & BusinessMaster your iPhone in one minute a day: Sign up here to get our FREE Tip of the Day delivered right to your inbox.
http://dlvr.it/T3cDVX
Monday, March 4, 2024
Hack Aging & Stay Healthy with Apple
When one gets to a particular age, one might start to pine for the proverbial fountain of youth. At 71, I seem to have arrived at that juncture. I have been pursuing longevity by studying the latest scientific research and by using technology to track my health parameters, so I can be aware and improve them. There is a revolution in healthcare with respect to longevity. A plethora of scientific research is being conducted, shifting the paradigm to treating aging as a disease, not as an inevitability. That research is leading to many excellent technologies to test and track our health metrics so we can directly see where to put our resources toward achieving longevity.
Our modern cars have an array of sensors to keep track of every aspect of performance, health, and safety. Yet we have only had occasional doctor visits to give us insights into our health metrics, the rest of the time flying blind. With the amazing technology we now have available we can track them on our own.
I have found the ability to track my health metrics to be a great motivator to try to improve them. For example, the Apple Health app notified me that my VO2 max was tracking below average. I stepped up my morning walks, using the Gentler Streak Workout Tracker app (free), tracking my average heart rate and keeping it in the needed zone to improve my VO2 max number. Within a couple weeks, I was able to move it to above average. If you have no awareness of your metrics, you won’t know what actions to take. Some of these metrics can have life or death consequences, but all of them are important. They will motivate you to exercise more, eat better, take needed supplements, and see your doctor to address your health needs. By keeping my focus on these metrics, I have improved my exercise and diet and look and feel much better.
Apple Watch: My Health Tracking Companion
The Apple Watch works in concert with the iPhone to offer a multitude of features that make it the perfect health tracking tool. It has powerful apps that support various aspects of health, including heart health, mobility, activity, and medication tracking. The watch can monitor important health information such as heart rate, sleep patterns, and even emotional states. It also offers advanced metrics for workouts, including heart rate zones, power, and elevation.
I now know during my doctor’s visits to ask the right questions to ask and which tests to request. This has given me more confidence in my health and pointed out a few areas I could use for improvement.
The Apple Watch is known for its accurate heart rate monitoring and can alert users to high or low heart rates, as well as irregular heart rhythms suggestive of atrial fibrillation. It also monitors blood oxygen levels, an important indicator of overall wellness. The Fall Detection feature can be crucial for elderly users or those with certain medical conditions.
In addition to these features, the Apple Watch encourages users to engage with their health. Data suggests that Apple Watch users are more likely to track their health data, and in my experience the device’s intimate nature makes it easier to form healthy habits.
However, it’s important to note that while the Apple Watch is a powerful tool for health tracking, it should not replace professional medical advice or regular check-ups with healthcare providers.
Following are a few of the apps I use regularly:
Apple Health and Fitness Apps - (Free)
These are the built-in apps that come with your iPhone and Apple Watch. The Apple Health app is a centralized and secure platform that collects and organizes your health and fitness data from your Apple devices and compatible third-party apps. It tracks a variety of health metrics, including activity, sleep, and health records, and provides insights to help you understand your health trends. The Fitness app presents you with the famous graphical rings for move, exercise and stand aspects of your daily activity. The at-a-glance view is a great motivator to do what it takes close them each day.
Gentler Streak - (Free)
Gentler Streak takes a holistic approach to health, focusing on gradual lifestyle changes that lead to lasting results. It guides users through customizable streaks, fostering habits that contribute to overall well-being. From nutrition to mindfulness, Gentler Streak empowers users to make incremental changes, ensuring a smooth journey towards a healthier lifestyle.
YouTube Premium - ($13.99)
I prefer YouTube Premium as it is ad-free. The algorithm is quite adept at providing personalized recommendations based on viewing history and interests. Once you view a few videos from longevity experts like David Sinclair, the algorithm serves you up excellent content from experts all over the world. I use this extensively for my longevity research.
Apple Podcasts - (Free)
Apple’s podcast app works very well to access a universe of information. There are many on the topic of longevity. Most podcasts now have a companion YouTube channel where you can enjoy both the audio and video components of these presentations. I listen to the podcast version when traveling when viewing the video component is not possible.
AutoSleep - ($5.99)
AutoSleep is the co-pilot we all need for a rejuvenating journey through the night. This app doesn’t just track your sleep; it analyzes patterns, provides sleep quality scores, and offers personalized tips for improvement. By transforming your nightly rest into a measurable metric, AutoSleep becomes a valuable tool for fine tuning your sleep. You can track your sleep with the Apple Health app, but this takes it to another level. It displays the data in detailed graphical reports on your iPhone with links to detailed information to understand your sleep. I usually review this each morning upon waking.
Perplexity AI - (Free)
This is an excellent AI App that is easy to use and provides the sources of its responses.
The Perplexity iPhone app is a conversational search engine powered by AI, providing instant answers and information on any topic with up-to-date sources. The app is user-friendly, with a simple interface, and is available for free on the App Store, offering a seamless experience for users seeking accurate and intelligent answers on any topic. It has a widget as well, which I find handy.
As we embrace the era of health-conscious living, these apps serve as our co-pilots. Just as car sensors provide real-time data to optimize performance, these apps empower us to understand and enhance our body’s mechanics. Coupled with the valuable insights from health podcasts, this roundup equips you with the tools and knowledge you need to take control of your well-being and ensure a smoother, more extended life.
OpinionApple WatchApple AppsThird-Party AppsHealth & FitnessMaster your iPhone in one minute a day: Sign up here to get our FREE Tip of the Day delivered right to your inbox.
http://dlvr.it/T3bth6
Our modern cars have an array of sensors to keep track of every aspect of performance, health, and safety. Yet we have only had occasional doctor visits to give us insights into our health metrics, the rest of the time flying blind. With the amazing technology we now have available we can track them on our own.
I have found the ability to track my health metrics to be a great motivator to try to improve them. For example, the Apple Health app notified me that my VO2 max was tracking below average. I stepped up my morning walks, using the Gentler Streak Workout Tracker app (free), tracking my average heart rate and keeping it in the needed zone to improve my VO2 max number. Within a couple weeks, I was able to move it to above average. If you have no awareness of your metrics, you won’t know what actions to take. Some of these metrics can have life or death consequences, but all of them are important. They will motivate you to exercise more, eat better, take needed supplements, and see your doctor to address your health needs. By keeping my focus on these metrics, I have improved my exercise and diet and look and feel much better.
Apple Watch: My Health Tracking Companion
The Apple Watch works in concert with the iPhone to offer a multitude of features that make it the perfect health tracking tool. It has powerful apps that support various aspects of health, including heart health, mobility, activity, and medication tracking. The watch can monitor important health information such as heart rate, sleep patterns, and even emotional states. It also offers advanced metrics for workouts, including heart rate zones, power, and elevation.
I now know during my doctor’s visits to ask the right questions to ask and which tests to request. This has given me more confidence in my health and pointed out a few areas I could use for improvement.
The Apple Watch is known for its accurate heart rate monitoring and can alert users to high or low heart rates, as well as irregular heart rhythms suggestive of atrial fibrillation. It also monitors blood oxygen levels, an important indicator of overall wellness. The Fall Detection feature can be crucial for elderly users or those with certain medical conditions.
In addition to these features, the Apple Watch encourages users to engage with their health. Data suggests that Apple Watch users are more likely to track their health data, and in my experience the device’s intimate nature makes it easier to form healthy habits.
However, it’s important to note that while the Apple Watch is a powerful tool for health tracking, it should not replace professional medical advice or regular check-ups with healthcare providers.
Following are a few of the apps I use regularly:
Apple Health and Fitness Apps - (Free)
These are the built-in apps that come with your iPhone and Apple Watch. The Apple Health app is a centralized and secure platform that collects and organizes your health and fitness data from your Apple devices and compatible third-party apps. It tracks a variety of health metrics, including activity, sleep, and health records, and provides insights to help you understand your health trends. The Fitness app presents you with the famous graphical rings for move, exercise and stand aspects of your daily activity. The at-a-glance view is a great motivator to do what it takes close them each day.
Gentler Streak - (Free)
Gentler Streak takes a holistic approach to health, focusing on gradual lifestyle changes that lead to lasting results. It guides users through customizable streaks, fostering habits that contribute to overall well-being. From nutrition to mindfulness, Gentler Streak empowers users to make incremental changes, ensuring a smooth journey towards a healthier lifestyle.
YouTube Premium - ($13.99)
I prefer YouTube Premium as it is ad-free. The algorithm is quite adept at providing personalized recommendations based on viewing history and interests. Once you view a few videos from longevity experts like David Sinclair, the algorithm serves you up excellent content from experts all over the world. I use this extensively for my longevity research.
Apple Podcasts - (Free)
Apple’s podcast app works very well to access a universe of information. There are many on the topic of longevity. Most podcasts now have a companion YouTube channel where you can enjoy both the audio and video components of these presentations. I listen to the podcast version when traveling when viewing the video component is not possible.
AutoSleep - ($5.99)
AutoSleep is the co-pilot we all need for a rejuvenating journey through the night. This app doesn’t just track your sleep; it analyzes patterns, provides sleep quality scores, and offers personalized tips for improvement. By transforming your nightly rest into a measurable metric, AutoSleep becomes a valuable tool for fine tuning your sleep. You can track your sleep with the Apple Health app, but this takes it to another level. It displays the data in detailed graphical reports on your iPhone with links to detailed information to understand your sleep. I usually review this each morning upon waking.
Perplexity AI - (Free)
This is an excellent AI App that is easy to use and provides the sources of its responses.
The Perplexity iPhone app is a conversational search engine powered by AI, providing instant answers and information on any topic with up-to-date sources. The app is user-friendly, with a simple interface, and is available for free on the App Store, offering a seamless experience for users seeking accurate and intelligent answers on any topic. It has a widget as well, which I find handy.
As we embrace the era of health-conscious living, these apps serve as our co-pilots. Just as car sensors provide real-time data to optimize performance, these apps empower us to understand and enhance our body’s mechanics. Coupled with the valuable insights from health podcasts, this roundup equips you with the tools and knowledge you need to take control of your well-being and ensure a smoother, more extended life.
OpinionApple WatchApple AppsThird-Party AppsHealth & FitnessMaster your iPhone in one minute a day: Sign up here to get our FREE Tip of the Day delivered right to your inbox.
http://dlvr.it/T3bth6
Friday, March 1, 2024
How to Retrieve Deleted Emails
What to Know
* Most email clients have a Recently Deleted or "Trash" folder somewhere in the app.
* Most email clients store deleted emails for up to 30 days, but for some, the default setting is 14 days.
* Once an email has been permanently deleted, it's almost impossible to recover it.
Everyone has deleted an important email they needed to find later. If you need to know how to retrieve deleted emails, whether you're using Gmail or iCloud, there's usually a way to recover them. Most email clients allow you to store deleted emails for up to 30 days. We'll go over everything you need to know to recover deleted emails on your iPhone or your Mac.
Jump To:
* How to Recover Deleted Emails in Mail
* How to Find Deleted Emails in Gmail
* FAQ
How to Recover Deleted Emails in Mail
Apple's Mail client saves its recently deleted emails under the Mailboxes tab in the Mail app. You will be able to find all the recently deleted emails for all the addresses that you've connected to your Mail app. Learn how to connect multiple accounts to the Mail app.
Recover Deleted Emails in Mail - iPhone
* On your iPhone, open the Mail app.
* Navigate to the Mailboxes screen.
* If one of your accounts is collapsed, you can tap the arrow to expand the menu.
* Tap Deleted Messages or Trash, depending on what the folder is named.
* To remove an email from the Deleted Messages or Trash folder, tap Edit.
* Select the messages you want to move.
* Tap Move.
* Tap Move X Messages.
* Choose where you want to move the emails. To move them back to your inbox, tap Inbox.
Recover Deleted Emails in Mail - Mac
* Open the Mail app on your Mac.
* Click View.
* Make sure Show Sidebar is enabled.
* Click Trash or Deleted Messages.
* Click the email you want to move out of Deleted Messages. If you want to move multiple emails, press the Shift button while clicking the emails.
* Click Message.
* Hover over Move To...
* To move it back to your inbox, hover over Inbox.
* Click the email address to select the inbox you want to move the deleted message to.
How to Find Deleted Emails in Gmail
If you use Gmail instead of Apple's Mail app, you can still recover deleted emails for up to 30 days. The folder that holds your recently deleted emails is called the Trash folder. If you like learning how to use Apple devices, be sure to sign up for our free Tip of the Day!
Find Deleted Emails in Gmail - iPhone
* On your iPhone, open the Gmail app.
* Tap the Menu button.
* Tap Trash.
* Press and hold an email you want to remove from the trash to select it.
* Select the emails you want to move.
* Tap the three dots at the top.
* Tap Move.
* Choose the place you want to move the deleted messages to. Tap Primary to move them back to your mail inbox.
Find Deleted Emails in Gmail - Mac
* Go to Gmail.
* Click More.
* Click Trash.
* From here, the quickest way to move an email out of the trash folder is to drag and drop the email into your inbox.
If you use another mail client like Outlook or Hotmail, your emails will stay in the recently deleted folder for up to thirty days. But if you use Yahoo, do be aware that recently deleted emails are only stored for up to seven days unless you change the default setting.
And that's how you recover recently deleted emails. Make sure that you've adjusted the settings of your mail client to ensure you don't lose emails before you're ready, but do be aware that those emails take up storage! If you're running low on storage, it might be good to clear out your Mail and get organized.
FAQ
* How do I find permanently deleted emails? Depending on your settings, most deleted emails will be erased from the trash folder after thirty days or less. Once your email is erased from the trash folder, it's nearly impossible to recover without contacting the company.
* Can I recover deleted text messages? There are a few ways to recover deleted text messages, including restoring your iPhone to a previous backup.
* How to recover recently deleted photos? Like emails and text messages, there is a place on your iPhone where you can find recently deleted photos and recover them. Similarly, photos only stay in recently deleted for up to thirty days.
How-ToiPhoneMacAppsApple AppsThird-Party AppsMailEmailGmailDevice ManagementMaster your iPhone in one minute a day: Sign up here to get our FREE Tip of the Day delivered right to your inbox.
http://dlvr.it/T3RgwH
* Most email clients have a Recently Deleted or "Trash" folder somewhere in the app.
* Most email clients store deleted emails for up to 30 days, but for some, the default setting is 14 days.
* Once an email has been permanently deleted, it's almost impossible to recover it.
Everyone has deleted an important email they needed to find later. If you need to know how to retrieve deleted emails, whether you're using Gmail or iCloud, there's usually a way to recover them. Most email clients allow you to store deleted emails for up to 30 days. We'll go over everything you need to know to recover deleted emails on your iPhone or your Mac.
Jump To:
* How to Recover Deleted Emails in Mail
* How to Find Deleted Emails in Gmail
* FAQ
How to Recover Deleted Emails in Mail
Apple's Mail client saves its recently deleted emails under the Mailboxes tab in the Mail app. You will be able to find all the recently deleted emails for all the addresses that you've connected to your Mail app. Learn how to connect multiple accounts to the Mail app.
Recover Deleted Emails in Mail - iPhone
* On your iPhone, open the Mail app.
* Navigate to the Mailboxes screen.
* If one of your accounts is collapsed, you can tap the arrow to expand the menu.
* Tap Deleted Messages or Trash, depending on what the folder is named.
* To remove an email from the Deleted Messages or Trash folder, tap Edit.
* Select the messages you want to move.
* Tap Move.
* Tap Move X Messages.
* Choose where you want to move the emails. To move them back to your inbox, tap Inbox.
Recover Deleted Emails in Mail - Mac
* Open the Mail app on your Mac.
* Click View.
* Make sure Show Sidebar is enabled.
* Click Trash or Deleted Messages.
* Click the email you want to move out of Deleted Messages. If you want to move multiple emails, press the Shift button while clicking the emails.
* Click Message.
* Hover over Move To...
* To move it back to your inbox, hover over Inbox.
* Click the email address to select the inbox you want to move the deleted message to.
How to Find Deleted Emails in Gmail
If you use Gmail instead of Apple's Mail app, you can still recover deleted emails for up to 30 days. The folder that holds your recently deleted emails is called the Trash folder. If you like learning how to use Apple devices, be sure to sign up for our free Tip of the Day!
Find Deleted Emails in Gmail - iPhone
* On your iPhone, open the Gmail app.
* Tap the Menu button.
* Tap Trash.
* Press and hold an email you want to remove from the trash to select it.
* Select the emails you want to move.
* Tap the three dots at the top.
* Tap Move.
* Choose the place you want to move the deleted messages to. Tap Primary to move them back to your mail inbox.
Find Deleted Emails in Gmail - Mac
* Go to Gmail.
* Click More.
* Click Trash.
* From here, the quickest way to move an email out of the trash folder is to drag and drop the email into your inbox.
If you use another mail client like Outlook or Hotmail, your emails will stay in the recently deleted folder for up to thirty days. But if you use Yahoo, do be aware that recently deleted emails are only stored for up to seven days unless you change the default setting.
And that's how you recover recently deleted emails. Make sure that you've adjusted the settings of your mail client to ensure you don't lose emails before you're ready, but do be aware that those emails take up storage! If you're running low on storage, it might be good to clear out your Mail and get organized.
FAQ
* How do I find permanently deleted emails? Depending on your settings, most deleted emails will be erased from the trash folder after thirty days or less. Once your email is erased from the trash folder, it's nearly impossible to recover without contacting the company.
* Can I recover deleted text messages? There are a few ways to recover deleted text messages, including restoring your iPhone to a previous backup.
* How to recover recently deleted photos? Like emails and text messages, there is a place on your iPhone where you can find recently deleted photos and recover them. Similarly, photos only stay in recently deleted for up to thirty days.
How-ToiPhoneMacAppsApple AppsThird-Party AppsMailEmailGmailDevice ManagementMaster your iPhone in one minute a day: Sign up here to get our FREE Tip of the Day delivered right to your inbox.
http://dlvr.it/T3RgwH
Solved: iPhone Keeps Turning Off Live Photos
What to Know
* Live Photos should turn on by default in the Camera app.
* You can set Live Photos to stay on permanently, by enabling Preserve Settings.
* If you want Live Photos to play in the Photos app, you can enable Auto-Play Videos and Live Photos.
Live Photos are a fun way to capture memories by saving both a still image and a short video of the moment. However, it can be annoying to have to constantly turn this feature on and off. Why does your iPhone keep turning off Live Photos? We’ll go over why this happens and how to resolve it so that you can always keep Live Photos on.
Jump To:
* Why Does My iPhone Keep Turning Off Live Photos?
* How to Turn On Live Photos Permanently
* How to Turn Live Photo On in the Photos App
* FAQ
Why Does My iPhone Keep Turning Off Live Photos?
Interestingly, Live Photos is turned on by default when opening the iPhone camera. The only reason it would be off is if you turned it off the last time you opened your camera and if you use the Live Photo option under Preserve Settings.
Preserve Settings essentially allows you to control which settings are automatically enabled or disabled when you open your camera. If you toggled on the Live Photo option and then disabled Live Photos in the Camera app, the setting will remain turned off until you enable it again. For more iPhone photography tips and tricks, check out our free Tip of the Day newsletter.
How Do I Turn Live Photos on Permanently?
If you find that your iPhone keeps turning off Live Photos, you can navigate to the Preserve Settings screen and toggle on the Live Photo option:
* Toggle on Live Photo in Preserve Settings.
* Open the Camera app.
* Make sure Live Photo is enabled.
Once you have enabled Live Photos with Preserve Settings toggled on, you should have no more trouble with the setting turning off on its own.
How to Turn Live Photo On in the Photos App
If your problem is not with the Camera but with the Photos app turning off Live Photos on its own, check your Photos settings:
* Open the Settings app, and tap Photos.
* Scroll down, and make sure Auto-Play Videos and Live Photos is enabled.
This setting will ensure Live Photos will always play when you open them.
FAQ
* How do I disable locations in photos? By default, whenever you take a photo, your iPhone will attach the current location to it. However, you can always find out how to turn off location on photos.
* How do I permanently turn off live photos? If you’re tired of having Live Photos on, check out our article on how to turn off Live Photos.
How-ToiPhoneCameraPhotosSettingsLive PhotosPhoto & VideoMaster your iPhone in one minute a day: Sign up here to get our FREE Tip of the Day delivered right to your inbox.
http://dlvr.it/T3Rgg7
* Live Photos should turn on by default in the Camera app.
* You can set Live Photos to stay on permanently, by enabling Preserve Settings.
* If you want Live Photos to play in the Photos app, you can enable Auto-Play Videos and Live Photos.
Live Photos are a fun way to capture memories by saving both a still image and a short video of the moment. However, it can be annoying to have to constantly turn this feature on and off. Why does your iPhone keep turning off Live Photos? We’ll go over why this happens and how to resolve it so that you can always keep Live Photos on.
Jump To:
* Why Does My iPhone Keep Turning Off Live Photos?
* How to Turn On Live Photos Permanently
* How to Turn Live Photo On in the Photos App
* FAQ
Why Does My iPhone Keep Turning Off Live Photos?
Interestingly, Live Photos is turned on by default when opening the iPhone camera. The only reason it would be off is if you turned it off the last time you opened your camera and if you use the Live Photo option under Preserve Settings.
Preserve Settings essentially allows you to control which settings are automatically enabled or disabled when you open your camera. If you toggled on the Live Photo option and then disabled Live Photos in the Camera app, the setting will remain turned off until you enable it again. For more iPhone photography tips and tricks, check out our free Tip of the Day newsletter.
How Do I Turn Live Photos on Permanently?
If you find that your iPhone keeps turning off Live Photos, you can navigate to the Preserve Settings screen and toggle on the Live Photo option:
* Toggle on Live Photo in Preserve Settings.
* Open the Camera app.
* Make sure Live Photo is enabled.
Once you have enabled Live Photos with Preserve Settings toggled on, you should have no more trouble with the setting turning off on its own.
How to Turn Live Photo On in the Photos App
If your problem is not with the Camera but with the Photos app turning off Live Photos on its own, check your Photos settings:
* Open the Settings app, and tap Photos.
* Scroll down, and make sure Auto-Play Videos and Live Photos is enabled.
This setting will ensure Live Photos will always play when you open them.
FAQ
* How do I disable locations in photos? By default, whenever you take a photo, your iPhone will attach the current location to it. However, you can always find out how to turn off location on photos.
* How do I permanently turn off live photos? If you’re tired of having Live Photos on, check out our article on how to turn off Live Photos.
How-ToiPhoneCameraPhotosSettingsLive PhotosPhoto & VideoMaster your iPhone in one minute a day: Sign up here to get our FREE Tip of the Day delivered right to your inbox.
http://dlvr.it/T3Rgg7
How to Check Your iPhone Battery Level on Your Apple Watch
What To Know
* You'll need to download a third-party app to check your iPhone's battery percentage on your Apple Watch.
* We recommend the Battery Life app to see your iPhone's battery level on your Apple Watch.
* The Battery Life app also lets users see the battery level of other paired devices, like AirPods.
Apple hasn't made it possible to check your iPhone battery level from your Apple Watch with a native feature. Luckily, you can use a free third-party app to see your iPhone battery level on your Apple Watch; here's how!
* Tap Get to download the Battery Life app to your Apple Watch.
* Add the Battery Life complication to your Apple Watch face.
* Tap the battery level percentages at the top-left of your Apple Watch face.
* Now, you'll be able to see your iPhone battery level, as well as the battery levels of any other devices paired with your Apple Watch! Tap Update if the battery level looks incorrect to you.
Subscribe to our free Tip of the Day for more great Apple Watch tutorials!
FAQ
* Are there other apps I can use to check my iPhone battery level on my Apple Watch? Yes, but we've chosen the highest-rated app and tested it ourselves for this article. Feel free to try other options, and let us know what you think about them in the comments!
* How do I check my Apple Watch battery level on my iPhone? You can check your Apple Watch battery level by adding the Batteries widget to your iPhone's Today View.
* What do I do if my iPhone battery is draining quickly? There are several steps to take if your iPhone battery is draining too quickly; we have several ways to fix that problem!
By now, you should be able to check your iPhone's battery level on your Apple Watch. Be sure to check back here at iPhone Life with any of your iPhone questions. We have tips and tutorials on any Apple topic you can imagine!
How-ToApple WatchiPhoneThird-Party AppsBatteryDevice ManagementMaster your iPhone in one minute a day: Sign up here to get our FREE Tip of the Day delivered right to your inbox.
http://dlvr.it/T3RMZ3
* You'll need to download a third-party app to check your iPhone's battery percentage on your Apple Watch.
* We recommend the Battery Life app to see your iPhone's battery level on your Apple Watch.
* The Battery Life app also lets users see the battery level of other paired devices, like AirPods.
Apple hasn't made it possible to check your iPhone battery level from your Apple Watch with a native feature. Luckily, you can use a free third-party app to see your iPhone battery level on your Apple Watch; here's how!
* Tap Get to download the Battery Life app to your Apple Watch.
* Add the Battery Life complication to your Apple Watch face.
* Tap the battery level percentages at the top-left of your Apple Watch face.
* Now, you'll be able to see your iPhone battery level, as well as the battery levels of any other devices paired with your Apple Watch! Tap Update if the battery level looks incorrect to you.
Subscribe to our free Tip of the Day for more great Apple Watch tutorials!
FAQ
* Are there other apps I can use to check my iPhone battery level on my Apple Watch? Yes, but we've chosen the highest-rated app and tested it ourselves for this article. Feel free to try other options, and let us know what you think about them in the comments!
* How do I check my Apple Watch battery level on my iPhone? You can check your Apple Watch battery level by adding the Batteries widget to your iPhone's Today View.
* What do I do if my iPhone battery is draining quickly? There are several steps to take if your iPhone battery is draining too quickly; we have several ways to fix that problem!
By now, you should be able to check your iPhone's battery level on your Apple Watch. Be sure to check back here at iPhone Life with any of your iPhone questions. We have tips and tutorials on any Apple topic you can imagine!
How-ToApple WatchiPhoneThird-Party AppsBatteryDevice ManagementMaster your iPhone in one minute a day: Sign up here to get our FREE Tip of the Day delivered right to your inbox.
http://dlvr.it/T3RMZ3
Thursday, February 29, 2024
Samsung Receives 75 Accolades at iF Design Awards 2024
Samsung Electronics today announced that it received a total of 75 awards at the International Forum (iF) Design Awards 2024, a prestigious German
http://dlvr.it/T3Q7Ql
How to Set Up Apple’s Authenticator App
What to Know
* Multi-factor authentication keeps your online accounts secure.
* By using Apple authenticator app, you can easily manage your codes from iCloud Keychain.
* You can set up verification codes in the Passwords section of the Settings app.
Two-factor or multi-factor authentication keeps your accounts secure. Everyone who values their security and privacy should have multi-factor authentication enabled for every online account that offers it. You can usually do this with either your phone number or an authenticator app. Luckily, your iPhone has a built-in Apple authenticator app.
Jump To:
* Why You Should Use a Code Generator App
* How to Set Up Authenticator App on iPhone
* FAQ
Why You Should Use a Code Generator App
Using authenticator apps for multi-factor authentication makes it harder for hackers to gain access to your accounts. Having a second factor ensures that if someone obtains your password, they will be unable to log into your account because they would need the six-digit code provided by the authenticator app.
But did you know Apple has an authenticator app built into iCloud Keychain? While you can install third-party authenticator apps like Google’s or Microsoft’s code generator apps, you can also opt to use Apple’s. Any of these apps are good choices, as long as you are using multi-factor authentication.
How to Set Up Authenticator App on iPhone
If you use Apple’s password generator with iCloud Keychain, you can also generate six-digit multi-factor authentication codes. You’ll need to set it up for each account, individually. For more Apple security and privacy advice, like how to auto-fill verification codes, be sure to check out our free Tip of the Day newsletter.
Now, to get started, visit the website you want to set up multi-factor authentication for. You’ll need to go into your account settings on the website and find the security section. Then, here’s how to set up your authenticator app on iPhone:
* Visit the website where you want to add multi-factor authentication and navigate to your account settings. For this example, I used my Etsy account, but this will work with many different sites.
* Tap the Security tab.
* Tap Turn on 2FA (or a similar button).
* Some websites will offer different authentication options, such as SMS.
* To use the Apple Authenticator app, tap Authenticator App.
* The site will display a QR code, as well as a setup key. Keep these on hand, as you proceed.
* Now, open the Settings app, and tap Passwords.
* Find the account you want to add verification codes to and tap it.
* Under Account Options, tap Set Up Verification Code…
* Tap Enter Setup Key or Scan QR Code. If your account provided you with a QR code, I recommend that option, as setup keys are usually very long strings of letters and numbers.
* Once you’ve scanned the QR code or entered the setup key, the verification code will automatically be added to the password page. You’ll see it under the password. Tap it to copy it to your clipboard.
* Return to your web browser, and enter the verification code (if you copied it in the previous step, you can simply paste it here). Tap Continue to finish setting up 2FA for this account.
That’s how to set up your authenticator app on iPhone. Your iPhone will automatically generate a new code every 30 seconds so the code you need to enter when logging in will be different every time. Next, find out how to share passwords on iPhone.
FAQ
* How do I get my Apple Authenticator code? When logging into a website, if it asks for a verification code and you have set that account up in iCloud Keychain, the code will automatically appear as a text suggestion above the keyboard. You can simply tap it to insert the code. If the suggestion does not appear, you will need to go into the Settings app, and tap Passwords, then find the account that you need a verification code for.
* What is the best free authenticator app for iPhone? If you use iCloud Keychain as your password manager, it makes the most sense to use it for multi-factor authentication codes as well. However, if you wish to use an app separate from Apple, apps like Google Authenticator and Microsoft Authenticator can fulfill the same purpose.
How-ToiPhoneiCloud KeychainSettingsPrivacy & SecurityMaster your iPhone in one minute a day: Sign up here to get our FREE Tip of the Day delivered right to your inbox.
http://dlvr.it/T3P1nY
* Multi-factor authentication keeps your online accounts secure.
* By using Apple authenticator app, you can easily manage your codes from iCloud Keychain.
* You can set up verification codes in the Passwords section of the Settings app.
Two-factor or multi-factor authentication keeps your accounts secure. Everyone who values their security and privacy should have multi-factor authentication enabled for every online account that offers it. You can usually do this with either your phone number or an authenticator app. Luckily, your iPhone has a built-in Apple authenticator app.
Jump To:
* Why You Should Use a Code Generator App
* How to Set Up Authenticator App on iPhone
* FAQ
Why You Should Use a Code Generator App
Using authenticator apps for multi-factor authentication makes it harder for hackers to gain access to your accounts. Having a second factor ensures that if someone obtains your password, they will be unable to log into your account because they would need the six-digit code provided by the authenticator app.
But did you know Apple has an authenticator app built into iCloud Keychain? While you can install third-party authenticator apps like Google’s or Microsoft’s code generator apps, you can also opt to use Apple’s. Any of these apps are good choices, as long as you are using multi-factor authentication.
How to Set Up Authenticator App on iPhone
If you use Apple’s password generator with iCloud Keychain, you can also generate six-digit multi-factor authentication codes. You’ll need to set it up for each account, individually. For more Apple security and privacy advice, like how to auto-fill verification codes, be sure to check out our free Tip of the Day newsletter.
Now, to get started, visit the website you want to set up multi-factor authentication for. You’ll need to go into your account settings on the website and find the security section. Then, here’s how to set up your authenticator app on iPhone:
* Visit the website where you want to add multi-factor authentication and navigate to your account settings. For this example, I used my Etsy account, but this will work with many different sites.
* Tap the Security tab.
* Tap Turn on 2FA (or a similar button).
* Some websites will offer different authentication options, such as SMS.
* To use the Apple Authenticator app, tap Authenticator App.
* The site will display a QR code, as well as a setup key. Keep these on hand, as you proceed.
* Now, open the Settings app, and tap Passwords.
* Find the account you want to add verification codes to and tap it.
* Under Account Options, tap Set Up Verification Code…
* Tap Enter Setup Key or Scan QR Code. If your account provided you with a QR code, I recommend that option, as setup keys are usually very long strings of letters and numbers.
* Once you’ve scanned the QR code or entered the setup key, the verification code will automatically be added to the password page. You’ll see it under the password. Tap it to copy it to your clipboard.
* Return to your web browser, and enter the verification code (if you copied it in the previous step, you can simply paste it here). Tap Continue to finish setting up 2FA for this account.
That’s how to set up your authenticator app on iPhone. Your iPhone will automatically generate a new code every 30 seconds so the code you need to enter when logging in will be different every time. Next, find out how to share passwords on iPhone.
FAQ
* How do I get my Apple Authenticator code? When logging into a website, if it asks for a verification code and you have set that account up in iCloud Keychain, the code will automatically appear as a text suggestion above the keyboard. You can simply tap it to insert the code. If the suggestion does not appear, you will need to go into the Settings app, and tap Passwords, then find the account that you need a verification code for.
* What is the best free authenticator app for iPhone? If you use iCloud Keychain as your password manager, it makes the most sense to use it for multi-factor authentication codes as well. However, if you wish to use an app separate from Apple, apps like Google Authenticator and Microsoft Authenticator can fulfill the same purpose.
How-ToiPhoneiCloud KeychainSettingsPrivacy & SecurityMaster your iPhone in one minute a day: Sign up here to get our FREE Tip of the Day delivered right to your inbox.
http://dlvr.it/T3P1nY
iMessage Contact Key Verification Explained
What to Know
* Contact Key Verification is a new security feature that ensures the person you are texting is who they say they are.
* You can enable Contact Key Verification in your Apple ID settings within the Settings app.
* Once enabled, you can check your contacts' verification keys in the Messages app.
Privacy and security are one of Apple's strong suits which is why the new iMessage Contact Key Verification feature is a change I gladly welcome. This new setting helps protect your messages and ensures you are talking to the right person. Find out what this new feature does and how to enable it for your Apple ID.
Jump To:
* What is Contact Key Verification?
* How to Enable Contact Key Verification
* FAQ
What is Contact Key Verification?
While iMessage is end-to-end encrypted, Contact Key Verification adds an extra step of security by allowing you to verify the person you are texting is who they say they are. This works by assigning a unique code to your Apple ID, which your contacts can use to verify your identity when texting you (and vice versa). iMessage handles this verification process automatically in the background, but if an error is detected, you will be notified that the person you are texting may not be who they claim to be. On top of that, you can also manually verify your contacts using a personal, individual verification code found within the Messages app. In the following section, we'll show you how to turn on the new Contact Key Verification setting and how to use it to verify a contact.
How to Enable Contact Key Verification on iPhone
Your messages are encrypted when sending and receiving them, but Apple's new Contact Key Verification system lets you ensure you’re texting the person you intend to text. For more helpful iPhone tips and tricks, be sure to check out our free Tip of the Day newsletter. Now, here’s how to enable iMessage’s Contact Key Verification feature.
* Open the Settings app, and tap your name at the top.
* Scroll to the bottom and tap Contact Key Verification.
* Tap the toggle to enable Contact Key Verification.
* Tap Continue.
* If you have outdated devices tied to your Apple ID, you will need to remove them before continuing.
* Once Contact Key Verification has been activated, the toggle will be green. You can tap Show Public Verification Code to view your own code.
* To verify another person’s code, simply open their conversation in iMessages, and tap their contact icon. Scroll to the bottom, and then, tap Verify Contact… To get a verification code, both of you must open each other's contact card and tap Verify Contact at the same time.
* Compare your verification code with the other person either in-person or over the phone. Tap Mark as Verified if they match. If not, tap No Match.
* Now your contact's personal verification code will be saved to their contact card. Tap Update to save this information.
* In your contact's card, you'll now see a "verified" check under Advanced Message Security.
Note: Contact Key Verification only works if both parties have already set this feature up. If you don't see the Verify Contact option, that means the other person does not have this feature enabled.
That’s how to set up and use the new iMessage Contact Key Verification feature!
FAQ
* How to turn on iMessage? You can enable iMessage in the Settings app. Check out our article on how to enable iMessage to find out more.
* What does iPhone verification required mean? If your iPhone keeps saying, "verification required," it is not related to Contact Key Verification. This simply means there is an issue with your iPhone's payment method. You will need to update your payment method to continue.
How-ToiPhoneiMessageMessagesPrivacy & SecurityMaster your iPhone in one minute a day: Sign up here to get our FREE Tip of the Day delivered right to your inbox.
http://dlvr.it/T3NjWy
* Contact Key Verification is a new security feature that ensures the person you are texting is who they say they are.
* You can enable Contact Key Verification in your Apple ID settings within the Settings app.
* Once enabled, you can check your contacts' verification keys in the Messages app.
Privacy and security are one of Apple's strong suits which is why the new iMessage Contact Key Verification feature is a change I gladly welcome. This new setting helps protect your messages and ensures you are talking to the right person. Find out what this new feature does and how to enable it for your Apple ID.
Jump To:
* What is Contact Key Verification?
* How to Enable Contact Key Verification
* FAQ
What is Contact Key Verification?
While iMessage is end-to-end encrypted, Contact Key Verification adds an extra step of security by allowing you to verify the person you are texting is who they say they are. This works by assigning a unique code to your Apple ID, which your contacts can use to verify your identity when texting you (and vice versa). iMessage handles this verification process automatically in the background, but if an error is detected, you will be notified that the person you are texting may not be who they claim to be. On top of that, you can also manually verify your contacts using a personal, individual verification code found within the Messages app. In the following section, we'll show you how to turn on the new Contact Key Verification setting and how to use it to verify a contact.
How to Enable Contact Key Verification on iPhone
Your messages are encrypted when sending and receiving them, but Apple's new Contact Key Verification system lets you ensure you’re texting the person you intend to text. For more helpful iPhone tips and tricks, be sure to check out our free Tip of the Day newsletter. Now, here’s how to enable iMessage’s Contact Key Verification feature.
* Open the Settings app, and tap your name at the top.
* Scroll to the bottom and tap Contact Key Verification.
* Tap the toggle to enable Contact Key Verification.
* Tap Continue.
* If you have outdated devices tied to your Apple ID, you will need to remove them before continuing.
* Once Contact Key Verification has been activated, the toggle will be green. You can tap Show Public Verification Code to view your own code.
* To verify another person’s code, simply open their conversation in iMessages, and tap their contact icon. Scroll to the bottom, and then, tap Verify Contact… To get a verification code, both of you must open each other's contact card and tap Verify Contact at the same time.
* Compare your verification code with the other person either in-person or over the phone. Tap Mark as Verified if they match. If not, tap No Match.
* Now your contact's personal verification code will be saved to their contact card. Tap Update to save this information.
* In your contact's card, you'll now see a "verified" check under Advanced Message Security.
Note: Contact Key Verification only works if both parties have already set this feature up. If you don't see the Verify Contact option, that means the other person does not have this feature enabled.
That’s how to set up and use the new iMessage Contact Key Verification feature!
FAQ
* How to turn on iMessage? You can enable iMessage in the Settings app. Check out our article on how to enable iMessage to find out more.
* What does iPhone verification required mean? If your iPhone keeps saying, "verification required," it is not related to Contact Key Verification. This simply means there is an issue with your iPhone's payment method. You will need to update your payment method to continue.
How-ToiPhoneiMessageMessagesPrivacy & SecurityMaster your iPhone in one minute a day: Sign up here to get our FREE Tip of the Day delivered right to your inbox.
http://dlvr.it/T3NjWy
Wednesday, February 28, 2024
Why Is My iPhone Shutting Off with Battery Left?
What to Know
* If your iPhone randomly shuts off, this can signal a defective or dying battery that needs replacing.
* However, this can also happen because your software is outdated or your device has overheated.
* To troubleshoot, check your iPhone battery health and device temperature, and restart your iPhone.
If your iPhone shuts off randomly, even with some battery left, this can signal a defective or dying battery. However, this isn't always the case! There are several reasons why your iPhone might be turning off without warning. We'll cover common fixes and show you how to check your battery to see if your iPhone needs service.
Jump To:
* Why Is My iPhone Shutting Off with Battery Left?
* How to Stop Your Phone from Turning Off by Itself
* FAQ
Why Does My iPhone Keep Turning Off with Battery Left?
There are several potential reasons why your iPhone is shutting off, even though it has battery left. The most common reason is that your iPhone battery is defective or the capacity to hold charge has diminished over time. However, your iPhone suddenly shutting off can also signal software issues from buggy apps, outdated software, or an overheated device from power-intensive apps.
How to Stop Your Phone from Turning Off by Itself
First things first: if your phone shuts off without warning, place your hand on the back of your iPhone and check the device temperature. If your device feels hot to the touch, it may have turned off due to overheating. This is especially likely if you placed your iPhone in the sun or were using power-intensive gaming apps. If your device temperature feels normal, follow the troubleshooting steps below.
Restart Your iPhone If It Shuts Off Randomly
If your iPhone has been turning off even though it still has battery left, your first troubleshooting step should be to turn your iPhone on and off. Restarting your iPhone resets your device at a software level and is a great way to fix program issues causing your iPhone to switch on and off at random intervals. For an iPhone X or later (any iPhone model without a Home button), here's how to turn it on and off:
* Press and hold one of the Volume buttons and the Side button.
* When the power off screen appears, slide to power off your iPhone.
* Press and hold one of the Volume buttons and the Side button to switch your iPhone back on.
Restarting your iPhone is a common fix, but even if this does seem to resolve the issue, I recommend checking your iPhone battery health in the section below. This is important since your iPhone turning off randomly can signal a diminished battery capacity.
Force Restart Your iPhone
A force restart cuts the power from the phone's battery to the hardware, allowing you to reset at a hardware level. The steps to force restart your iPhone differ from those for a regular restart. To force restart your iPhone:
* Click and release the Volume Up button.
* Click and release the Volume Down button.
* Press hold the Side button until the power off screen appears, then slide to power off your iPhone.
Hopefully, your iPhone will begin functioning normally after the force restart! However, I still recommend checking your iPhone battery health in the section below since your iPhone turning off randomly is one of the classic signs of a defective or dying battery.
Check Your iPhone Battery Health
Follow the steps below to check your iPhone battery health. This is a great way to determine if you need to get your device serviced or if the solutions listed here will likely stop your iPhone from turning off without warning.
* Open the Settings app and tap Battery.
* Tap Battery Health & Charging.
* This screen will display information about your battery's capacity, peak performance, and whether your battery needs to be serviced.
A few things to watch for: if your battery's Maximum Capacity on the screen above is below 80 percent, by Apple's guidelines, you need to contact Apple Support and get the battery checked out. A battery capacity below 80 percent is likely the reason your iPhone randomly shuts off and isn't holding charge. Also, if you see any warning messages about your iPhone needing service or suggestions on how to improve your battery health, you should follow those prompts to see if they resolve your issue.
Note
If you have AppleCare+ and your battery's Maximum Capacity is below 80 percent, you can replace your iPhone battery with no additional charge.
Install Software Updates to Stop Your iPhone Turning Off
If your iPhone battery health seems normal, another great preventative measure is to check for available software updates, as outdated software may be causing your iPhone to keep turning on and off without reason. Here's how to check for available software updates:
* Open the Settings app and tap General.
* Select Software Update.
* If you see an available update, select Update Now.
Follow the on-screen instructions to complete the software update. The steps above are a quick summary for those fairly familiar with the software update process. However, if you need more clarification, here's a great resource that covers everything you need to know about updating your iPhone software.
Factory Reset Your iPhone & Restore from a Backup
If you've followed the steps above and your iPhone still turns off with a full battery, it's time to do a factory reset. A factory reset erases your iPhone data and settings. While it is time-consuming, this is an excellent way to resolve underlying issues with settings, content, and software. To do this, you'll need to create a backup of your iPhone data, perform the factory reset, and then restore the backup on your iPhone after the reset. This article walks you through how to factory reset your iPhone, and includes tips on properly creating an iCloud or Finder backup. For tips on iPhone maintenance and troubleshooting, sign up for our free Tip of the Day Newsletter!
Contact Apple Support
If the steps above haven't resolved your issue, this likely means your battery or other hardware component needs to be replaced. You can contact Apple Support to get your iPhone serviced. If your iPhone is older and you're considering replacing it, you can also learn when it is best to upgrade your iPhone.
FAQ
* Why does my phone keep turning off and restarting? If your iPhone keeps turning on and off, the cause is often a dying battery or outdated software. However, your device could have also overheated, which is especially likely if you placed your phone in the sun or were running power-intensive gaming apps.
* Why does my iPhone keep turning off with a full battery? Unfortunately, this is a clear sign of a defective or dying iPhone battery. When the battery capacity has been sufficiently diminished, the iPhone will randomly shut off, and it doesn't matter what the battery icon on your screen shows. You will likely need to replace the iPhone battery to solve the issue.
Photo by Tyler Lastovich on Unsplash
How-ToiPhoneSettingsBatteryTroubleshootingDevice ManagementMaster your iPhone in one minute a day: Sign up here to get our FREE Tip of the Day delivered right to your inbox.
http://dlvr.it/T3NKTC
* If your iPhone randomly shuts off, this can signal a defective or dying battery that needs replacing.
* However, this can also happen because your software is outdated or your device has overheated.
* To troubleshoot, check your iPhone battery health and device temperature, and restart your iPhone.
If your iPhone shuts off randomly, even with some battery left, this can signal a defective or dying battery. However, this isn't always the case! There are several reasons why your iPhone might be turning off without warning. We'll cover common fixes and show you how to check your battery to see if your iPhone needs service.
Jump To:
* Why Is My iPhone Shutting Off with Battery Left?
* How to Stop Your Phone from Turning Off by Itself
* FAQ
Why Does My iPhone Keep Turning Off with Battery Left?
There are several potential reasons why your iPhone is shutting off, even though it has battery left. The most common reason is that your iPhone battery is defective or the capacity to hold charge has diminished over time. However, your iPhone suddenly shutting off can also signal software issues from buggy apps, outdated software, or an overheated device from power-intensive apps.
How to Stop Your Phone from Turning Off by Itself
First things first: if your phone shuts off without warning, place your hand on the back of your iPhone and check the device temperature. If your device feels hot to the touch, it may have turned off due to overheating. This is especially likely if you placed your iPhone in the sun or were using power-intensive gaming apps. If your device temperature feels normal, follow the troubleshooting steps below.
Restart Your iPhone If It Shuts Off Randomly
If your iPhone has been turning off even though it still has battery left, your first troubleshooting step should be to turn your iPhone on and off. Restarting your iPhone resets your device at a software level and is a great way to fix program issues causing your iPhone to switch on and off at random intervals. For an iPhone X or later (any iPhone model without a Home button), here's how to turn it on and off:
* Press and hold one of the Volume buttons and the Side button.
* When the power off screen appears, slide to power off your iPhone.
* Press and hold one of the Volume buttons and the Side button to switch your iPhone back on.
Restarting your iPhone is a common fix, but even if this does seem to resolve the issue, I recommend checking your iPhone battery health in the section below. This is important since your iPhone turning off randomly can signal a diminished battery capacity.
Force Restart Your iPhone
A force restart cuts the power from the phone's battery to the hardware, allowing you to reset at a hardware level. The steps to force restart your iPhone differ from those for a regular restart. To force restart your iPhone:
* Click and release the Volume Up button.
* Click and release the Volume Down button.
* Press hold the Side button until the power off screen appears, then slide to power off your iPhone.
Hopefully, your iPhone will begin functioning normally after the force restart! However, I still recommend checking your iPhone battery health in the section below since your iPhone turning off randomly is one of the classic signs of a defective or dying battery.
Check Your iPhone Battery Health
Follow the steps below to check your iPhone battery health. This is a great way to determine if you need to get your device serviced or if the solutions listed here will likely stop your iPhone from turning off without warning.
* Open the Settings app and tap Battery.
* Tap Battery Health & Charging.
* This screen will display information about your battery's capacity, peak performance, and whether your battery needs to be serviced.
A few things to watch for: if your battery's Maximum Capacity on the screen above is below 80 percent, by Apple's guidelines, you need to contact Apple Support and get the battery checked out. A battery capacity below 80 percent is likely the reason your iPhone randomly shuts off and isn't holding charge. Also, if you see any warning messages about your iPhone needing service or suggestions on how to improve your battery health, you should follow those prompts to see if they resolve your issue.
Note
If you have AppleCare+ and your battery's Maximum Capacity is below 80 percent, you can replace your iPhone battery with no additional charge.
Install Software Updates to Stop Your iPhone Turning Off
If your iPhone battery health seems normal, another great preventative measure is to check for available software updates, as outdated software may be causing your iPhone to keep turning on and off without reason. Here's how to check for available software updates:
* Open the Settings app and tap General.
* Select Software Update.
* If you see an available update, select Update Now.
Follow the on-screen instructions to complete the software update. The steps above are a quick summary for those fairly familiar with the software update process. However, if you need more clarification, here's a great resource that covers everything you need to know about updating your iPhone software.
Factory Reset Your iPhone & Restore from a Backup
If you've followed the steps above and your iPhone still turns off with a full battery, it's time to do a factory reset. A factory reset erases your iPhone data and settings. While it is time-consuming, this is an excellent way to resolve underlying issues with settings, content, and software. To do this, you'll need to create a backup of your iPhone data, perform the factory reset, and then restore the backup on your iPhone after the reset. This article walks you through how to factory reset your iPhone, and includes tips on properly creating an iCloud or Finder backup. For tips on iPhone maintenance and troubleshooting, sign up for our free Tip of the Day Newsletter!
Contact Apple Support
If the steps above haven't resolved your issue, this likely means your battery or other hardware component needs to be replaced. You can contact Apple Support to get your iPhone serviced. If your iPhone is older and you're considering replacing it, you can also learn when it is best to upgrade your iPhone.
FAQ
* Why does my phone keep turning off and restarting? If your iPhone keeps turning on and off, the cause is often a dying battery or outdated software. However, your device could have also overheated, which is especially likely if you placed your phone in the sun or were running power-intensive gaming apps.
* Why does my iPhone keep turning off with a full battery? Unfortunately, this is a clear sign of a defective or dying iPhone battery. When the battery capacity has been sufficiently diminished, the iPhone will randomly shut off, and it doesn't matter what the battery icon on your screen shows. You will likely need to replace the iPhone battery to solve the issue.
Photo by Tyler Lastovich on Unsplash
How-ToiPhoneSettingsBatteryTroubleshootingDevice ManagementMaster your iPhone in one minute a day: Sign up here to get our FREE Tip of the Day delivered right to your inbox.
http://dlvr.it/T3NKTC
Subscribe to:
Posts (Atom)