Thursday, August 31, 2023

How to Check Your Wi-Fi Ghz on iPhone & iPad (iOS 17)

What to Know * To know if your Wi-Fi is 2.4 or 5 GHz, open the Settings app, then look next to the name of your Wi-Fi network. * To change from 2.4 to 5 GHz and back again, tap Wi-Fi in Settings, then tap the Wi-Fi frequency you want to switch to. * The 2.4 GHz Wi-Fi frequency is weaker, but has a larger coverage area. 5 GHz Wi-Fi has a smaller coverage area, but a stronger signal.  Are you wondering what Wi-Fi frequency your iPhone or iPad is connected to? Here's how to check your Wi-Fi GHz on an iPhone. How to Check Your Wi-Fi Ghz on iPhone & iPad   Be sure to check out our free Tip of the Day for more great internet and Wi-Fi tutorials. Now, here's how to know if your Wi-Fi is 2.5 or 5 GHz, and how to change your Wi-Fi frequency.  * Open the Settings app. * You'll see Wi-Fi with a network name and either 2.4 or 5 GHz next to it; it's just that easy to find out which Wi-Fi frequency you're using! If you want to change Wi-Fi frequencies, just tap Wi-Fi. *  The network you're currently using is the one with the blue checkmark next to it. Tap the network without the checkmark to change from 2.4 to 5 GHz, or from 5 to 2.4 GHz.  FAQ * What does 2.5 GHz mean, and what does 5 GHz mean? GHz is short for gigahertz; 2.5 and 5 GHz are two frequencies with different speeds and ranges used by your Wi-Fi router.   * Should I use 2.4 GHz or 5 GHz Wi-Fi? 2.4 GHz has a larger coverage area and can penetrate solid objects better than 5 GHz, but has a lower data rate. But, 2.4 GHz usually has more devices connected, and is more prone to interference.  * What GHz is my Wi-Fi? It's easy to check if Wi-Fi is 2.4 or 5 GHz on an iPhone or iPad; just open the Settings app, and you'll see your Wi-Fi frequency next to the name of your Wi-Fi network.  By now, you should know how to tell if your Wi-Fi is 2.4 or 5 GHz. Be sure to check back with iPhone Life for all your iPhone, iPad, and other Apple device questions! How-ToiPadiPhoneSettingsInternetWi-FiDevice ManagementMaster your iPhone in one minute a day: Sign up here to get our FREE Tip of the Day delivered right to your inbox.
http://dlvr.it/SvQMD8

Wednesday, August 30, 2023

Galaxy Buds2 Pro Evolves LE Audio Capabilities, Bringing New Auracast to Samsung Smart TV

Samsung Electronics today announced new software updates to Galaxy Buds2 Pro and Samsung Smart TVs,1 reshaping the audio experiences across even more connected
http://dlvr.it/SvMhfR

Tuesday, August 29, 2023

Monday, August 28, 2023

[Video] Brave the Outdoors With Galaxy Tab S9: Your Ultimate Companion for Active Pursuits

Samsung Electronics is elevating outdoor experiences with the all-new Galaxy Tab S9. Designed with adventurous, adrenaline-seeking Galaxy users in mind, this
http://dlvr.it/SvGkjc

‘It’s Easy!’ Samsung Electronics Releases ‘Everyday SmartThings With Son’ Campaign Video, Featuring Son Heung-Min

Samsung Electronics today unveiled a campaign video titled “Everyday SmartThings with Son,” starring globally renowned football player Son Heung-min. The video
http://dlvr.it/SvG8Tg

Saturday, August 26, 2023

Samsung TV Brings Sustainable Screen Experience With AI Energy Saving Features

Samsung Electronics, a global leader in the TV industry for 17 consecutive years, has been propelling its commitment towards sustainable tech through a series
http://dlvr.it/SvBkLS

Friday, August 25, 2023

Samsung Celebrates Disney’s 100th Anniversary With Special Edition of The Frame

Samsung Electronics today announced the launch of The Frame-Disney100 Edition to commemorate Disney’s 100th anniversary. Available in 55, 65 and 75-inch class
http://dlvr.it/Sv8G5V

Thursday, August 24, 2023

Declutter Messages by Auto-Deleting Verification Codes (iOS 17)

If your Messages inbox filled with a bunch of six-digit verification codes left over from sign-ins to various sites and apps? Your iPhone now has a feature that will automatically clear out verification codes, also known as one-time passwords or OTPs, after you’ve used them. If you frequently get two-factor authentication codes texted to you, this feature is sure to help clear up your messages. Why You’ll Love This Tip: * Keep your messages from getting filled up by verification codes. * Declutter your inbox if you use Autofill with the Mail app. How to Auto-Delete OTP Codes on iPhone System Requirements: This tip works on iPhones running iOS 17 or later. Find out how to update to iOS 17. If you use two-factor authentication, you are probably used to having your verification codes texted to you. By now, you’ve probably also gotten used to using Autofill, which is a feature that automatically grabs your SMS verification codes and allows you to enter them automatically, with a single tap. For more iPhone privacy and security advice, be sure to sign up for our free Tip of the Day newsletter. Now, here’s how to auto-delete OTP codes on iPhone: * Open the Settings app, and tap Passwords. * Tap Password Options. * Tap the toggle next to Clean Up Automatically to enable or disable this feature. Now, whenever you use Autofill to enter your iPhone verification codes, the texts and emails you receive will automatically be deleted, keeping your inboxes organized. How-ToiPhoneMessagesSettingsPrivacy & SecurityMaster your iPhone in one minute a day: Sign up here to get our FREE Tip of the Day delivered right to your inbox.
http://dlvr.it/Sv5c34

Wednesday, August 23, 2023

Three Samsung Researchers Elected as Working Group Vice-Chairs of 3GPP

  Samsung Electronics announced that three Samsung researchers have been elected vice-chairs in the 3rd Generation Partnership Project (3GPP), the
http://dlvr.it/Sv2zLK

Tuesday, August 22, 2023

5 Quick Ways to Secure Your iPhone

With hacking making the news every few weeks, it’s high time to take a moment and tighten our digital defenses. Apple makes tons of privacy and security tools available, but it’s up to you to make the most of them. 1. Use a Strong & Unique iPhone Passcode Your passcode is the entry point to your digital security; with the keys to the gate, an attacker can walk right past the walls. With only your iPhone (and the passwords it saves), you can log in to most of your online accounts, so don’t make it easy! Make sure your iPhone has a passcode on it and use a 6-digit code rather than 4. To set your iPhone passcode, go to Settings > Face ID & Passcode (or Touch ID & Passcode) > Turn Passcode On. You can also change your passcode on that same screen if you’d like to set a stronger one. For more iPhone security advice, be sure to check out our free Tip of the Day newsletter. 2. Protect Your Passcode One of the most consistent threats to your very-modern digital property is the oldest one on earth: thieves. Crooks sometimes sneakily film you entering your passcode before they snatch your iPhone. If they succeed, they can use your passcode to get into your stolen iPhone, and then away they go helping themselves to whatever they want from the device, including bank accounts, credit cards, and more. Make sure that you use Face ID or Touch ID to cut back on how often you have to enter your passcode in public, and if you do have to enter your passcode in public, then hold your phone where only you can see. To turn on Face ID or Touch ID, go to Settings > Face ID & Passcode, toggle it on, and walk through the setup. 3. Turn On Find My for All Your Devices Find My is Apple’s built-in app for tracking lost and stolen devices. Apple’s security systems are designed so that Apple can’t track you: they don’t have access to your Apple ID passwords or Find My. That means they can’t help you if your iPhone is lost: you have to do it yourself. You can turn on Find My in Settings > Your Apple ID > Find My > toggle on Find My iPhone. Then go and turn it on in the same place on your Mac and iPad. This doesn’t just help you find a misplaced iPhone hiding under your car seat, it also lets you remotely disable and lock your iPhone if it’s ever stolen. 4. Use a Strong Unique Password for Your Apple ID With just your Apple ID password, a crook can log in to iCloud.com and register your iPhone as stolen, locking you out of your own device (even if it isn’t actually stolen). If you’ve been using the same password in multiple places, your Apple ID is the first one you should change to something unique! Go to the Settings app > Apple ID > Password & Security and then tap on Change Password to set a new unique password. Remember: longer is better than weirder. Use four random words, randomly generated, to get a nice long password that’s easy for you to remember and hard for computers to guess. While you’re there in the Password & Security menu, make sure that Two Factor Authentication is turned on (it’s on by default with newer Apple IDs). Final tip: use a password manager like iCloud Keychain or third-party options like Bitwarden, 1Password, or Dashlane to store the login credentials of all the accounts you’ve set up online, including your Apple ID! 5. Set Up an Account Recovery Contact Losing access to your Apple ID account would be a real nightmare, as it stores your photos, contacts, app purchases, the locations of your devices, and even your passwords for other accounts (if you use iCloud Keychain to save your passwords). Protect yourself by designating an Account Recovery Contact. Go to Settings > Apple ID > Password & Security > Account Recovery and tap the button labeled Add Recovery Contact. Your phone will let you designate a contact who will receive a special code you can use to securely recover your account if you’re ever locked out. How-ToiPhoneApple IDFind MyiCloudFace ID & Touch IDPasscodePrivacy & SecurityMaster your iPhone in one minute a day: Sign up here to get our FREE Tip of the Day delivered right to your inbox.
http://dlvr.it/Sv1Kv6

Monday, August 21, 2023

With New ‘Try Galaxy’ App Update, Non-Android Users Can Experience Samsung Galaxy Z Flip5 & Z Fold5

Samsung Electronics today announced that it has released an update for its “Try Galaxy” app, allowing non-Android smartphone1 users to test drive the intuitive
http://dlvr.it/StyBfT

Flexing New Possibilities: How To Make the Most of Your Galaxy Z Flip5 With Flex Window

The Galaxy Z Flip5 continues the legacy of the Galaxy Z Flip series — ushering in a new world of mobile experiences thanks to its compact form factor that fits
http://dlvr.it/StxPJ8

Samsung Electronics Teams Up With NEXON To Unveil World’s First HDR10+ GAMING Title, ‘The First Descendant’

Samsung Electronics, a global leader in the visual display industry, today announced the launch of the world’s first gaming title featuring the High
http://dlvr.it/Stx8bH

Friday, August 18, 2023

How to Automatically Sort Grocery Lists in Reminders (iOS 17)

If you're someone who likes an organized march around the grocery store, iOS 17 has come through for you. Now, grocery lists in Reminders automatically sort into categories so you can get everything you need from one section before moving on to the next. Here is how to get your Reminders grocery list to automatically sort in iOS 17. Why You'll Love This Tip: * Enjoy efficient trips through the grocery store. * Receive suggestions on where to look for ingredients you're less familiar with. * Navigate a beautiful and intuitive layout as you check off your groceries. How to Sort Grocery Lists by Category in Reminders System Requirements This tip works on iPhones running iOS 17 or later. Find out how to update to iOS 17. If you've ever wandered around a grocery store, only to find yourself doubling back to the other side of the store for produce you missed the first time around, you'll appreciate this new iOS 17 feature. It automatically sorts grocery lists by category, making sure you get everything you need with one stop per section. For more ways iOS 17 can make your life easier, check out our free Tip of the Day newsletter. Before you begin, make sure you've created a grocery list in the Reminders app. You can create a sorted grocery list from scratch, but you'll need to know how to make a list in the Reminders app first. * Open your Reminders app and select your grocery list. * If the items aren't automatically sorted, tap the More icon in the top right. * Tap Show List Info. * Tap List Type. * Tap Groceries. * Tap Done. * Your groceries will now be automatically sorted by category. Tap an entry to mark it off. Easy as pie! Which you can find in the bakery section. As long as your list is marked as a grocery list, this setting will stay on, so there is no need to worry about it reverting. How-ToiPhoneAppsApple AppsRemindersShoppingMaster your iPhone in one minute a day: Sign up here to get our FREE Tip of the Day delivered right to your inbox.
http://dlvr.it/StpqVy

Thursday, August 17, 2023

Build a Custom Workout Plan in Apple Fitness+ (iOS 17)

Achieving your goals with Apple Fitness+ has become much more accessible thanks to custom workout plans in iOS 17. You can now build a plan that fits your needs and helps you stay on track. Read on to find out how to get started! Why You’ll Love This Tip: * Keep yourself accountable and stay on track. * Set fitness goals and work towards achieving them. How to Build an Apple Fitness Workout Plan System Requirements This tip works on iPhones running iOS 17 or later, or iPads running iPadOS 17 or later. Find out how to update to iOS 17 and iPadOS 17. If you have a subscription to Apple Fitness+, you can build a custom workout plan. Instead of starting each workout individually, from scratch, you can choose what activities you’ll do, for how long, and for how many weeks. For more iPhone fitness tips and tricks, be sure to sign up for our free Tip of the Day newsletter. Now, let’s take a look at how to build a custom Apple Fitness Plus workout plan: * Open the Fitness app. * Tap the Fitness+ tab. * Tap Build Your Plan. * There are a lot of options on this screen. To start, you can choose which days you want to work out. * Select the number next to Total Time Per Day to choose the amount of time you will spend working out each day. * You can choose anywhere between 10 and 90 minutes per day. * Tap the number of weeks next to Length of Plan to select how long you want this plan to go on. * You can select anywhere between 2 and 8 weeks. * Select which Activity Types you will be doing during this plan. * Tap Review Plan once you have made your selections. * Now, you can customize your weekly schedule. This might look different for you, depending on your selections in the previous steps. If you have multiple days, you can swipe left and right to switch between days. * Tap the date under Review Plan to select a start date. * Depending on the days of the week you selected in step 4, you will be able to customize when exactly your plan starts. * Tap an activity to customize it for that particular day. The customization options are the same as the ones seen in steps 16-19. * Tap Add to add additional time to a particular activity on a specific day. * You can switch to a different activity by tapping the currently selected one. * You can tap any of the times to add additional time. * You can also tap any of the extra equipment options. * Tap Add when you are finished. * You can select your preferences for trainers or the type of music. * Tap Create Plan when you are ready. Once your plan is created, you can find it in the Fitness+ tab in the Fitness app, and you may receive reminders to complete your planned workout on the designated days. Your plan will start based on your selection in step 13, and continue for however many weeks you chose in step 7. Next, find out how to add a favorite workout to your workouts. How-ToiPhoneApple Fitness PlusFitness AppHealth & FitnessMaster your iPhone in one minute a day: Sign up here to get our FREE Tip of the Day delivered right to your inbox.
http://dlvr.it/StnKkX

Wednesday, August 16, 2023

Where Did the Control Center on Apple Watch Go? (watchOS 10)

Why can't you swipe up to get to your Apple Watch Control Center? Do you see widgets instead? If so, your watch is running watchOS 10 or later! With this update comes a new way to open your Control Center that requires zero swiping. Don't worry, it's easy, and you'll be used to it in no time. Why You’ll Love This Tip: * The watchOS 10 update made some changes to the Apple Watch layout, including a new way to access the Control Center. * Instead of swiping up to open the Control Center on your Apple Watch, you must now press the Side button. How to Open Control Center Apple Watch (watchOS 10) System Requirements To use this tip, you will need an Apple Watch running watchOS 10. Once you update to watchOS 10, your Apple Watch won’t swipe up to open the Control Center anymore. So if you want to ping your iPhone, turn on Focus Modes, or check your Wi-Fi settings, you'll have to open the Apple Watch Control Center by pressing the Side button. To discover more iOS 17 features, sign up for our free Tip of the Day! * Press the Side button on your unlocked Apple Watch. * You will see your Apple Watch Control Center! Pro Tip Your Apple Watch will need to be unlocked before you can access the Control Center by tapping the Side button. You can do this with the passcode or with your iPhone. Now you know what to do if your Apple Watch won't swipe up to the Control Center. Changes like this are common with Apple updates, and getting used to them takes a while. Next, learn about the other new features that watchOS 10 brings to your Apple Watch. How-ToApple WatchControl CenterDevice ManagementMaster your iPhone in one minute a day: Sign up here to get our FREE Tip of the Day delivered right to your inbox.
http://dlvr.it/StkwbZ

Samsung Brings the Latest Galaxy Z Fold5, Z Flip5, Tab S9 Series and Watch6 Series Experiences to Previous Devices

Samsung is bringing select features from the latest One UI to previous generations of devices1 through a new update. This landmark release is part of the
http://dlvr.it/Stj80p

Tuesday, August 15, 2023

Bringing Creativity to Life With the Galaxy Tab S9 and Taejun Pak

In today’s digital world, creators are a driving force, bringing new ideas and creations to life through mobile devices. This is where the Galaxy Tab S9 series
http://dlvr.it/Sth13r

Monday, August 14, 2023

Partnering for FAST Growth — Samsung TV Plus X CJ ENM

Eunhye Park, Head of Content Distribution Strategy at CJ ENM,1 had a choice to make. Park was tasked with finding new business opportunities to leverage the
http://dlvr.it/StcRz5

Friday, August 11, 2023

International Youth Day 2023: How Samsung Empowers the Innovators of Tomorrow

Every year on August 12, the United Nations’ International Youth Day (IYD) serves as an essential day of awareness to spotlight the challenges faced by today’s
http://dlvr.it/StVQpy

Samsung Collaborates With Emerging Young Artists To Create Unique ‘Galaxy Z’ Accessories Exclusively on Samsung.com

Samsung Electronics today announced that it has unveiled two new mobile accessories for the new Galaxy Z series, featuring the vibrant artwork of promising
http://dlvr.it/StVQcS

Thursday, August 10, 2023

See Real-Time Transcriptions of Voicemails (iOS 17)

Ever get a call from an unknown number, but don’t want to pick it up? Live Voicemail is a new feature that takes the iPhone back to the days of answering machines. Now, whenever you receive a call, you’ll be able to see a live transcription of the voicemail message being left by the caller, as they're leaving it. Why You’ll Love This Tip: * Find out who’s calling and why before you pick up the phone. * Make sure it's someone you want to talk to before you answer a call. * Interrupt your friends while they’re in the middle of leaving a voicemail. How to Use Live Voicemail on iPhone System Requirements This tip works on iPhones running iOS 17 or later. Find out how to update to iOS 17. While iPhone voicemail transcriptions have been available for some time now, Live Voicemail works a bit differently in that it provides the transcription while the voicemail is in progress, rather than after. It’s super useful in helping you determine who is calling and why so that you can decide whether or not you’ll answer the phone. To get the most out of the latest iPhone features, be sure to sign up for our free Tip of the Day newsletter. While this feature is enabled by default when updating to iOS 17, here’s how to confirm that it’s turned on and working: * Open the Settings app, and tap Phone. * Scroll down and tap Live Voicemail. * Tap the toggle to enable or disable Live Voicemail. * When you get a call, tap the Voicemail icon at the bottom-right of the screen. * You may see a message that says "Waiting...". Wait a moment, and the transcription should begin. * If your device is locked, you may need to unlock it to see Live Voicemail. Just swipe up from the Home Bar. * When your iPhone unlocks, tap the voicemail icon in the status bar (or in the Dynamic Island if your device has one). * You’ll then see a live transcription of the message being left. Since most unknown number calls turn out to be scams or spam calls, this feature has been super useful for finding out exactly who is calling before I pick up the phone. However, this works with all phone calls, not just ones from unknown numbers. How-ToiPhonePhoneVoicemailCommunicationMaster your iPhone in one minute a day: Sign up here to get our FREE Tip of the Day delivered right to your inbox.
http://dlvr.it/StT2qN

[Interview] How Samsung TVs and RNIB Are Setting a New Benchmark for Accessible Technology

Robin Spinks, Head of Inclusive Design at the Royal National Institute of Blind People (RNIB), has dedicated his career to creating an inclusive environment.
http://dlvr.it/StRrMN

Wednesday, August 9, 2023

[Interview] Keep the Temperature Low and Electric Bills Lower: Useful Air Conditioner Tips From Samsung Engineers

Many researchers and engineers at Samsung Electronics publish verified data collected from their projects as research papers. While some advanced studies make
http://dlvr.it/StPc8R

Tuesday, August 8, 2023

View a Transcript of Audio Messages (iOS 17)

There have been a number of new additions to the Messages app in the latest version of iOS that make it easier to use and navigate. Among those updates, audio messages in the Messages app are now automatically transcribed. Why You’ll Love This Tip: * Read audio messages right in your text conversation when you can’t listen to them at the moment. * Interact with audio messages the same way you do with normal texts. How to Transcribe Voice Messages on iPhone System Requirements This tip works on iPhones running iOS 17 and later. Starting with iOS 17, iMessage will now automatically display a transcription underneath audio messages. The catch is that both the sender and recipient need to be on iOS 17. To get the most out of the newest iOS updates, be sure to sign up for our free Tip of the Day newsletter. Now here’s how to see a transcription of voice messages on iPhone: * You don’t need to enable any special settings, as this feature works automatically. Simply open a text conversation that contains an audio message. * You’ll see the transcription under the message. This also works for audio messages you send. To find out how to send an audio message on iPhone, check out this article. Now if you’re ever out and can’t listen to an audio message right away, you can just read it instead, thanks to the new transcription feature. This feature is also sure to come in handy for those who are Deaf or hard of hearing. How-ToiPhoneiMessageMessagesCommunicationMaster your iPhone in one minute a day: Sign up here to get our FREE Tip of the Day delivered right to your inbox.
http://dlvr.it/StNDTb

Samsung Expands Collaboration With Intel To Advance vRAN Innovation

Samsung Electronics today announced the company is expanding its collaboration with Intel through a new product innovation agreement, allowing the companies to
http://dlvr.it/StMqwF

Samsung Art Store Brings Salvador Dali Masterpieces Into Homes Worldwide

Samsung Electronics today announced it is welcoming 12 of Salvador Dalí’s most striking masterpieces to Samsung Art Store1 in partnership with the
http://dlvr.it/StMP8K

Monday, August 7, 2023

Unboxing the Galaxy Tab S9 Ultra ②: Inimitable Display With Tough IP68-Rated Water and Dust Resistance

In the second part of this series, Samsung Newsroom explores the Galaxy Tab S9 Ultra’s features up close, including its impressive display, next-level
http://dlvr.it/StJh44

Thursday, August 3, 2023

How to Pause Your Location on Find My iPhone (2023)

What to Know * Find My iPhone lets users see the location of their own devices, as well as the locations of their friends and family. * To stop sharing location with Find My iPhone, open the Find My app, tap People, tap the contact, then tap Stop Sharing My Location. * You can pause location sharing with Airplane Mode or by turning off your phone. Here's how to freeze your location on Find My iPhone, make your location stay in one spot, or even how to spoof or fake your location on an iPhone. Remember, use your powers for good, everyone! Jump To: * How to Turn Off Location Sharing in Find My iPhone * How to Freeze Your Location on an iPhone * How to Fake a Location on an iPhone &iPad How to Pause Your Location on Find My iPhone It's essential to turn on Find My iPhone in case your iPad or iPhone gets lost or stolen; it's also a great way to share your location with friends and family members and see their locations. But, if you want a little more privacy, here's how to freeze your location on Find My iPhone, and how to fake your location on an iPhone. Be sure to check out our free Tip of the Day for more great Find My iPhone tutorials! How to Turn Off Location Sharing in Find My iPhone The easiest way to pause or freeze your location on Find My iPhone is to turn off Location Sharing. Here's how to turn off location sharing on an iPhone or iPad. Keep in mind that this is not a way to stop sharing your location without notifying the other person. When you stop sharing your location in Find My, your friend or family member will be able to tell you stopped sharing your location—if they're checking—because they'll see a screen that says No location found. They will not, however, get an official notification from their phone that says you have stopped sharing your location. How to Freeze Your Location on an iPhone If you want to stop sharing your location temporarily, you can turn on Airplane Mode. Airplane Mode turns off the wireless features on your iPhone or iPad, so your location will not be updated in the Find My app. You can still use Bluetooth devices like AirPods, headphones, and speakers. Here's how to turn on Airplane Mode. * Open the Control Center on your iPhone or iPad. * Tap the Airplane icon to turn on Airplane Mode; it will turn from gray to orange, and you'll see a small white airplane icon at the top of your screen while Airplane Mode is on. If you don't want to use Airplane Mode, you can just turn your iPhone or iPad off. These methods are also not a way to stop sharing your location without a notification, because there will be a slight difference in the description at the top of the screen. As with above, the person with whom you are sharing your location will not received an official notification that you've stopped sharing. They will just see the difference in how you appear in the app. * While you are sharing your location and not using Airplane Mode, and have not turned your iPhone off, your friend or family member will see Live at the top of the screen.     * When you turn on Airplane Mode or turn your phone or tablet off, your friend or family member will see a number of minutes at the top, which indicates how many minutes ago Find My was connected.  How to Fake a Location on an iPhone &iPad If you want to fake a location on your iPhone or use an iPhone location spoofer, here's how, and I surely hope you're using this information for something innocuous like playing Pokemon Go. There are several third-party apps that will allow you to fake a GPS location on your iPhone or iPad, but it's difficult to find a highly-rated one. Here's one that seems to check all the boxes: Tenorshare iAnygo ($14.95/ month) This app for Mac and iPhone will let you change your GPS location without jailbreaking. This works with all location-based apps, and is compatible with the latest iOS update.  FAQ * What happens when you pause your location on Find My iPhone? When you pause your location on an iPhone or iPad, your friends and family members will see the location where you were when you froze or paused your location with the number of minutes since your location was live.  * Does Find My iPhone work if Wi-Fi and cellular are off? Apple says, "If you turn on Find My network, you can locate your device or item even if it's not connected to a Wi-Fi or cellular network. The Find My network is an encrypted anonymous network of hundreds of millions of Apple devices that can help you locate your device or item."    * Can you find a lost iPhone if the location is off? You can find a lost iPhone, even if it's dead or offline, but if you've turned off Find My iPhone, you're only going to see the last location of your iPhone before your turned off Find My or before the battery died.  I hope this article has taught you how to freeze or pause your location on Find My iPhone. If you enjoyed this article, you may also want to learn how to send someone your location, the fastest way! How-ToiPadiPhoneAppsFind MyApple AppsLocation ServicesPrivacy & SecurityMaster your iPhone in one minute a day: Sign up here to get our FREE Tip of the Day delivered right to your inbox.
http://dlvr.it/St91bQ

How to Use Custom Photo Stickers in iOS 17

iOS 17 has brought with it a bunch of cool new features. But the new Custom Photo Stickers is my favorite update yet. With iOS 16, we gained the ability to remove an image from the background of a photo. This takes that concept, streamlines it, and then gives us a bunch of new and fun ways to customize it. Here's how to make a sticker from a photo on iPhone with iOS 17. Why You'll Love This Tip: * Create stickers of various subjects that will be accessible through the emoji keyboard wherever you're typing. * Add effects to the stickers, like making them a GIF, turning them holographic, and more. How to Make an Image a Sticker with iOS 17 System Requirements: In order to use this tip, you will need to have updated to iOS 17 on any of the following devices: * iPhone 14, 14+, Pro, Pro Max * iPhone 13. 13 mini, Pro, Pro Max * iPhone 12, 12 mini, Pro, Pro Max * iPhone 11, Pro, Pro Max * iPhone XS, XS Max * iPhone XR * iPhone SE (2nd Gen or later) Before we get started, there are a few important things to note. Firstly, to create an animated sticker on the iPhone, you will need to choose a Live Photo. You can create static stickers with any photo, but for the sticker to be animated, the photo needs to be a Live Photo. While you will be able to send the stickers to almost every texting application, some apps are not yet updated to allow the sticker to be animated. Additionally, the stickers will sometimes remain very small and blurry. This happened when we shared our own stickers in the iPhone Life company Slack. Another problem people tend to have with the feature is that it struggles to pick up the subject. Not all photos have a clearly defined subject for the AI to identify, so try to choose photos where there is a clear subject. Users also find that sometimes the Live Sticker option is finicky, and it seems to only work within the Messages app at present. Hopefully, though, this feature will be able to work across more Apple native apps and others with future updates. Lastly, it's important to remember that the other person you are sharing the sticker with must have updated to iOS 17 to see the intended result. With all that being said, this feature is still very cool nonetheless. Here's how to do it! How to Make iPhone Emoji Stickers from a Photo 
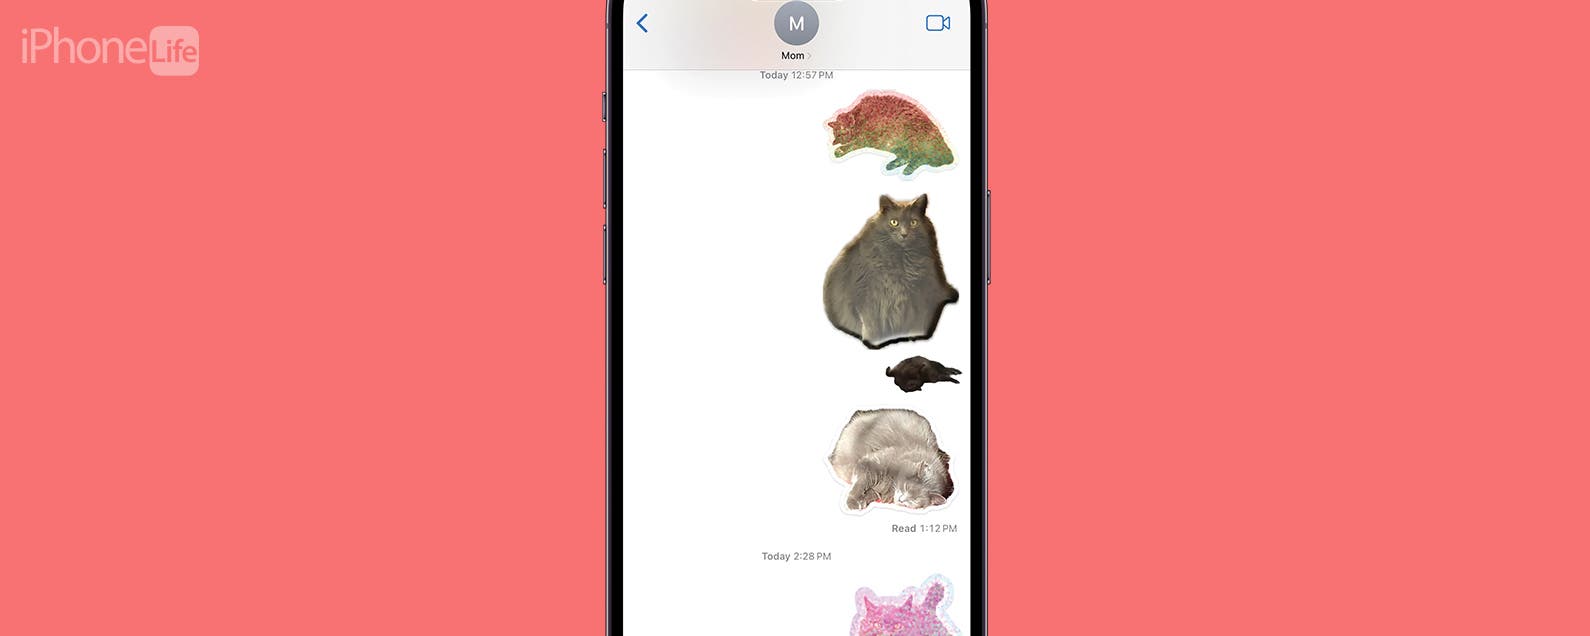
This feature is so much fun to use, and I've already created many stickers of my cat and sent them to my family and friends. If you like being in the know about the latest Apple software updates, be sure to sign up for our free Tip of the Day! * Open the Photos app and select a picture where the subject clearly stands out from the background. Additionally, choose a Live Photo if you want the sticker to be animated. * Tap on the image. * Then, tap and hold for a quick moment directly on the subject to bring up the menu. You will know the subject has been highlighted because there will be a silver line around the border of the subject. * Tap Add Sticker. * Next, if you want to add an effect, tap Add Effect. * From here, you can choose the Original option. * With the Original option, you can also tap Live in the corner as long the photo you chose was a Live Photo to animate your sticker. * You can also choose Outline, which gives your subject a thick white outline, just like a real sticker. * The Comic option will turn your subject into a drawing. * The Puffy option makes the sticker look like a 3D puffy sticker. You can tilt your iPhone to play with the shadows and light to see that it's 3D. * And lastly, there's the Shiny option, which turns your sticker holographic. This one is the most interactive when you move your iPhone directionally. * Tap Done to save your sticker. * Now, to paste a sticker, open the Emoji Keyboard anywhere you can type. * Swipe from left to right to access all saved stickers. And that's how to use the cool new feature called Custom Photo Stickers that comes when you update your iPhone to iOS 17! How-ToiPhoneMessagesPhotosKeyboardLive PhotosCommunicationMaster your iPhone in one minute a day: Sign up here to get our FREE Tip of the Day delivered right to your inbox.
http://dlvr.it/St8dDs

[Video] Generation17 Young Leaders’ Inspiring Journey to Galaxy Unpacked 2023

For the first time ever, Samsung Electronics brought the Generation17 Young Leaders to Seoul, South Korea for an in-person, week-long event. Throughout the
http://dlvr.it/St8BjK

Tuesday, August 1, 2023

How to Turn Off Screen Distance Notifications on Your iPhone (2023)

What to Know * To turn Screen Distance pop-ups off, open the Settings app, tap Screen Time, then tap Screen Distance. Toggle Screen Distance to the left. * Apple introduced the new Screen Distance feature as part of iOS and iPadOS 17. * Screen Distance reminds iPad and iPhone users to hold their devices to reduce eye strain. It's a good idea to leave Screen Distance notifications on for kids, or if you're already suffering the effects of visual health problems like myopia or eye strain. But, here's how to turn off Screen Distance notifications if they're bothering you.  How to Turn Off Screen Distance Notifications on Your iPhone Screen Distance uses your device's TrueDepth camera system to let you know when your iPhone or iPad is fewer than 12 inches away from your eyes. Check out our free Tip of the Day for more great Apple Health app tutorials. Now, let's learn how to turn off vision health pop-ups on your iPhone or iPad.  * Open the Settings app on your iPhone or iPad. * Tap Screen Time. * Tap Screen Distance. * Make sure Screen Distance is toggled to the left, showing gray, which means it's off.  FAQ * Is it bad to have your phone too close to your eyes? Yes, as Scientific American reports, "Ophthalmologists, optometrists, and other eye professionals note a seeming link between myopia, also called nearsightedness, and 'near work'—visual activities that take place at a distance of about 40 centimeters (16 inches) from the eye." If you want to keep these notifications on, make sure to read our article on how to reduce eye strain with screen distance alerts. * How far should my iPhone be from my eyes? Apple recommends that screens should be at least 12 inches from your eyes, while Scientific American recommends at least 16 inches.  * Can phones damage kids' eyes? According to kidspot.com, "Watching screens on smartphones and gadgets for long periods of time raises the risk of eye conditions like myopia and eye fatigue. Children can experience less sleep and are less able to focus. This leads to an unhealthy sleep cycle as kids sleep more during the day and less at night." I hope this article has helped you turn off those annoying Vision Health notifications. Be sure to check back with iPhone Life with any other questions you have about iPad or iPhone notifications! How-ToiPadiPhoneHealthScreen TimeHealth & FitnessMaster your iPhone in one minute a day: Sign up here to get our FREE Tip of the Day delivered right to your inbox.
http://dlvr.it/St24nl