Wednesday, August 31, 2022

Add Emojis to Photos on Your iPhone–the Easy Way! (2022)

If you want to add some fun flair to your photos, adding emojis is a great way to start! As an added benefit, you can also use emojis to hide the face of a friend or child when you want to protect their privacy in photos shared online. In this article, we’ll show you the hidden trick to adding emojis to photos using the iPhone Photos app. How to Add Emojis to Pictures using the Photos App Adding emojis to images in the Photos app is easy, and the trick is that you first need to insert a text box. Then, you can add any emoji you like, rotate it, and change the emoji size. For more fun iPhone photography and photo editing tips, sign up for our free Tip of the Day Newsletter. Now, let's cover how to add an emoji to a photo: * Open the Photos app and select the photo you want to add an emoji to. * Tap Edit in the upper right corner. * Tap the Markup icon. * Tap the plus icon at the bottom of the screen. * Tap Text. This will insert a text box in your photo.  * Double-tap the text box to edit the text field.  * When your keyboard appears, select the emoji you want to add, then tap anywhere outside the text box to close the keyboard. * Tap the emoji on the photo to bring up the text editing menu. * If you want to adjust the size of the emoji, tap the small aA icon in the lower left corner.  * Drag the slider to increase or decrease the size of the emoji.   * You can move the emoji by tapping the emoji and dragging it to a new position. To rotate the emoji, tap and hold the blue dots on the sides at the same time. * Tap Done to close the editing menu once you're finished editing the photo.  * Tap Done one more time to save your changes. Now you can easily add some fun emoji flair to your images! If you have an overwhelming number of photos on your iPhone, check out these easy ways to transfer photos from your iPhone to your computer.  How-ToiPhonePhotosPhoto & VideoMaster your iPhone in one minute a day: Sign up here to get our FREE Tip of the Day delivered right to your inbox.
http://dlvr.it/SXYSxg

Samsung Electronics Unveils Odyssey OLED G8 Gaming Monitor at IFA 2022

Samsung Electronics will unveil the Odyssey OLED G8 (Model Name: G85SB) — another premium addition to the Odyssey lineup — at IFA 2022 in Berlin, Germany,
http://dlvr.it/SXYHR3

Did You Know How To Use Your Galaxy Devices in Optimal Condition?

Samsung is committed to fostering a sustainable future and providing convenient, accessible and affordable ways that help Galaxy users use their devices in the
http://dlvr.it/SXXDt1

Samsung Electronics To Deliver Private 5G Network Solutions to Korea’s Public and Private Sectors

Samsung Electronics today announced the company was selected to provide a diverse selection of its 5G solutions to five government agencies and private
http://dlvr.it/SXWpBV

Tuesday, August 30, 2022

How to Disable Google Maps Fuel-Efficient Routes on iPhone (2022)

In an eco-conscious effort, Google Maps now includes a convenient fuel-efficient routing option. This allows you to view which route consumes the lowest amount of fuel. What's the downside? You don’t always get the shortest path, as the app prioritizes the fuel-efficient option by default. If you're getting inconvenient routes, we’ll show you how to turn off the Google Maps fuel-efficient routing feature. How to Disable Google Maps Fuel Efficient Route Settings For more nifty tips on your iPhone features and popular app settings, sign up for our free Tip of the Day Newsletter. While fuel-efficient routing is good for the planet and for saving on gas, if you’re in a hurry, you might want to take a different path. Here’s how to turn off fuel-efficient routing in Google Maps to ensure you reach your destination as quickly as possible. * Open the Google Maps app. Tap the search bar and enter a destination. (If you're not heading anywhere, just enter a random destination so you can access and adjust route settings.) * Tap Directions to view the route and adjust the route options. * Tap the three dots icon next to your starting location. * From the menu that appears, tap Route Options. * Tap the toggle to disable Prefer fuel-efficient routes. (The toggle is blue when enabled, and gray when disabled.) * Once you've updated your route options, press the back arrow icon to return to your route. * Now for any destination you enter, Google Maps will display the shortest and fastest route by default. If you change your mind later and want to turn fuel-efficient routing back on, follow the steps above and tap the toggle again. Now that you have Google Maps fuel-efficient routing switched off, the app will always display the shortest route, regardless of which one uses more gas. If you're interested, you can also learn how to find someone else's iPhone when it's lost. Then you'll be prepared to help friends and family when someone (inevitably) misplaces their phone! How-ToiPhoneAppsThird-Party AppsGoogle MapsLifestyleMaster your iPhone in one minute a day: Sign up here to get our FREE Tip of the Day delivered right to your inbox.
http://dlvr.it/SXVFqQ

Samsung Electronics Launches 2022 Collection of New Bespoke Products That Elevate the Home Life Experience

Samsung Electronics today announced the release of a new Bespoke product lineup in Europe that will showcase the company’s continued commitment to becoming the
http://dlvr.it/SXT205

Monday, August 29, 2022

[Editorial] Samsung at IFA 2022: Vision Towards the Ultimate Sustainable Home

  The world today faces many challenges. In particular, the pandemic has become a cause for us to back on the various challenges we’ve faced in the past,
http://dlvr.it/SXPFpb

Friday, August 26, 2022

[Photo News] Meet ‘Odyssey City’ at Gamescom 2022 and Experience the Future of Gaming

Gamescom 2022, the world’s largest gaming show, kicked off grabbing much attention in Cologne, Germany on August 24. Gamescom, which was held virtually for the
http://dlvr.it/SXGnMk

Thursday, August 25, 2022

Samsung Develops Prototype ‘Reinvented Toilet’ in Partnership with the Bill & Melinda Gates Foundation

Samsung Electronics today announced that it has completed a project in collaboration with the Bill & Melinda Gates Foundation in response to the Reinvent
http://dlvr.it/SXCdVp

Samsung Electronics Unveils High-Performance 990 PRO SSD Optimized for Gaming and Creative Applications

Samsung Electronics, the world leader in advanced memory technology, today announced the 990 PRO, the company’s high-performance NVMe SSD based on PCIe 4.0.
http://dlvr.it/SX9yQ4

Tuesday, August 23, 2022

Samsung Internet 19.0 Beta is Now Available

Samsung Electronics today released Samsung Internet 19.0 beta,1 which provides new powerful features to help protect users against online threats from
http://dlvr.it/SX5KRJ

Monday, August 22, 2022

Start Your Adventure in the Odyssey Ark’s Multi-Universe

The Odyssey Ark, a groundbreaking gaming screen, was released to make every gamer’s dream come true.   Along with 4K resolution and the 165Hz refresh
http://dlvr.it/SX1nvy

Sustainability Through Durability, Samsung’s 20-Year Commitment

At Bespoke Home 2022 in June, Samsung introduced its vision for sustainable solutions at home based on the Bespoke concept of flexible appliances that adapt to
http://dlvr.it/SX1V0P

Friday, August 19, 2022

Samsung Electronics Breaks Ground on New Semiconductor R&D Complex in Giheung, Korea

Samsung Electronics today broke ground for a new semiconductor research and development complex in Giheung, Korea, aiming to extend its leadership in
http://dlvr.it/SWtxV3

Thursday, August 11, 2022

[Design Story] Going Beyond Innovation: Galaxy Z Flip4 and Galaxy Z Fold4

  The world is ever-changing, and today’s users are adapting quicker than ever. The concepts of innovation and ingenuity are constantly being redefined,
http://dlvr.it/SWRTV0

Wednesday, August 10, 2022

How to Remove a Lock Screen on iPhone in iOS 16

Thanks to iOS 16, you can now customize your Lock Screen by adjusting the clock font, widgets, color, and style. However, you may end up with dozens of abandoned experimental lock screens that clutter up your iPhone. Luckily, it is easy to delete them, and this article will show you how. Related Article: How to Use the iPhone Camera Lock Screen Shortcut (2022) How to Delete Lock Screen on iPhone Once you update to iOS 16 (either in the fall when the public version is released or before then as part of the Apple Beta Software Program), you'll be able to create multiple customized Lock Screens, but you might have had too much fun creating them and now want to delete one. Before following these steps, keep in mind that once you delete a Lock Screen, it will disappear and will not be able to be restored. Here are the steps: * Tap and hold your Lock Screen until you see the Customize and Focus buttons shown below. * Find the Lock Screen you wish to delete by swiping left or right. * Once you are looking at the Lock Screen you wish to delete, swipe up. * Tap the trash can icon. * Tap Delete to confirm that you wish to delete the Lock Screen. I suggest going in and deleting unused Lock screens regularly to avoid having a cluttered iPhone. How-ToiPhoneLock ScreenDevice ManagementMaster your iPhone in one minute a day: Sign up here to get our FREE Tip of the Day delivered right to your inbox.
http://dlvr.it/SWPPZD

New Samsung Galaxy Foldables Drive More Sustainable Future While Providing the Most Versatile Mobile Experience

  Samsung Electronics announces today that it has made progress towards achieving the 2025 sustainability goals for the MX(Mobile eXperience) Business.
http://dlvr.it/SWPCjY

Monday, August 8, 2022

How to Create an iCloud Shared Photo Library in iOS 16 (2022)

iCloud shared albums are seeing a serious upgrade with iOS 16; you can now create a whole iCloud Shared Photo Library that you can invite up to five people to join. It differs from a shared album because participants can do much more with it than before. You can take photos and videos directly in that shared library so you don't need to add it later, and everyone can add, edit, and delete any photo. Here's how to set up an iCloud Shared Photo Library. Related: How to Only Share Manually in Your Shared Photo Library What Is a Shared Photo Library? iOS 16 introduced a new feature called Shared Photo Library, which lets you share a whole iCloud photo library with up to five people. Unlike shared albums, in the iCloud Shared Photo Library, you can record photos and videos right in that library instead of adding them after, and everyone can add, edit, share, and delete. The only requirement for sharing is everyone involved has iOS 16 and no one is part of another Shared Photo Library. For more tutorials on iOS 16, check out our Tip of the Day. How to Use iCloud Shared Photo Library First, make sure the people you want to share your Photo Library with are updated to iOS 16 (iOS 16 is only available as a beta until its official release in fall 2022) and aren't part of any Shared Photo Library already. Then: * Open Settings. * Tap Photos. * Tap Shared Library. You will see Set Up to the right of the text if it's not already set up. * Tap Start Setup. * Tap Add Participants. * Type in the name of the contact you want to add, then tap their name when it appears. * Tap Add. * Once you're done adding participants, tap Continue. * Choose how much of your existing personal library you want to share. You can choose All My Photos and Videos, Choose by People or Date (for if you want to share all the photos from one day or of one person), or Choose Manually. * Tap Continue. * If you're choosing manually, choose the photo you want to share, then tap Add. * Tap Preview Shared Library if you want to preview the library before sharing it. Otherwise, tap Skip and Continue. * If you previewed your library, review it and then tap Continue. * Now, you will officially send invitations to your shared library. Select Invite Via Messages or Share Link. * Send the message or share the link in your desired format. * Now, select whether you want to share photos in this library automatically via Bluetooth when the participants are nearby. Tap either Share Automatically or Share Manually Only. * Tap Done. And there you have it! Enjoy a new and more customizable way to share photos through iCloud. How-ToiPadiPhoneAppsiCloud Photo SharingPhotosPhoto & VideoMaster your iPhone in one minute a day: Sign up here to get our FREE Tip of the Day delivered right to your inbox.
http://dlvr.it/SWGnwh

Sunday, August 7, 2022

Samsung Launches One UI 5 Open Beta Program for Galaxy S22 Series

Samsung Electronics today kicked off its One UI 5 open beta program which will initially be available on the Galaxy S22 series (Galaxy S22, Galaxy S22+ and
http://dlvr.it/SWBKsh

Wednesday, August 3, 2022

Samsung Electronics Unveils Far-Reaching, Next-Generation Memory Solutions at Flash Memory Summit 2022

  Samsung Electronics, the world leader in advanced memory technology, today unveiled an array of next-generation memory and storage technologies during
http://dlvr.it/SVyMt2

How to Create a Weather Lock Screen on iPhone (2022)

With iOS 16, you have various ways of customizing the wallpaper for your Lock Screen. One way you can customize your Lock Screen wallpaper is to display the weather conditions of your current location. Not only will the Weather Lock Screen display your location and its weather conditions, the background will match the conditions. For example, if it's raining in your location, the background will show a rainy sky. Let's check out how to create a Weather Lock Screen on your iPhone. Related Searches: How to Get Weather Alerts on iPhone Why You'll Love This Tip * Have quick access to your current location's weather conditions. * Dodge time trying to access apps to check the weather.  How to Set Up a Weather Lock Screen on iPhone The Weather Lock Screen requires you to enable your Location Services for the Weather app. Other than the general font, colors, and widgets, there isn’t anything for you to customize. If you need a recap on turning your Location Services on, we've got you covered. Even though you can add other locations to your Weather app, it isn’t possible to see dynamic weather for a location that isn’t your current one. This may become an option in the future. Here's how to set up the Weather Lock Screen on your iPhone. * Go to Settings. * Tap Wallpaper. * Tap Add New Wallpaper. * Tap either the Weather icon or the Weather pre-set option. * If desired, you can add some widgets. * Tap Done.   How-ToiPhoneWeatherLock ScreenDevice ManagementMaster your iPhone in one minute a day: Sign up here to get our FREE Tip of the Day delivered right to your inbox.
http://dlvr.it/SVxsqt

Tuesday, August 2, 2022

How to Set Up & Use Shared Tab Groups in Safari on iOS 16

iOS 16 is bringing many new features to the iPhone, including some for the latest version of Safari. One of these, that you can try out now if you've updated to the iOS 16 beta, is Shared Tab Groups, a feature allowing multiple people to collaborate live in a single Tab Group on Safari. Shared Tab Groups are an interesting new feature for Safari that is available on other platforms where you can use Safari 16 as well, such as on a Mac, but here we'll cover how to set it up and use it on your iPhone. This feature allows you to create a Tab Group that invited people can view and add to, for real-time collaboration and planning of events or just to make it easier to share fun web pages with friends instead of texting them URLs. For more new ways to use Tab Groups in iOS and Safari 16, check out our guide on customizing Tab Group Start Pages and be sure to sign up for our free Tip of the Day newsletter for more guides on the newest features on your Apple devices. How To Set Up Shared Tab Groups Setting up and using a Shared Tab Group is easy, but some of the options currently feel hidden or at least unintuitive. I am hoping that the user experience will improve before the final release of Safari 16. Once set up, the feature seems to work well, however, so let's break down how to set it up step-by-step. * With Safari open, tap the tabs button in the lower right corner. * Now, tap the button in the bottom center that shows the name or description of the tab group you are currently in. * Swipe up on the sheet that opens on the bottom to see all the options. * Tap the option labeled New Empty Tab Group. * Enter a name for your Tab Group in the text field and then tap Save. * Now you'll be on the tabs screen of the new group. To make it into a shared group, tap the share button next to the group name. * A typical share sheet will open, allowing you to share a link to join the group in the usual ways. The simplest way is to share via the Messages app, so find a recommended chat to share to, or tap the Messages to send to someone else. I picked a suggested group chat with two of my coworkers. * 
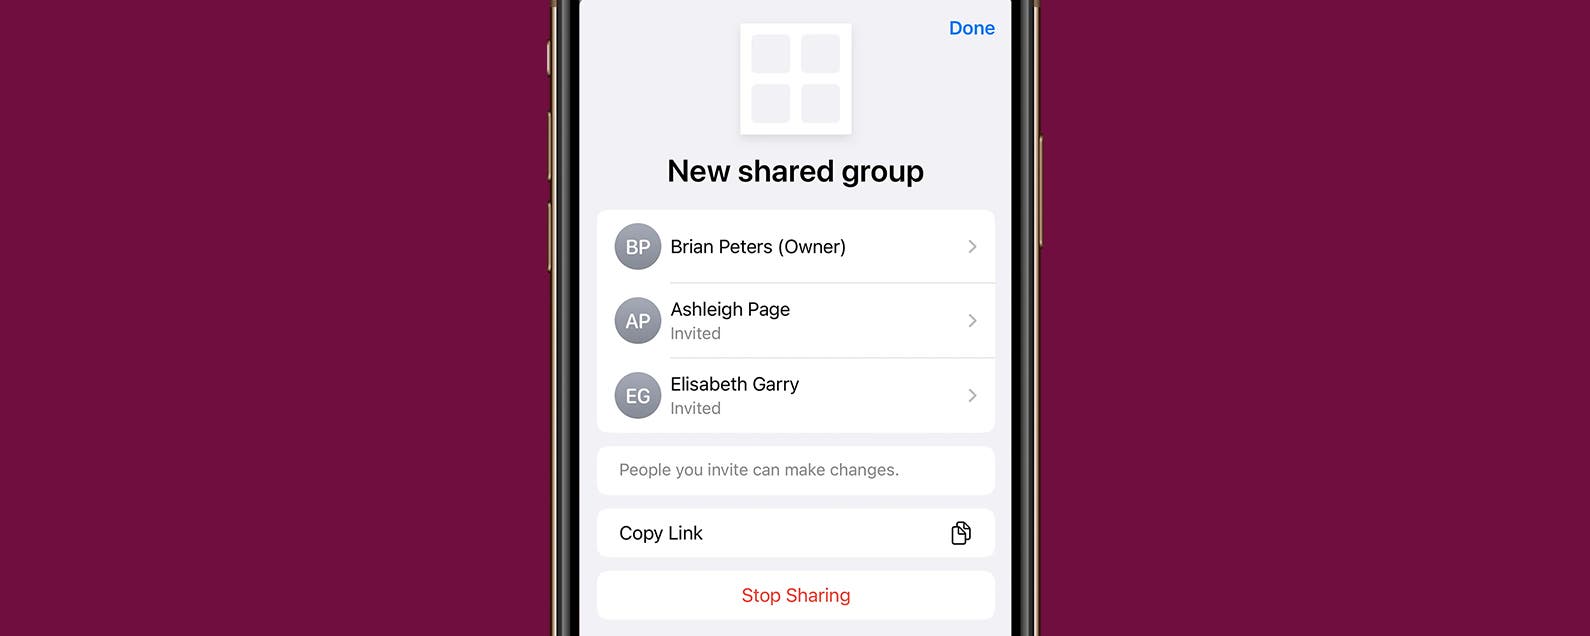
After sharing an invitation to the tab group, the share button will be replaced with the icon below, showing small indicators of the people you've invited to collaborate. You can tap this button for tab group options. * The menu here gives you easy access to communications with the members of the shared group, such as sending a text message, or making a group audio or video call. You can also tap the Manage Share button if you want to remove people from the group. * On this screen, you can tap members of the group to revoke their access, or copy the link to share with group members if they have lost track of it. Confusingly, however, this is not where you go if you want to add more people to the group. Read on to see how to do this. * Sending new invitations to an already existing Shared Tab Group is the aspect of this feature that I found the most confusing. In my opinion, the means to do this is not made clear at all. In particular it should be noted that using the Copy Link function from the previous screenshot will not allow any access to people that aren't members of the group, which is what I initially assumed it would do. To add a new person to the group, return to the tabs screen and open the Tab Groups sheet by tapping the name of the group in the bottom center of the screen. * On this sheet, long press the name of the shared group. * This will open a small menu allow you to, among other things, share the Tab Group. In this menu simply tap Share. That's it! This opens a share sheet just like the one used when you initially shared the Tab Group and works in exactly the same way.  It's quite easy to do once you know where the option is, but I found it obtuse and difficult to locate or even to remember where the option was hiding after only a few days. Using the Shared Tab Group works exactly like using any Tab Group, with the exception that all people in the group can use it. You'll see tabs and pages opened by others and what tab they are currently looking at, and they'll see the same for you. Saving a page as a Favorite will make it appear in the Group Favorites section of the start page for everyone, and pinning a tab will pin it for everyone. This is an interesting and potentially useful feature for collaboration, but be careful to switch back to one of your non-shared tab groups before you do anything that you want to be private. How-ToiPhoneAppsApple AppsSafariiOSCommunicationMaster your iPhone in one minute a day: Sign up here to get our FREE Tip of the Day delivered right to your inbox.
http://dlvr.it/SVx2SF

New Unsend a Message Feature: Can People Still See It? (2022)

This year, Apple introduced iOS 16 at their annual WWDC conference. One feature of iOS 16 is that you will be able to unsend a text message in the Messages app. However, will recipients of your text messages be able to see them once you delete them? We will dig further into this question for an answer. Related Article: How to Retrieve Deleted Text Messages on iPhone (2022 Update) Will People Still View Text Messages after Unsending Them? Whether or not people can see your messages after unsending them depends on the situation. For example, if you send SMS/MMS messages on your iPhone the unsend feature will not work, allowing people to still view your messages. The option to unsend won’t even appear in SMS threads. With SMS/MMS messages, they go through your carrier’s network. Therefore, Apple cannot control what happens to these messages once you’ve pressed “Send”. The unsend feature also won’t work in iMessages unless everyone in the conversation is using iOS 16. While the Undo Send feature might seem to work on your end, recipients who don't have iOS 16 won't be able to see that you've deleted the text. Therefore, the original message will still remain on their end regardless of your attempts to unsend. Since iOS 16 will drop support for the iPhone 6s, the iPhone SE (1st generation), and the iPhone 7 models, a few people will be stuck with iOS 15. iPhoneiMessageCommunicationMaster your iPhone in one minute a day: Sign up here to get our FREE Tip of the Day delivered right to your inbox.
http://dlvr.it/SVtsvM

Monday, August 1, 2022

Samsung Electronics Publishes Paper in Nature Communications on Multifunctional Artificial Muscle Actuator

  Samsung Electronics today announced that Dr. Bongsu Shin (co-first author) at Samsung Research1 published a paper titled “Actuating Compact Wearable
http://dlvr.it/SVqsPT

Can You Use AirPods on a Plane? (2022)

If you just bought a pair of AirPods and are preparing for airplane travel, you have probably wondered if you can use these wireless earbuds on the plane. You may also have wondered if AirPods can be used in Airplane Mode when you're not able to make calls or text. Let's take a look at using AirPods on the plane.  Related Article: The Quickest Way to Turn Announce Messages with Siri Off & On Can AirPods Be Used on a Plane? Can you use AirPods on an airplane? The quick answer is yes. In 2013, the Federal Aviation Administration made it ok for passengers to carry portable electronic devices on a flight. Since AirPods are considered a portable electronic device, you won’t have any issues. However, you still have to put your iPhone in Airplane Mode to disable the cellular radio. As soon as you enable Airplane Mode on your phone, you can turn your Bluetooth back on. As a result, you will be able to use your AirPods during the flight. If available, you can even connect to your flight's onboard Wi-Fi, but you won't be able to make voice calls, even over Wi-Fi, due to FCC regulations that ban airborne calls using cell phones.  Airline Policies on AirPods While the FAA permits the use of AirPods during flights, some airlines have banned or limited the use of Bluetooth devices on board. One reason is that some airlines have older aircrafts that are more vulnerable to Bluetooth waves than their newer aircrafts. Another reason behind bans is that Bluetooth waves can sometimes alter the navigation system of an aircraft. As a reference, we have a chart that lists some of the most popular airlines and their policies regarding AirPods.  Airline AirPods Allowed? Alaska Airlines Yes American Airlines Yes Notes: Cannot use during takeoff and when landing. Can be used with the airline's inflight entertainment app.  Delta Airlines Yes Note: Cannot use during takeoff and when landing. Envoy Air Yes Frontier Airlines Yes Note: Cannot use during takeoff and when landing. Hawaiian Airlines Yes Notes: Cannot use during takeoff and when landing. Can be used with the airline's inflight entertainment app.  JetBlue Airways Yes SkyWest Airlines Yes Southwest Airlines Yes Notes: Cannot use during takeoff and when landing. They can be used with the airline's inflight entertainment system.  Spirit Airlines Yes United Airlines Yes Note: Can be used with the airline's inflight entertainment app in some flights. AirPodsBluetoothTravelMaster your iPhone in one minute a day: Sign up here to get our FREE Tip of the Day delivered right to your inbox.
http://dlvr.it/SVqjV1