Friday, December 30, 2022

Samsung Appoints Hubert H. Lee To Lead Its MX Design Team

  Samsung Electronics today announced the appointment of Hubert H. Lee as EVP and Head of its MX (Mobile eXperience) Design Team. Having previously worked
http://dlvr.it/Sg74dB

Wednesday, December 28, 2022

Samsung Electronics Launches Newsroom in the Republic of Uzbekistan

Samsung Electronics today announced the launch of Samsung Newsroom Uzbekistan, which will serve as the official news source of Samsung Electronics for local
http://dlvr.it/Sg2Rl4

Samsung Electronics C-Lab Startups To Debut at CES 2023

Samsung Electronics today announced it will be showcasing new innovative projects developed through its C-Lab program1 at CES 2023. To the public, Samsung will
http://dlvr.it/Sg299l

Tuesday, December 27, 2022

Make the Most of Your Year-End Festivities With Powerful Audio From Samsung’s Soundbar and Sound Tower Devices

  The end of a year is the perfect time to gather friends and family and celebrate the year that has passed as well as the one that is to come. When it
http://dlvr.it/SfzfrG

Sunday, December 25, 2022

Samsung Electronics and Galaxy Community Generate Over USD 10M to Date To Help the World Achieve the Global Goals

Samsung Electronics today announced the company has reached a significant milestone in its journey to advance the Sustainable Development Goals (SDGs), or the
http://dlvr.it/SfvZxl

Friday, December 23, 2022

[Interview] Samsung Art Store x Hyun Kim: Connecting With Your Inner Child Through Art

Samsung Art Store is a remarkable service for The Frame, the award-winning lifestyle TV that gives viewers new ways to enjoy artwork from the comfort of their
http://dlvr.it/SfqTBd

Wednesday, December 21, 2022

Apple Watch Ultra Review: Apple Lied About the Best Feature

What has 60 hours of battery life, a built-in dive computer, emits an 86-decibel emergency alarm, and costs a whopping $799? The new Apple Watch Ultra! Rumors of a more rugged Apple Watch have been circulating for years, yet the dramatic announcement last fall (complete with life and death rescue scenes) still managed to shock fans worldwide. As a die-hard Apple Watch fan, I bought this top-of-the-line smartwatch without a second thought. Though I may not be the target demographic for this extreme watch, I have no regrets about my extravagant purchase. Larger than Life The Ultra is the biggest Apple Watch to date, not only in size but also in technological scope. With a display just under two inches diagonally, the Ultra is thicker and heavier than any other Apple Watch ever made. I was originally disappointed that the Ultra was only available in a 49mm case because it is a big jump from my 41mm Series 7—it is almost as tall as my wrist is wide. However, it didn’t take long for me to adjust, and the large, bright display makes navigate apps so much easier and even type messages thanks to the full keyboard. Plus, if you already had the larger version of one of the previous Apple Watch models, your old bands will still fit this watch! Although I wouldn’t call the Ultra ugly, it is clear that Apple prioritized functionality over aesthetics, offering this wearable only in aerospace-grade titanium for durability and resistance to corrosion. In addition to being hard to scratch, the matte silver color is perfect for camouflaging imperfections, while the orange accents give the watch a unique look. All-New Action Button The two orange accents are on the Digital Crown and the new Action Button. The Apple Watch Ultra is only available with cellular capabilities, which is another reason it is so expensive. Generally, the GPS only models are $100 cheaper, and it is a shame that Apple didn’t give us the option this time. Not only does the hardware cost more, you also need to get a cellular plan through your provider. This is usually only $5-10 per month but it is still an extra expense that many might not need. All other Apple Watch models that are GPS + Cellular have a red circle on their Digital Crowns. The Ultra’s is orange, presumably to match the Action Button. The Action Button is new to the Apple Watch Ultra and can be customized to help you quickly access your favorite feature. If you are a hiker, you may want to set it to Waypoint, which will mark your current location in the Compass app or Backtrack, which will help you find your way back the way you came. The other options include Workout, Stopwatch, Dive, Flashlight, or Shortcut. Shortcut takes you to a list of shortcuts for a specific task or a series of complex tasks. I picked Shortcut because I have many smart appliances controlled by my Home app and I love that I can use the Action Button to automate my bedtime routine. This includes turning off lights, setting an alarm, and even turning on my Sleep Recorder app that I would otherwise forget about: all with a click of a button! Of course, you can also turn it off if you are prone to accidentally tapping it, which is a nice touch. Unprecedented Battery Life Although I only needed to charge my Apple Watch Series 7 once every 22-24 hours, the promised 60 hours of battery life on the Ultra was hard to believe. I decided to test it and go as long as I could without charging right out of the box. While I wasn’t particularly active during this period, it was still hard to believe that I didn’t have to charge the watch for almost 75 hours! This game-changing battery life alone justifies the steep price tag for me. However, with the luxury of charging only twice a week, I have noticed that I am more likely to end up forgetting to charge until I get a low battery warning. While this isn’t a legitimate complaint, it can get me into a pickle if I’m relying on my watch for directions or communication. I also haven’t gotten a chance to test the battery life while doing more battery-intensive activities such as diving or using the Backtrack feature or the emergency siren while lost on a hike. While I hope I never need to use one of the many life-saving features of the Apple Watch Ultra, having them on hand brings peace of mind to me and my loved ones. Pros: * 60+ Hour Battery Life * Premium Features Including a Built-in Dive Computer and 86 Decibel Emergency Siren * Fits Watch Bands Compatible with Larger Versions of Older Apple Watch Models * New Customizable Button * Cycle Tracking Via Temperature Sensor * Brighter and Larger Screen * Crash Detection * Rugged and Resistant to Scratches or Damage Cons: * High Cost * Large Size and Weight Make the Watch Bulky * Only One Color and Material Option * No Option for GPS Only * Cycle Tracking can be Intrusive Final Verdict As an Apple Watch enthusiast, this is definitely the watch that I’ve been waiting for. I am impressed with the unbelievable battery life that rivals competing wearables, the new customizable Action Button, and the safety features such as Crash Detection that alerts authorities and your emergency contact in case of a car accident. However, the size and price of the Ultra will not necessarily appeal to the everyday Apple Watch user. Master your iPhone in one minute a day: Sign up here to get our FREE Tip of the Day delivered right to your inbox.
http://dlvr.it/SfjZC1

Tuesday, December 20, 2022

Do You Need an iPhone to Connect to HomePod?

The HomePod is one of the best smart speakers on the market. The Google Home and Amazon Echo offer similar experiences, and both are compatible with any phone. What about the HomePod? Do you need an iPhone to connect to HomePod? The short answer is yes, but there are some caveats we'll go over below. Jump To: * Do You Need an iPhone to Set Up HomePod? * Can an Android Phone Connect to HomePod? * How to Use HomePod without a Phone Do You Need an iPhone to Set Up HomePod? While an iPhone specifically is not required, you will need an iOS 15 (or newer) or iPadOS 15 (or newer) capable device to get started with your HomePod. The setup process can be done on iPhone, iPod touch, or iPad. If you’re having trouble with the standard setup screens, you can also use the Home app to set up the device. If you want to get the most out of your HomePod, be sure to sign up for our Tip of the Day newsletter. Can an Android Phone Connect to HomePod? Android phones cannot connect to HomePod in the same way that iPhones can. However, if you download a third-party app on your Android device that enables AirPlay, you can stream music and other audio to the HomePod. That is the extent of Android’s compatibility with the HomePod. For the HomePod's initial setup process, you will need an Apple device. As stated previously, any device that runs iOS 15 (or newer) or iPadOS 15 (or newer) will be able to get your HomePod ready to use. How to Use HomePod without a Phone After the initial setup, HomePod is designed to be used independently. While an iPhone or iPad will certainly allow you to get the most out of your new smart speaker, you do not necessarily need them to use it. You can still ask Siri questions and she’ll give you the answers, and as long as you have an active Apple Music subscription you can listen to music from your HomePod without your iPhone or iPad. If you have more than one, we can also show you how to pair HomePod minis to turn them into stereo speakers! HomePodHomePod SoftwareDevice ManagementMaster your iPhone in one minute a day: Sign up here to get our FREE Tip of the Day delivered right to your inbox.
http://dlvr.it/SfdHMQ

Monday, December 19, 2022

[Infographic] The Toughness Evolution: Exploring the History of Samsung’s Ruggedized Devices

The recent launch of the Galaxy XCover6 Pro and Tab Active4 Pro is the result of years of innovation. Every time a new model is released, Samsung listens
http://dlvr.it/Sfcsrc

London Shoppers Experience the Future of Gaming With Samsung Odyssey Ark and Gaming Hub

Samsung Electronics has collaborated with iconic department store Selfridges to offer shoppers in London an exclusive and exciting opportunity to experience
http://dlvr.it/Sfb7gJ

Friday, December 16, 2022

Streamline Your Festivities This Winter With Samsung’s Smart Home Appliances

The winter season is one of the most enjoyable times of the year, seeing friends and families come together to give thanks, celebrate the year that has passed
http://dlvr.it/SfS0Bj

Putting Data Transparency Back in Consumers’ Hands With the Latest Galaxy Security and Privacy Dashboard

In our increasingly connected world, data powers almost everything we do. It affects the way we search, shop and show up online, and it even influences the way
http://dlvr.it/SfRlKX

Thursday, December 15, 2022

World Champion Houston Astros Draft Samsung To Elevate Minute Maid Park With State-of-the-Art Technology

  Samsung Electronics and the Houston Astros today announced they will digitally enhance Minute Maid Park with display technology designed to further
http://dlvr.it/SfQcCG

[Editorial] Connecting Innovation and Sustainability: Samsung’s Focus for CES 2023

We are living in a world that is very complex and changing rapidly.   We now have to navigate uncharted waters where everything is changing — from
http://dlvr.it/SfNbVS

Tuesday, December 13, 2022

Samsung Electronics Launches Newsrooms in Sweden and Norway

Samsung Electronics today announced the launch of Samsung Newsroom Sweden and Samsung Newsroom Norway, which will serve as the first-ever official news sources
http://dlvr.it/SfHPbr

How to Use Scribble on iPad (iPadOS 16)

Scribble is a super fun feature available on the iPad that allows you to use your Apple Pencil to handwrite text into any text field you would normally use the keyboard for, and it will automatically turn into typed text. Not only is the feature surprisingly accurate at picking up even messy handwriting, but there are also written commands that you can perform, like slashing through a word to highlight, that make this feature very convenient! Why You'll Love This Tip * Use your Apple Pencil for handwriting text on your iPad. * Learn quick and easy written commands to master your handwriting skills on the iPad. How to Use Scribble Function on iPad A few key things to note before we get started, be sure you have updated to the latest iPadOS. Scribble will work with any model of iPad that supports either Apple Pencil 1 or Apple Pencil 2. How to Turn Scribble On or Off To turn the Scribble feature on or off, * On your iPad, go to Settings. * Tap Apple Pencil. * Toggle Scribble on or off. It will be green when enabled and gray when disabled. * Additionally, if you'd like to practice Scribble before you get started, tap Try Scribble. You will be walked through a very simple tutorial that shows you the basics! How to Handwrite with Scribble and Use Scribble Shortcuts Now that you have Scribble enabled on your iPad, here's an example of how you might use it in practice! If you like tips about using your Apple devices, be sure to sign up for our free Tip of the Day! Here's Scribble in action: * With an Apple Pencil, hand write messages in the Message app and watch them auto-convert to typed text. * Fill in forms with Scribble.  * Use the Scribble Pen in the Notes app to convert to typed text automatically. The Scribble Pen is closest to the Undo/Redo buttons with a small "A" on the side.  * This is what writing with the Scribble Pen in the Notes app looks like: * Delete text by scribbling it out with a wavy pen stroke. * Select text by drawing a line through it or a circle around it. * Join or separate two characters with a space by drawing a vertical line between them. * Make space between letters by tapping and holding between two characters. They will automatically separate after a moment. And that's a quick crash course on how to use Scribble on your iPad. Do be warned that Scribble still does not work with every app. However, since the feature debuted in 2020, more and more apps support Scribble. I love anything that makes my iPad feel like a high-tech journal, and the Scribble feature might just be the best one yet! How-ToApple PencilStylusesScribbleProductivity & BusinessMaster your iPhone in one minute a day: Sign up here to get our FREE Tip of the Day delivered right to your inbox.
http://dlvr.it/SfGylw

Samsung Electronics Receives the 2022 SEAL Business Sustainability Award for Repurposing Ocean-Bound Plastic

Samsung Electronics announced that the company was named a winner of the 2022 SEAL Business Sustainability Awards for transforming discarded fishing nets into
http://dlvr.it/SfFlr6

Friday, December 9, 2022

7 Ways to Live Longer Using Your iPhone

Your iPhone can help with far more than communication and entertainment. We all know the downsides of too much screen time, and to help, Apple’s health and wellness updates have focused on helping you build better habits and track your mental, emotional, and physical health. Let’s cover some simple ways to track your fitness and nutrition goals, monitor health symptoms, get better sleep, reduce stress, and make use of your iPhone’s emergency features. 1. Add Crucial Medical Information to Your iPhone’s Lock Screen If you have a medical issue such as a cardiac condition, severe allergy, or problem that may leave you unable to communicate with medics and other first responders, it’s important to have a simple method to convey your situation so you can receive appropriate help. While a medical alert bracelet or a medical ID card in your wallet may help in an emergency, your iPhone is another tool to ensure you receive the care you need. To set up your Medical ID, open the Health app, tap your profile icon, tap Medical ID, and tap Edit. Now you can add any medical conditions, notes, and allergies. Scroll down, tap the toggle to show your Medical ID on your Lock Screen, and tap Done to save. First responders can then view this information by tapping the Emergency button on your Lock Screen. 2. Add Emergency Contacts for Automatic Notification There’s no denying that the Emergency SOS on your iPhone Lock Screen is a life-saving feature. Many don’t realize that if you add emergency contacts, the service calls the emergency service departments and alerts your emergency contacts simultaneously. Those saved contacts will receive a message with your current location, warning them that you have called emergency services. Apple makes it incredibly easy to add these contacts. Just open the Health app, tap your profile icon, tap medical ID, and tap Edit. Now you can scroll down and tap Add Emergency Contact and select people from your Contacts list. Tap Done to save your new emergency contact. 3. Set Up Wind Down Shortcuts & Sleep Reminders for Better Sleep Not getting enough sleep can compromise your health and safety in ways ranging from increased risk of heart disease to car accidents. Wind Down shortcuts and Sleep Reminders can help you get the consistent, quality sleep you need each night. Wind Down shortcuts allow you to quickly access the apps you might use as you wind down before bed each night, such as a calming playlist, guided meditation, or podcast. Those shortcuts will appear on your Lock Screen at a set time before your bedtime goal each night, so you don’t have to open your phone and scroll past potentially distracting apps and notifications to find them. To enable Wind Down shortcuts, open the Health app, tap Browse, select Sleep, and tap Sleep Schedule to set the time you’d like to go to bed each night. Then tap Wind Down Shortcuts to add shortcuts to your preferred apps. Select Options and tap to enable the Sleep Reminders toggle to notify you when Wind Down is about to begin for that day. 4. Track Your Workouts & Activity to Crush your Fitness Goals Did you know regular movement greatly decreases the chance of premature death? If you have a daily step count goal, or distance you’d like to swim or cycle, you can track your daily activity in your Health app. When you carry your iPhone, it will log the distance you’ve covered, and if you log workouts on a paired Apple Watch, you can log dozens of different types of movement. You can view all your activity in the Fitness app, or in the Health app by tapping Browse, then Activity to view all your tracked activity data. You can also scroll down and tap an activity category to add specific workout data, such as a specific cardio or strength workout. 5. Track Your Blood Pressure, Walking Steadiness & Nutrition If you have a specific area of health you’re interested in tracking, you can likely do so in your Health app. When you open the Health app and tap Browse, you’ll see various Health categories, such as Heart, Mindfulness, Nutrition, and Symptoms. Tap a category to start tracking or setting specific health goals. For example, you can use the Symptoms category to help you track recurring issues to show a health professional, such as chest tightness, headaches, or nausea. In the end, the specific areas you’d like to track will relate to your current health goals and concerns. 6. Reduce Stress by Enabling Focus Modes Do your news notifications or incoming messages give you regular cortisol spikes? Your iPhone’s generic Do Not Disturb mode has been rolled into a more customizable Focus mode feature. With Focus modes, you can pause notifications from specific apps or contacts for a period of time to help avoid distractions. You can set these Focus modes manually or have them activate while you’re at a specific location or during a particular time of day. Many people have created Focus modes to reduce notifications while driving, exercising, or spending quality time with family and friends. To create a Focus mode, open the Settings app, tap Focus, and tap the plus icon to create a new Focus category. 7. Increase Productivity by Setting Time Limits for Addictive Apps! Setting daily screen time limits for apps you often mindlessly scroll through can increase your productivity and reduce stress. I used to go through cycles of deleting social media apps on my iPhone to make them less readily accessible, only to find myself re-downloading them a week later (like a strict diet I couldn’t stick to). With screen time limits, you can set a daily time limit, and after you’ve spent the allotted amount of time on that app, your iPhone will lock you out until the next day. To set time limits for an app, open Settings, tap Screen Time, tap App Limits, and tap Add Limits. Then, select an app and the amount of time you’d like to set as a daily limit. Top image credit: JabaWeba / Shutterstock.com How-ToApple WatchiPhoneHealthHealth & FitnessMaster your iPhone in one minute a day: Sign up here to get our FREE Tip of the Day delivered right to your inbox.
http://dlvr.it/Sf3ppJ

Thursday, December 8, 2022

Can a MacBook Pro Charger Fast Charge an iPhone or iPad?

Fast charging is a feature that Apple introduced with the iPhone 8. It allows you to recharge your device faster than ever before. Fast charging requires a specific power adapter, but what if you already have a MacBook Pro charger? In this article, we’ll explore which chargers are compatible with your iPhone and iPad and what you can use to fast charge your phone. Jump To: * What Is Fast Charging for iPad & iPhone? * What Do You Need to Fast Charge Your Devices? * Can You Use a MacBook Pro Charger with an iPhone or iPad? What Is Fast Charging for iPad & iPhone? As the name implies, fast charging allows you to recharge your iPhone or iPad quickly. It can restore your device’s battery to 50% in about 30 minutes. This can be especially useful if you’re in a hurry and need to charge your phone before you leave. If you would like to learn about more useful iPhone and iPad features, be sure to sign up for our free Tip of the Day! What Do You Need to Fast Charge Your Devices? The first thing you need to fast charge your iPhone or iPad is a USB-C to Lightning cable. USB-A to Lightning cables will not be able to fast charge. The second thing you will need is either an Apple fast charging block or an Apple USB-C power adapter with the right wattage. You will need a power adapter with at least 20 watts or more to fast charge the iPhone 12 and later. For earlier iPhone models, you can use an 18W charger. For iPads, the 20W USB-C power adapter will charge your device faster than the standard charger. However, if you would like to optimize the charging time of your iPad, a 30W power adapter is recommended. Can You Use a MacBook Pro Adapter with an iPhone or iPad? The short answer is yes, you can use a MacBook Pro charger to fast charge your iPhone or iPad. Since Apple began using USB-C power adapters with the 2016 MacBook Pro, you can use this power adapter to fast charge your iPhone or iPad. According to Apple, the following devices are compatible with their USB-C MacBook Pro chargers: * iPhone 8 & newer * iPad mini (5th generation & newer) * iPad Air (3rd generation & newer) * iPad Pro 10.5-inch * iPad Pro 11-inch (1st generation & newer) * iPad Pro 12.9-inch (1st generation & newer) As stated previously, you will also need a USB-C to Lightning cable to use fast charging. So if you already have a MacBook Pro with a compatible charger and cable, there's no need to purchase any extra accessories to use fast charging! You can also use most MacBook power adapters to fast charge your Apple Watch as well, as long as you have an Apple USB-C Magnetic Fast Charging Cable. Top image credit: nodi.jpg / Shutterstock.com How-ToiPadiPhoneCables & AdaptersChargingLifestyleMaster your iPhone in one minute a day: Sign up here to get our FREE Tip of the Day delivered right to your inbox.
http://dlvr.it/Sf17nJ

Wednesday, December 7, 2022

MacOS Ventura—The Good, the Bad & the Ugly

After a month of hands-on testing, David and Donna share their experiences with macOS Ventura. From Stage Manager to continuity camera to the new Freeform app, they share everything they love and hate. Other topics include the viral Lensa AI app for creating artistic avatars, the rollout of iOS 16.2, and the importance of tracking medication interactions with the Health app. Click here to listen and subscribe. If you like what you hear, be sure to leave a review. And remember to tune in every other week to hear our editors share with you the latest Apple news, best apps, iPhone tricks, and coolest accessories. Limited-time offer! Claim 30% off your subscription to iPhone Life Insider when you visit iPhoneLife.com/PodcastDiscount. This episode was brought to you by: Matias Wired Aluminum Keyboard When Apple discontinued its wired keyboard, Matias stepped in to provide one of comparable price and arguably better quality. The built-in hub with multiple USB ports is great for connecting your wired mouse and other devices, and the full numeric keypad is a lifesaver for those who regularly crunch numbers. This keyboard is designed with compatibility in mind! It works with legacy software on older systems, but it also comes with a free USB-C adapter for newer Macs. Check out this and other great options from Matias! Question of the week: What are your favorite features of macOS Ventura? Send us your Lensa AI avatars! What do you think of the app? Are you on team Apple HomePod of Amazon Eho? Let us know at podcast@iphonelife.com. David & Donna's AI avatars are here: Articles referred to in this episode: * How to Check Medicine Interactions in the Health App (iOS 16) * How to Find, Manage & Cancel Subscriptions on iPhone (2022 Update) * Lensa AI ($29.99/year, 7-day free trial) Useful links: * Join the iPhone Life Facebook Group * Insider walk-through: get a sneak peek of members-only benefits * Get the Insider discount for Podcast Listeners * Sign up for the free Tip of the Day Newsletter * Email the Podcast * Subscribe to iPhone Life magazine NewsiPhoneApple EventsApple StoreEducationMaster your iPhone in one minute a day: Sign up here to get our FREE Tip of the Day delivered right to your inbox.
http://dlvr.it/SdyN9t

Tuesday, December 6, 2022

Samsung Electronics and NAVER Team Up To Develop Semiconductor Solutions Optimized for Hyperscale AI

  Samsung Electronics, the world leader in advanced memory technology, and NAVER Corporation, a global internet company with top-notch AI technology,
http://dlvr.it/Sdvwrl

Hidden Tips & Tricks for Your iPhone (iOS 16)

Our iPhones are capable of so much, yet many of us only scratch the surface with our daily use. Expanding your iPhone skills doesn’t mean you have to create feature-length movies or become a high-level app developer. You can simply learn hidden features that make your daily tasks easier. So, let’s take a look at the best hidden iPhone tricks to make your iOS use a little easier and a lot more fun. Have Some Fun 1. Send Your Message in Style Apple wants to let you express yourself in messages, made clear with the advent of emojis, memojis, animojis, and every kind of ‘moji you can think of. But did you know you can animate your messages themselves? Type in the message you want to send in an existing chat or enter a contact to create a new message thread, write your message, then long press on the blue Send arrow. You’ll be treated to a menu of fun animation options, and if you tap the Screen tab and swipe right, you’ll get even more, from balloons to fireworks and more. 2. Caption Your Photos Captioning your shots is as handy as it is enjoyable. Captions help your iPhone identify people, places, and things in your photos. They make it easier for you to search photos by name or phrase, and for screen readers to describe the picture. You can also add your own thoughts and memories, just like in a scrapbook or journal. To add a caption, just swipe up on a photo, tap the field that says Add a Caption, type in your caption, then hit done. Swipe down to close out. To view the caption, just swipe up on that photo again. Take a Load Off 3. Use Siri to Share Using Siri to share is not only an easier way to send pictures, videos, and websites, but it also offers those with limited mobility a much better sharing option. Not every app has Siri sharing enabled, but many do. To share using Siri, just open the webpage, photo, or other content you want to share, and say, “Hey Siri, share this with...” then the name of the contact you want to send it to. Siri will have you confirm and show you a draft of the message. Either say yes to confirm or tap the send arrow yourself. Don’t worry, if Siri sharing isn’t possible, your iPhone will let you know! 4. Clean Up Your Home Screen Having too many app icons on your Home Screen can slow you down or even pull you off track entirely. We usually want to have a lot more apps on our iPhones than we use on a daily basis (for example, I keep Uber even though I only use it when traveling), and we don’t need them all on our Home Screens. Luckily, you can remove an app icon from your Home Screen but still find it in the App Library. All you have to do is long press on the app icon in question, tap Remove App, then tap Remove From Home Screen. Now, it’ll be off your Home Screen and in your App Library. 5. Personalize Your Font Size by App 
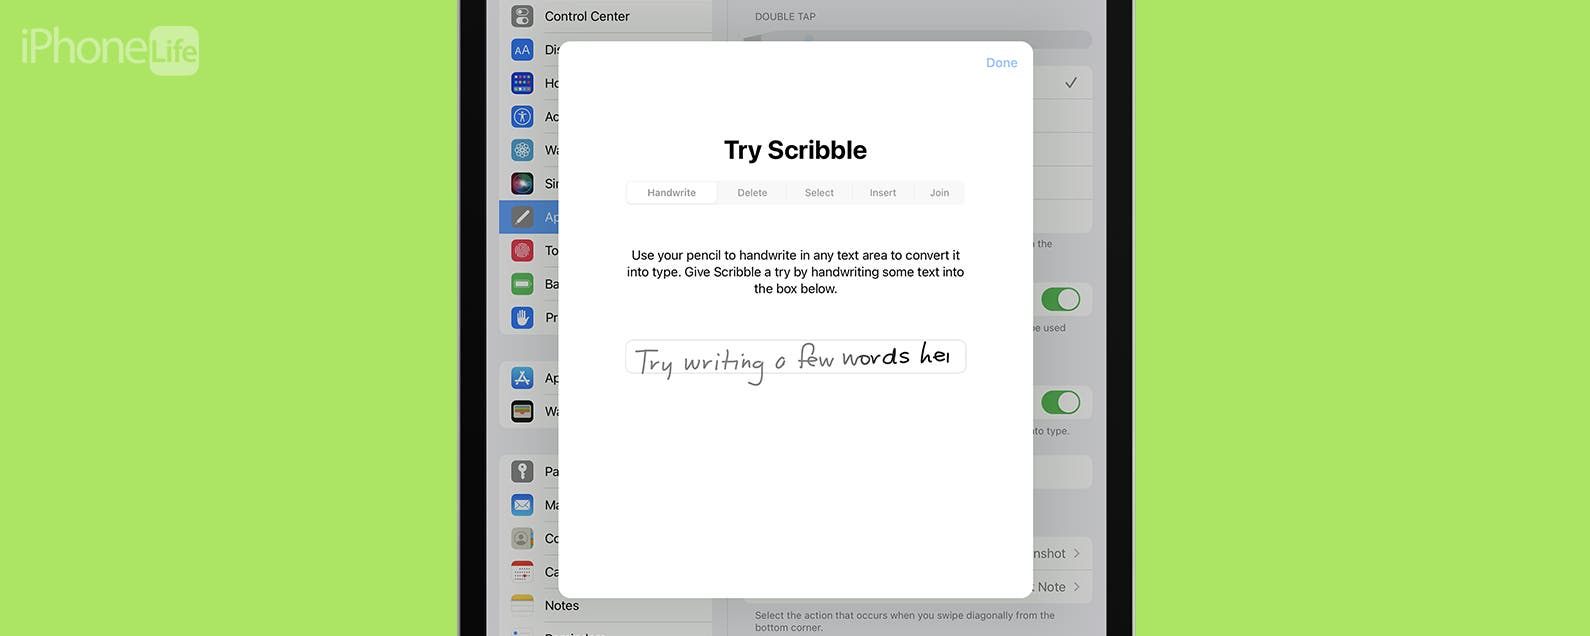
Each app has its own default font size, but you might want to adjust them individually, rather than do an all-over zoom on your iPhone screen. First, you’ll need to add the text size option to your Control Center. In Settings, tap Control Center. Toggle on Access Within Apps. Scroll down to the More Controls section and tap the green arrow next to Text Size. Now, when you open an app, swipe to open your Control Center, and tap the text icon (two A’s). A slider will appear on your screen, and you can swipe up or down to adjust your text size within that app. 6. Write Notes from Your Lock Screen Frequently, I’ll want to write a note so quickly that unlocking my iPhone can make the difference between remembering what I wanted to say and forgetting it forever. Luckily, you can circumvent your Lock Screen and open the Notes app directly from your Control Center. In Settings, tap Control Center, then tap Notes. Next, in Settings, tap Face ID & Passcode and toggle on Control Center so you can access your Control Center when your iPhone is locked. Now, all you have to do is swipe to open the Control Center and press the Notes app icon, and you’re good to go! 7. Teach Siri to Pronounce a Name Many of us have names we have to break down phonetically, and Siri, despite its best attempts, usually misses the mark entirely. Teaching Siri to pronounce the name of a contact correctly makes it a lot easier to use Siri to call that person, saving you from pronunciation gymnastics as you try to get them to understand. Open Contacts, tap on the name of the contact, then tap Edit. Scroll down until you see “add field”and tap it. Choose Phonetic First Name, Phonetic Middle Name, or Phonetic Last Name. Enter in the phonetic pronunciation of the name you want and tap Save. 8. Have Siri Take a Screenshot Whether your hands are full or you have limited mobility, having Siri take a screenshot is a super helpful trick that not many people know is possible. Believe it or not, it’s as simple as saying, “Hey Siri, take a screenshot.” Siri will take a picture of the screen and save it to your Photos App as usual and you’ll also be able to find it in your Screenshots folder. However, you will need a cellular or Wi-Fi connection for Siri to carry out this command, so if you’re somewhere without any service, manually taking the screenshot might be your only option. Do It Fast 9. Automatically Answer Calls There can be a host of reasons why you can’t physically answer a call. Maybe you’re elbow-deep in dinner prep, or maybe limited mobility hinders your ability to swipe the screen. Whatever the reason, having your iPhone automatically answer calls for you can be a big help. To set it up, go to Accessibility in Settings, tap Touch, then scroll down and touch Call Audio Routing. Tap Auto-Answer Calls, then in the next display toggle Auto-Answer Calls on. From here, choose how quickly your iPhone will answer. It can be as soon as three seconds, or you can give yourself a full minute to answer on your own. 10. Record a Video Fast When you find the perfect moment for a video, you don’t always have time to switch between Photo and Video mode on your iPhone. Luckily, there’s a handy trick to start instantly recording in video even if you’re on the regular Photo setting. Simply drag your shutter button over to the right. Your camera will start recording a video, which you can end by tapping the center shutter button, which now displays the red video recording icon. The white shutter button to the right will take a still. No need to hold the shutter button after you swiped; just swipe once and let it do its thing! 11. Keep Favorite Contacts on Your Home Screen Do you have a handful of people you contact regularly? Instead of scrolling back through previous calls or message threads, you can add a widget to your Home Screen that displays your most contacted people. Just long press on a blank area of your Home Screen until it enters jiggle mode. Then tap the Add icon on the top left. In the box that pops up, scroll down until you see Contacts. Tap it, swipe through until you see the size widget you want, then tap Add Widget. Now, you just have to tap on a name in the widget for that person’s contact info to come up. 12. Jump Back to the Top of an App Did you know that a simple iPhone gesture can save your thumb the workout of scrolling back to the top of most apps? Inside most apps with vertical scrolling, you can return to the top by tapping a specific portion of the screen. All you have to do is tap the center top of your iPhone, usually just below the notch if you have one. This will jump you back up to the top, so if you want to see where your photo collection really begins or look for the title of the long article you just finished reading, you can do it in one touch. 13. Quickly Translate Text Whether you’re traveling or just come across a phrase in a language you don’t know, Live Text can translate for you without you having to type the phrase in and select the language yourself. Just take a picture of the text or just open your camera and point it at the text, and tap the Live Text button once it appears. Tap the arrow to the side and then tap Translate. Your Translate app will show you the translation and give you options to favorite, change the language, or copy the translation. When you’re done, just tap the X in the top right corner to exit. 14. Quickly Find Events in Your Calendar Know you have a birthday party to go to this month but can’t remember the date? You can search the Calendar app on to find events and their dates. You’ll need to have the events already saved to your Calendar, but most holidays are automatically entered in the Calendar app by default. Just open your Calendar app and tap the Search icon. Then enter the name of the event. The results will include all the events of that name, including ones that have passed, so make sure to check the year! How-ToiPhoneAppsSiriApple AppsCalendarCameraContactsMessagesNotesPhotosLock ScreenDevice ManagementMaster your iPhone in one minute a day: Sign up here to get our FREE Tip of the Day delivered right to your inbox.
http://dlvr.it/Sdtj2d