Friday, July 31, 2020

How to Automatically Share Your Medical ID During an Emergency Call on the iPhone

Prior to iOS 13.5, iPhones had the option to store a Medical ID, which could be viewed from the Lock screen by selecting it from the emergency call screen. On iOS 13.5 and later, you can conveniently automatically share your Medical ID information with emergency dispatchers. By immediately giving access to your medical conditions and blood type, among other information, dispatchers and first responders can waste less time gathering that data. They can then spend more time attending to your needs! Follow our guide to set up your iPhone to automatically send your Medical ID information during an emergency call.

How to Set Your Medical ID to be Sent to Emergency Dispatchers

By sharing your Medical ID during emergency calls automatically, first responders and you alike can forego the process of collecting that information once they arrive on scene. Plus, since your Medical ID has sensitive data, it is encrypted to prevent the spread of that data. Take the following steps to configure your iPhone running iOS 13.5 or later to automatically send your Medical ID to emergency dispatchers:

  1. Open up the Health app.
  2. Tap your account profilee in the top right corner.


  3. Tap Medical ID


  4. Tap Edit.
  5. Scroll down and slide the Share During Emergency Call switch to on.


Now your iPhone has the feature to automatically share your Medical ID during emergency calls enabled. Hopefully it won’t be necessary, but if it is, you’ll be glad you turned it on. Once on, the feature will ask you every four hours for the following 24 hours if you want to shop sharing your location. Even when not prompted, you can stop showing your location at any time by tapping the iOS status bar, then choosing Stop Sharing Emergency Location.

Master your iPhone in one minute a day: Sign up here to get our FREE Tip of the Day delivered right to your inbox.


* This article was originally published here

Thursday, July 30, 2020

How to Set a Default Calendar on the iPhone & iPad

How to Set a Default Calendar on the iPhone & iPad

Have you ever set a work appointment in the Calendar app only to find that it's been scheduled in your family calendar rather than your work calendar? The problem is likely the result of having your family calendar rather than your work calendar set as the default calendar on your iPhone. The solution is to change the default calendar in the Calendar app to the one you use the most often. That way appointments will automatically be added to the right calendar. And on the less frequent occasions when you need to schedule an event in a different calendar, you can easily choose a different calendar when scheduling it. Here's how to set the default calendar on your iPhone to the calendar you use the most.

How to Set a Default Calendar on the iPhone or iPad

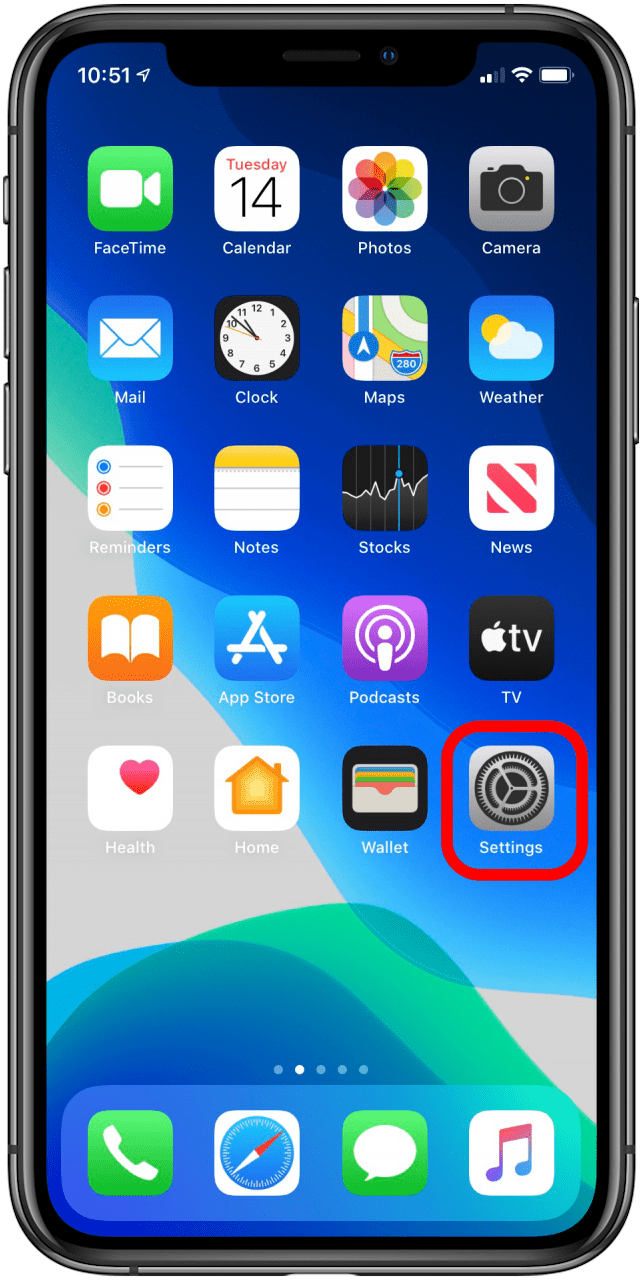
  1. Open Settings.
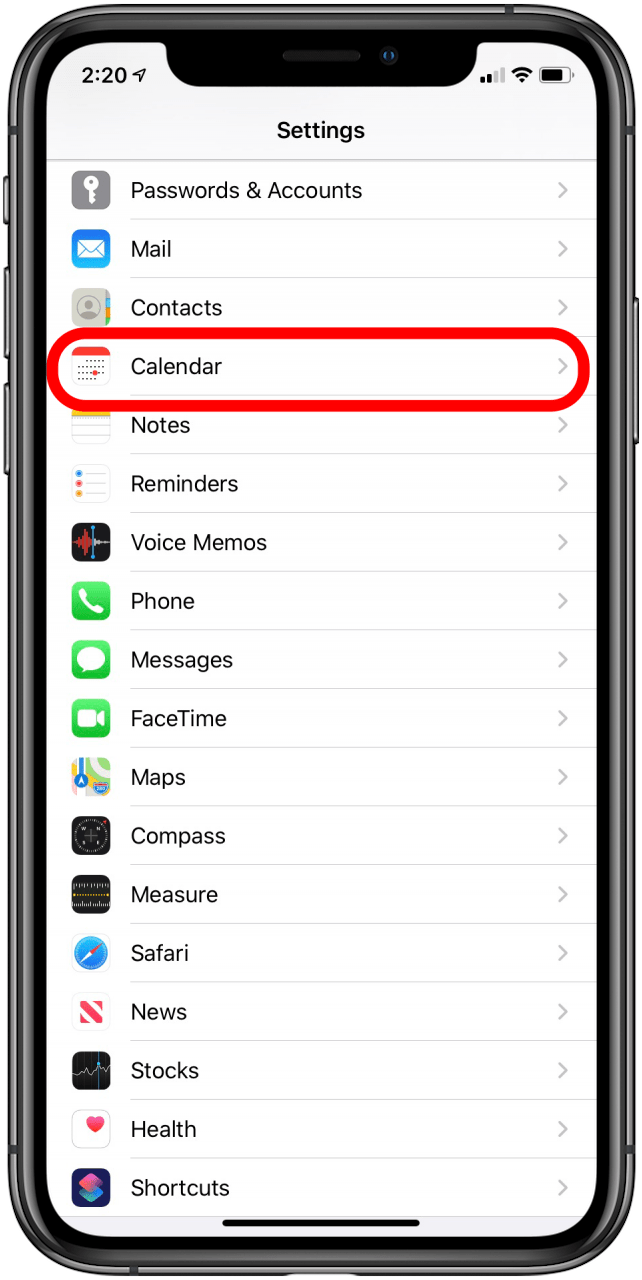
  2. Scroll down and tap Calendar.


  3. Tap Default Calendar.
  4. Choose your default calendar.

You can also create new calendars through the calendar app on your phone in case the default suggestions don't suit your preferences, as well as manually select a calendar for a new entry, but this is how you set your default calendar. For more great Apple product tutorials, check out our free Tip of the Day.

Master your iPhone in one minute a day: Sign up here to get our FREE Tip of the Day delivered right to your inbox.


* This article was originally published here

Wednesday, July 29, 2020

5 Apps for the Deaf & Hard of Hearing

The iPhone as most people know it is not the same device when it’s in my hands. As a deaf person, my iPhone serves as a tool for accessing a whole new world. Some of the apps that hearing people use daily for recreational or professional purposes are apps I rely on to communicate with other people and to make my life more comfortable. In this article, I’ll highlight five of my favorite iPhone applications that make my life easier in every way. These apps include a helpful voice to text app, as well as a popular Apple app, FaceTime.

Related: 10 Siri Voice Commands for iPhone for the Blind & Visually Impaired

I’ll start off with number five, UberEats (free). Ordering food may seem like a simple task, but it often becomes complicated for me. When I use interpreters to call a restaurant, they often relate the order perfectly, but they’re bound to make mistakes sometimes. These mistakes often cost me my order, or a detail or two goes missing. Using UberEats, I can ensure that my order is served without any complications. I’m also able to communicate with the driver using a chat option in the app, rather than having to call through an interpreter. It has made my life much easier, just by cutting out the hassle of communicating with restaurant staffers.

Here comes number four, Ava (free); it’s an app that translates spoken English into readable text. Ava has served me well in meetings with hearing people. What I like about Ava is that it doesn’t charge you for minimal use, but of course, if you use it daily for professional purposes, it’s worth the investment as you’ll save the cost of using interpreters. This preference varies from person to person, but for me, the app does the job. Since I’m able to gesture, read lips, and so on, Ava is often the only tool I need to collect information during live meetings. This app works just as well for one-on-one conversations with my hearing family members. Unlike other apps that make a lot of errors, Ava is super impressive with its ability to relay words. For example, my roommate, who is also deaf, works at the National Institute of Health, and says Ava is able to skillfully relay the scientific terms he uses daily as part of his job.

Number three on my list is Convo (free), a video-calling app that deaf people use to relay their calls through sign-language interpreters. Convo is also deaf-owned, which is a huge plus because the owners know exactly what kinds of barriers we face when using interpreters and relay services. Convo has proven to be superior in many ways, from the interpreting to the aesthetic of the app. The only reason I put Convo as number three on my list is because I usually use my laptop or TV for video calling, so I don’t need my phone for it. I use Convo once a week or so, depending on how many calls I need to make.

This app can also literally be a lifesaver. About a year ago, I was in an accident that totaled my truck. The only way for me to communicate with authorities was by using Convo. The interpreter surpassed my expectations and helped me confidently maneuver through my first accident. It’s really helpful to have such a reliable app when making an emergency call, especially in life-threatening situations.

Coming in a close number two is Make It Big (free). The app is designed to enlarge your text to the maximum size possible so you can confidently type to communicate without having to adjust the text size. I use Big daily for this reason. Often, I come across people who left their reading glasses at home, and Big comes in super handy. Another nice thing about Big is that it saves receipts of your texts so you can review them. If I made an order at a restaurant and liked how the food tasted, I can easily make the exact same order. This app is nice for every little conversation; from a person you’re sitting next to on the plane, to your potential boss in an interview.

Coming in strong in first place is FaceTime (free). If you’ve ever tried video calling with other applications, you’ll know that they can generally lag due to all the live data they’re transferring to the other phone. Since sign language uses a lot of motion, it requires a strong connection. A lot of apps can’t handle this. On the contrary, FaceTime has almost always been reliable to use for video calling. I use it when I call my parents or grandparents because it gives me the ability to read their lips while we’re on a call. It’s a super useful app that has earned the trust of most deaf people. I would say I use FaceTime anywhere from five to twenty times a day. I live with three other deaf people, including my girlfriend, and we FaceTime with each other to communicate. There’s something so natural about FaceTiming other deaf people. Being able to use sign language versus texting is a true advantage. You are able to see emotions, facial expressions, and signs while chatting. This makes all the difference, and for that, I have to thank Apple. Group calling is also an option now, which is great for deaf families who now can all join one call. Being able to talk face to face can’t compare to using interpreters or text messages. Call me on FaceTime, and I’ll teach you some sign language.

Topics: 
Master your iPhone in one minute a day: Sign up here to get our FREE Tip of the Day delivered right to your inbox.


* This article was originally published here

Tuesday, July 28, 2020

How to Unblock a Number on the iPhone

Learn how to find blocked numbers on the iPhone and unblock someone on the iPhone. Unblocking a number on your iPhone couldn’t be easier, thanks to the forward thinkers at Apple who knew that the handy block feature should not be permanent. That’s because it’s easy to block someone accidentally or unknowingly. Maybe you were blocking robo-callers or spam texters and blocked a contact by mistake. Or maybe you intentionally blocked a friend or colleague and now you want to undo that. Or maybe you’re having trouble calling a contact, or vice versa, so you want to see the blocked numbers on your iPhone and check to see if that number is on it. Here’s how to do it.

Related: How to Know If Someone Blocked Your Number on Their iPhone

How to Find Blocked Numbers on Your iPhone

  1. Open Settings.
  2. Tap either Phone, Messages, or FaceTime (any one of these will work.)


  3. Scroll down and tap Blocked Contacts. This will take you to your blocked list.

How to Unblock a Number on the iPhone

You can easily unblock one number or several numbers at once in the Blocked Contacts list.

  1. Tap Edit in the upper right corner of the Blocked Contacts list.

    tap edit
     
  2. Tap the red minus symbol to the left of the phone number or email address you want to unblock, then tap Done.
  3. Alternatively, you can swipe left on the phone number or email address you want to unblock, then tap Unblock.


Unblock a Number from the Contacts App on the iPhone

You don't need to go to the Blocked Contacts list to unblock a single contact. It may be easier to open their contact card within your Contacts app, where you also have the ability to unblock. Here’s how to do it. 

  1. Open the Phone app and then open the Contacts tab (or Recents tab) at the bottom or open the Contacts app.


  2. Find the contact you're looking for and tap on their name to open their contact card.
  3. Scroll to the bottom of their contact card and tap Unblock this Caller.


Can You Unblock a Deleted Contact?

If you deleted a contact after originally blocking them and now you want to get their number back, you may still be able to do so. If you only deleted it from Contacts, it may still appear in your Recents call log or your Voicemail log. If you deleted the contact from these logs too, you may need to call your phone company to retrieve their call log, which will list incoming and outgoing calls by date and time.


Topics: 
Master your iPhone in one minute a day: Sign up here to get our FREE Tip of the Day delivered right to your inbox.


* This article was originally published here

How to Create Parameters Query Ms Access

Monday, July 27, 2020

How to Share Your Hotspot with Family without Requiring a Passcode

Many of us share our data with our family members via a Wi-Fi hotspot on a regular basis—perhaps a spouse needs to get some work done or your kids are trying to do homework. Whatever the reason, sharing password access can be arduous, and it's unnecessary if you have Family Sharing. This easy method lets you bypass passwords and allow the people you trust to connect effortlessly to your hotspot. Not every service provider offers hotspots; so before you set this up, check to make sure this is available with your plan. Let's take a look at how to turn off the password requirement for family members when sharing data through a WiFi hotspot.

Share Your Hotspot Password-free Using Family Sharing

  1. Go to Settings
  2. .Tap Personal Hotspot. If that is not an option, tap on Cellular first, and then you will see the personal hotspot option.

    Go to settings How to share a WiFi connection using a hotspot
     
  3. Tap the toggle next to Allow Others to Join and make sure it's green. This will turn your hotspot on.
  4. Tap Family Sharing.

    Share WiFi connection How to share data through WiFi hotspots
     
  5. Tap the name of the person you want to share with.
  6. Select either Ask for Approval or Automatic, depending on your preference. Ask for Approval will keep it so that person must request access each time they try to connect, and Automatic will allow them to automatically connect when they are in range.
  7. Now when your family member wants to connect to your hotspot, they can simply go to their Wi-Fi settings and tap the name of the network. If Family Sharing is on, they'll connect right away, or as soon as you give approval, no password necessary. For more great iPhone tutorials, sign up for our free tip of the day.

    How to let others use your internet connection Share your WiFi connection without a password using Family Share
Master your iPhone in one minute a day: Sign up here to get our FREE Tip of the Day delivered right to your inbox.


* This article was originally published here

Sunday, July 26, 2020

iPhone Life Proudly Supports Racial Justice

In recent months, we’re reminded of the deeply entrenched racial divide in this country after the tragic loss of more members of our Black community, including George Floyd, Breonna Taylor, and Ahmaud Arbery. The widespread protests and civil unrest that have followed tell the story of a country that’s grieving and in search of a path forward. At iPhone Life, we are committed to fighting racial injustice and bias within policing, the tech world, and society as a whole. While large-scale action is needed to address the problem of systemic racism, we are also committed to taking personal action to support racial equality. 

To that end, we’re donating to organizations including Black Lives Matter, the ACLU, Code2040, and more. We’re examining our own company culture to make sure it is inclusive and free of bias. And more than ever, we’re committed to serving a diverse community of Apple users.

To Read: Apps by Black Developers, Diversity in Tech & Social Justice

As a news publication, we are putting a renewed effort into lifting up the voices of under-supported Black-owned tech companies and app developers. In the coming months, As an editorial team, we will be featuring the brilliant work of Black innovators in tech and seeking out contributions from a more diverse group of writers for each magazine issue. Are you a tech enthusiast who’s part of a minority community? Reach out to us at editors@iphonelife.com to inquire about writing opportunities. We look forward to hearing from you.

In the meantime, here are some articles for you to enjoy, including a roundup of apps by Black developers from the latest issue of iPhone Life magazine and a conversation with the founder of Code.org on the diversity gap in tech.

5 Free iPhone Apps to Support People of Color in Your Community

If you’re wondering what the best way to show support for people of color in your community is, check out Writer & Video Editor Nicholas Naioti's selection of apps that help you promote equality in your community. 


Apps by Black Creators

From self care to social justice, Staff Writer Amy Spitzfaden-Both features ten innovative apps created by Black app developers.


Crack the Code: Closing the Diversity Gap by Teaching Girls & Students of Color Computer Science

The field of computer science is brimming with opportunity, and yet women and minorities fill a disproportionately small number of these positions. Check out my conversation with Code.org cofounder Hadi Partovi on the importance of closing the diversity gap in tech. 


The iPhone’s Role in Citizen Journalism

More than five years ago, I wrote a piece about how citizens are holding the police force accountable using their smartphones. Unfortunately, this article is still just as relevant today. “Video is some of the most powerful evidence you can have,” said criminal defense attorney Peter Berlin. After the recent tragic deaths of George Floyd and Breonna Taylor at the hands of the police, the role of citizen journalism is more important than ever.


To Watch: Systemic Racism Explained

Our former Editor in Chief Alex Cequea went on to found an activist media company called act.tv. Alex made a 5-minute video about systemic racism that has gone viral in recent months. If you’re looking for a simple explanation of the mechanics of system racism, check it out.


Let's Stand Together

We invite you to join us in taking a stand against systemic racism, addressing the racial inequalities upon which this country was founded, and supporting Black-owned businesses and tech ventures today. Thank you for being a part of the iPhone Life community.

Top image credit: Maria Siubar / Shutterstock.com
Master your iPhone in one minute a day: Sign up here to get our FREE Tip of the Day delivered right to your inbox.


* This article was originally published here