Sunday, October 6, 2019

How to Make a Professional, High-Quality Video on Your iPhone

Even though I have three DSLR cameras and a variety of wide and telephoto lenses sitting on my shelf, I still prefer to shoot videos with my iPhone X. I used to do it to prove a point—that you can make quality videos with just your iPhone. But nowadays I shoot with my iPhone for other reasons I’ve discovered along the way.

One of the biggest reasons I enjoy using my iPhone is that it lends itself better to intimate storytelling, which is important for the types of videos I like to make. I’ve found that when shooting with my iPhone versus a DSLR, my subjects act more natural. That’s because most everyone is familiar with iPhones. It’s like ordering mac and cheese at a restaurant. You’ve had it before, and you’ve made it yourself at some point. It’s not a mystery. It's also easier to carry three iPhones than it is to haul three DSLRs with a variety of lenses. And if the impact of the story is going to be the same regardless of the tool used, then heck, why not shoot with an iPhone?

There is no limit to the types of videos you can create with your iPhone. I would even argue that it is better suited to some video formats, such as vertical social media videos. It is beyond me why anyone would go through the trouble of taking out their DSLR, shooting a 15-second video, exporting it to a computer, editing said video, exporting, transferring it to the iPhone, and then posting to Instagram when no one can even tell the difference!

Lately, my favorite place to share videos is IGTV, a new vertical video platform by Instagram. Think of the content as Instagram stories but longer (up to ten minutes for most accounts or one hour if you’re internet famous.) It’s a great way to casually connect with your audience via video, unlike the formally produced videos on YouTube. Other video types I love are the mini storytelling documentaries I create for clients and my own personal projects.

Creating Your Shot List

Regardless of the type of video I create, my process is the same. Before I shoot any video, my first step is to create a shot list, which is a detailed description or sketch of shots that I plan to include in the video. For example, each video typically has at least three types of shots: a wide shot, a medium shot, and a close-up. Depending on the story you’re trying to tell, the subject of these shots will vary. A good shot list also includes details about camera movement. Will the shot be captured by moving the camera horizontally (trucking shot) or vertically (pedestal shot)? This is the most important step, because without knowing what kinds of shots you need to capture, you won’t know what gear to bring on the shoot.

Packing for Your Shoot

Once you have your shot list, the fun and creative part begins—figuring out what tools will allow you to get those shots! For starters, I like to pack two iPhones in my gear bag. I usually shoot with the iPhone X and use an older model to act as either a second camera or as a remote control for the iPhone X (I’ll go into that later!). Aside from an additional phone, the rest of the gear in my bag usually includes a mount, several microphones, external lighting, additional storage, and a power source. Here’s how I decide which to bring:


Mounts:

If I know I’m going to be moving the iPhone a lot during the shoot, I will bring a gimbal, a handheld tool that stabilizes footage. I bought the DJI Osmo Mobile 2 ($189.00), specifically because it is compatible with FilMic Pro ($14.99), the filmmaking app that I use (more on that later). I will also always bring a tripod. I try to keep things as mobile as possible, so I’ll often bring a mini tripod like the Joby GorillaPod Mobile Rig ($99.95). For interviews or still footage, I will bring my full-sized Manfrotto tripod (starting at $219.99).


Microphones:

I always, always bring an external microphone. While the iPhone’s camera is capable of professional-quality video, its microphone is not. With the use of a simple adapter, I’m able to use mics made for DSLRs to upgrade the audio. My go-to microphone is the Rode VideoMic Pro ($169.99) shot-gun mic. For interviews, I will bring a set of hands-free lavalier microphones. Depending on how mobile the interview needs to be, I’ll either bring a wired set or a wireless set like my Rode RodeLink Wireless Kit ($394.13). But honestly, any external mic is a huge improvement over the iPhone, because it will isolate your audio and minimize ambient noise.


Attachment Lenses:

I have all sorts of lenses by Olloclip (starting at $54.99–$119.99) and Moment ($89–$119.99) that range from super macro to wide to telephoto. But I’ll admit that I really only use the wide lens and only when I really have to, because the built-in wide and telephoto lenses on the iPhone X make them almost unnecessary. The attachment lenses do come in handy when you need that little bit of extra reach or need a slightly wider view for cramped places.
 

Lights:

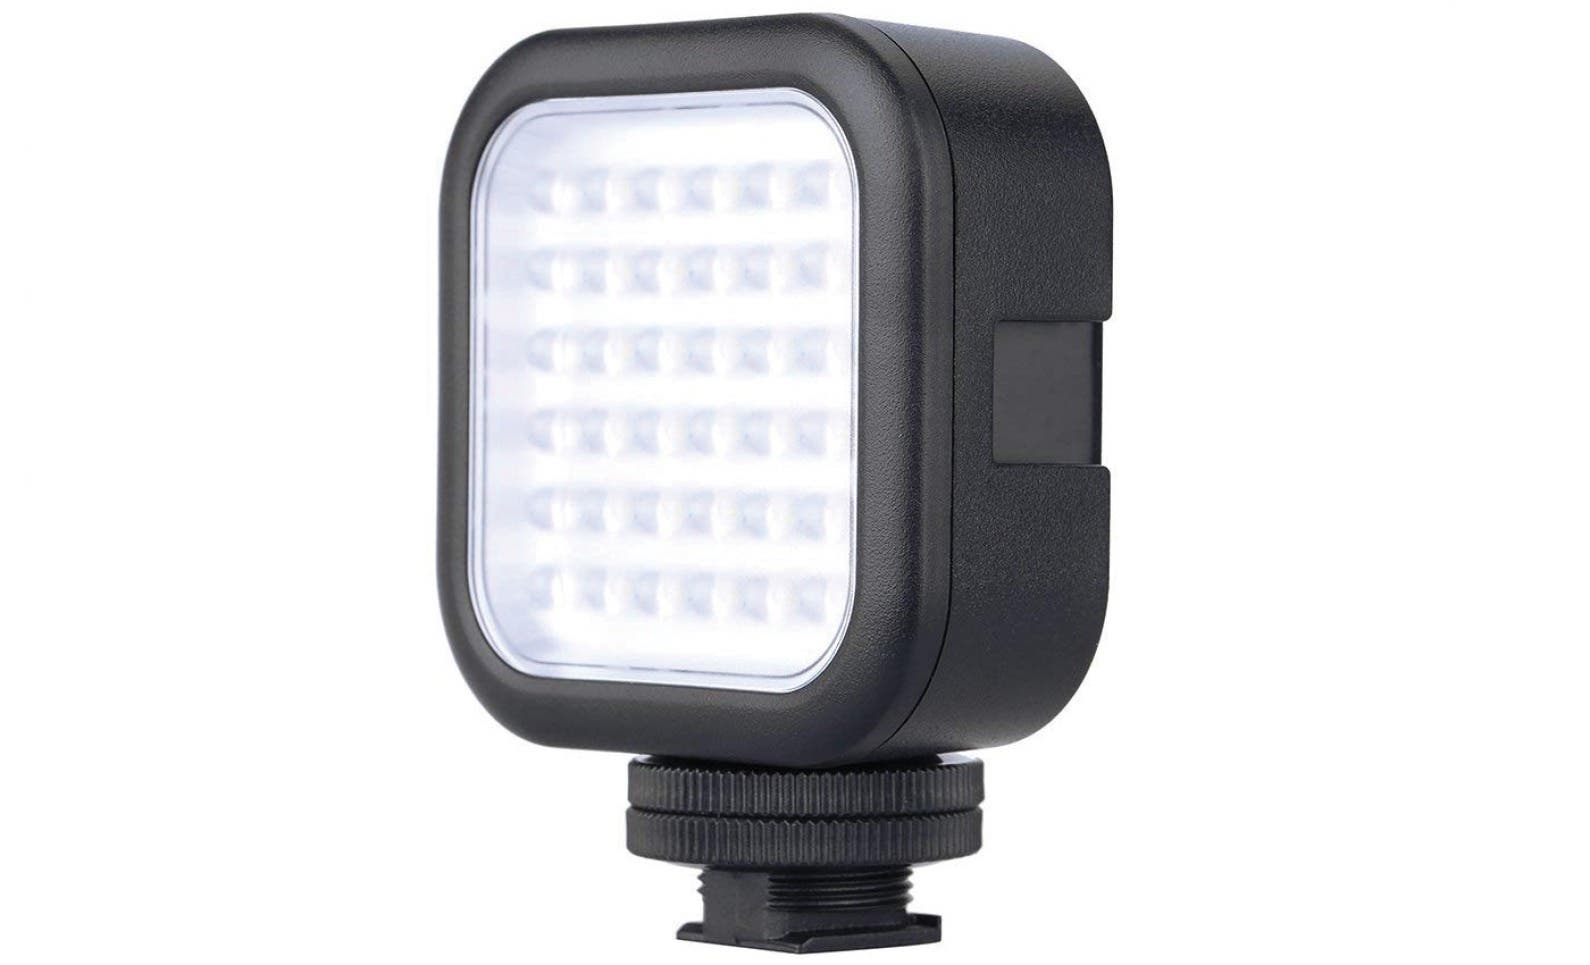
Oftentimes, your iPhone requires some extra help in low-light situations. External lights are great for adding and manipulating light and modifying the tone and mood of your set. I’ll sometimes use my Godox LED light (starting at $20) to remove shadows from my subject’s face or to add a pop of brightness in a scene. Because these lights are compact, they have a permanent place in my bag.


Power & Storage:

Nothing fills your iPhone’s storage more than filming hours of footage. Shooting thirty minutes of 4K footage shot at thirty fps will net about ten gigabytes of storage. Even though my iPhone has 256 GB of storage, I’m constantly offloading video onto an external flash drive or wireless drive. I use the SanDisk 128 GB Lightning FlashDrive ($62–$120) to transfer files to and from my iPhone, iPad, and MacBook. For more permanent storage, I use the WD My Passport Wireless Drive (starting at $149.99). Power is also another problem. If I’m going to shoot for longer than twenty minutes, I will plug my iPhone into an external charger and charge as I’m filming. There’s nothing worse than running out of battery in the middle of a shoot!

Overall, my advice with gear is that there’s no one set of gear to always bring. Don’t bring everything and the kitchen sink! It defeats the purpose of shooting with an iPhone. You need to think about the shoot and customize accordingly.

Choosing Your Camera App

The last thing I recommend is to get an app that will let you fully control all of your camera settings. My favorite, which seems to be many filmmakers’ favorite, including Steven Soderbergh, who used this app to film Unsane, is FilMic Pro. This is the app that lets me use one of my iPhones as a remote for controlling settings on my iPhone X. This allows me to place my iPhone in the most obscure places to get those creative shots. The strength of Filmic Pro is that it allows me to control the resolution, frame rate, shutter speed, exposure, focus area, and even color modes of what I’m filming. This is super important if you want quality video!

Executing the Shoot

Once I have all the gear, it’s just a matter of executing the shoot. Because there’s not a whole lot of gear or settings to mess around with when shooting on your iPhone, it’s much easier to focus on the creativity of filmmaking. However, it can also be easy to forget to be a filmmaker when you’re just using the iPhone. Remember that you have to move your iPhone like you would any video camera. That means you need to do your trucking shots, your dolly shots, your pans, and your pulls. Just because it’s an iPhone you’re filming with doesn’t mean the artistry behind filmmaking is gone. It’s very much there. And with the iPhone, you can get really creative with your shots because it fits in the most random places!

Making a quality video with your iPhone is easier now than ever, thanks to ample accessories and technology created specifically for mobile filmmaking. If you’re a beginner when it comes to filmmaking, the iPhone is a great place to start, because of the relatively low investment you’ll need to make in gear and the ability to focus on what truly matters—visual creativity and storytelling. But I tell ya, once you get started shooting on your iPhone, I’m guessing that you just might stay with it because it’s that good.

      Master your iPhone in one minute a day: Sign up here to get our FREE Tip of the Day delivered right to your inbox.


      * This article was originally published here

      Saturday, October 5, 2019

      Mechanical Keyboard Review: Woo-dy Combines High Tech with Old-School Materials

      I love the juxtoposition of high-technology and old-fashioned materials, like leather and wood. That describes the Woo-dy Mechanical Keyboard (starting at $99) that UNICK sent me to review. The keyboard is being crowdfunded but it has already passed its goal and I was able to try a real unit. Here are my impressions. First, it's beautiful. Customers can choose the wood type and key cap colors, and then use the software (Windows only, currently) to customize the backlighting and keyboard layout. While mine had a "WIN" key, it worked just like an Apple Command key.

      Woo-dy

      Speaking of keys and how they work, they are high-quality, smooth and soft ergonomically contoured Gateron mechanical keys but you may find you need to press harder to register a key stroke, especially with the space bar. It uses the included USB-A to USB-C cable which is also well-made with gold connectors and fabric braiding. And thanks to the keyboard's solid heft, it will stay put on your desk. 

      Another plus is that it operates as both a Wired or Wireless keyboard, so it can work with iOS devices via Bluetooth as well as macOS, Windows, or Linux computers via Bluetooth or USB. Gamers may prefer wired for faster response, namely 1ms under wired mode, and 4ms under Bluetooth mode. 

      Pros

      • Quality mechanical keys
      • Adjustable LED lighting
      • Wired or Wireless modes, for iOS, macOS, Windows, or Linux
      • Solid heft to stay put
      • Wood base is elegant

      Cons

      • Software is for Windows
      • Uses WIN key not Apple Command key
      • Mechanical keys require more forceful typing 
      • No dedicated function or iOS keys

      Final Verdict

      If you like mechanical keyboards, the Woo-dy Mechanical Keyboard from UNICK is a solid contender.

      Master your iPhone in one minute a day: Sign up here to get our FREE Tip of the Day delivered right to your inbox.


      * This article was originally published here

      Friday, October 4, 2019

      How to Swipe Text on the iPhone with iOS 13

      Slide to Type, or the QuickPath keyboard, has finally arrived on the iPhone with iOS 13! With the QuickPath keyboard you can compose words by swiping from letter to letter without lifting your finger from the virtual keyboard, and the phone predicts what word you want by noticing when you hesitate or change directions. You can also switch back and forth between swiping and tapping to type, as you prefer. When I first heard of this feature I didn't think much of it, but it quickly became my go to method for typing on my phone, and with all the texting and messaging we do these days, that's a big deal. I found I could compose messages one-handed, with increased overall speed and accuracy. Let's get started.

      Related: How to Switch between Keyboards on Your iPhone

      How to Swipe Text on the iPhone

      1. Slide to Type should be on by default in iOS 13, but let's make sure. Open Settings.
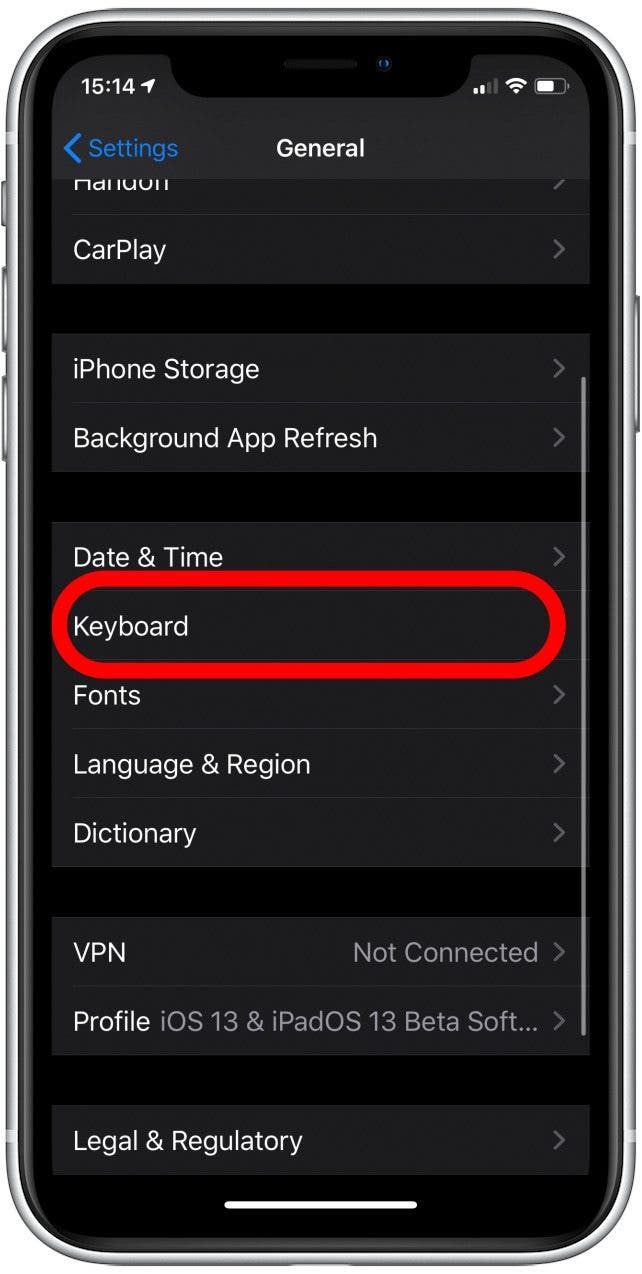
      2. Open General.

        swipe text on iphone swipe keyboard iphone
         
      3. Scroll down to Keyboards.
      4. Make sure Slide to Type is toggled on.

        iphone swipe swipe keyboard
         
      5. Slide to Type works with the normal iOS keyboard, so you can use it anyplace that you would normally type, such as Mail, Notes, or Messages. Simply begin a new composition. I'll demonstrate in Messages, by composing a reply to a message thread.
      6. Make sure the cursor is in the spot you want to type, and start your word by touching the first letter of the word on the keyboard.
      7. Swipe to the next letter in the move, and the next, without removing your finger from the surface. For example, the word 'hi' would be swiped starting at 'H' and then moving to 'I'.

        swype for iphone
         
      8. Lift your finger when you get to the last letter in the word, or when the predictive text at the top of the keyboard has zeroed in on the word you want.
      9. The keyboard will automatically add a space after each word, so you don't need to tap the spacebar.
      10. For double letter words like "tool," skip the second iteration of the repeated letter, swiping in this case from T to O to L.

        swype keyboard ios keyboard
         
      11. If the word came out wrong, check the predictive text along the top of the keyboard, and tap the one you meant.

      And that's it! Slide to Type is easy to use, fast, and accurate. Happy swiping!

      Master your iPhone in one minute a day: Sign up here to get our FREE Tip of the Day delivered right to your inbox.


      * This article was originally published here

      Thursday, October 3, 2019

      Review: iOttie Car Mount with Alexa

      I have reviewed quite a few car mounts over the years, and a few years ago, the Easy One Touch Connect ($69.95) that iOttie sent me to try would have been the best ever. It does things no other car mount I've tried does, namely integrate the Alexa voice assistant. This is a luxury that I now consider a necessity. I love being able to request navigation or music or weather without pushing a button or swiping a screen and taking my eyes off the road. 

      The iOttie device has its own app that connects to Amazon's Alexa app, and from then on, the device leverages your iPhone's data plan over a Bluetooth connection. In short, it just works. One concern I had was that I had to deliberately change my car radio to Bluetooth to hear what Alexa was saying. Your car radio may work differently, but for my Nissan Rogue, it automatically switches to the iPhone via Bluetooth when I answer a phone call, but not with this third-party offering.

      The car mount itself is built well, with a rock solid and adjustable phone grip. I like that I don't need a special case with metal and magnets. It just works with any phone, large or small, in a case or not. It is designed to mount to the windshield via suction cup, or an adhesive disc you attach to your dash. I have used a number of iOttie mounts over the years, including vent mounts, and I prefer the CD slot mount. After all, I never listen to CDs anymore and that option is quite secure. I also tried this mount in my cup holder and that worked nicely as well.

      They also include a car charging adapter. with a built-in microUSB cable and a second USB slot to charge your phone. That's important because this mount does not offer Qi wireless charging. Many competing mounts do, including others from iOttie. In a perfect world, this mount would also charge your phone wirelessly, but maybe that's left for a future version. Also, there are many folks who don't take advantage of wireless charging, because they use wallet cases, Pop Sockets, and other items attached to the back of their phone; so for those users, it's not a big deal.

      Pros

      • Alexa works well on the road
      • Leverages Bluetooth to use cellphone data plan
      • Rock solid phone grip
      • Assorted mounting options and includes car charging adapter
      • Easy quick release

      Cons

      • Does not include Qi wireless charging
      • May need to switch to Bluetooth audio in your car
      • Uses microUSB not USB-C or Lightning

      Final Verdict

      The folks at iOttie have added Alexa to the car and I'll never go back. I only wish it also had wireless charging.

      Master your iPhone in one minute a day: Sign up here to get our FREE Tip of the Day delivered right to your inbox.


      * This article was originally published here

      Wednesday, October 2, 2019

      How to Switch Your iPhone to Dark Mode with iOS 13

      The new iOS 13 Dark Mode feature reverses the color scheme on your iPhone, darkening the background and lightening text to provide higher contrast, and can help reduce the eye strain caused by looking at bright screens. Thanks to iOS 13, all you need to do to switch to Dark Mode on your iPhone is open the Display & Brightness options in the Settings app. Let's get started with how to switch your iPhone from Light to Dark Mode.

      Related: How to Adjust the Brightness of Your iPhone Screen

      How to Switch Your iPhone to Dark Mode

      1. Open the Settings app.
      2. Scroll down and select Display & Brightness.
      3. Tap the circle under Dark.


      4. Now your iPhone appears in Dark Mode. Happy browsing!

        news app as it appears in light mode


      Master your iPhone in one minute a day: Sign up here to get our FREE Tip of the Day delivered right to your inbox.


      * This article was originally published here

      Tuesday, October 1, 2019

      Review: Control this Robotic Vacuum with Alexa or an iOS App

      While others may have more name recognition, Ecovacs is a strong contender with nearly a dozen different models to meet the needs of specific customers. They sent me their most popular model, the DEEBOT 500 ($259.95), to try. For me, with primarily hardwood flooring, it works well. This particular model travels somewhat at random, stopping at walls and other obstacles and changing direction, but Ecovacs has more advanced models that can be programed via the app based on your floor layout.

      The DEEBOT 500 lasts for nearly two hours before it needs to be recharged, and magically, if finds its charging station automatically then charges itself. So that's one less thing to worry about. I wish my iPhone and Apple Watch could do that! The battery life is important, because this model works at random. Just keep the charging dock in an open area, to improve docking success. You can also use the included remote to tell the vacuum to go home and initiate recharging. The remote can also tell the DEEBOT which direction to go, pause or switch between spot and edge cleaning. 

      I love that, in addition to the app, the DEEBOT can be controlled by Alexa, (via Wi-Fi) as well as the included remote control (which looks a bit like my Logitech Harmony Express remote, so I have to be careful!). But I tend to use Alexa for as much as possible, anyway. It even looks like an oversized Amazon Echo Dot! It's not 100 percent automated. You have to empty the dust bin of course. And eventually, you may have to replace the filter or brushes, depending on usage.

      Ecovacs has so many models that it's hard to choose which model to get, as some of the higher end units offer water-based mopping, as well as carpet detection, and longer battery life. The good news is that the website offers a comparison tool and a filter so you can restrict items if you have carpets, desire mopping, etc., to find the right model(s) for you.

      Also, keep in mind that, if you have pets, they might be disturbed or even threatened by any robotic vacuum cleaner, as my small dog is. But I try to keep her in another part of the house when using the cleaner.

      Pros

      • Nearly two hours of battery life
      • Automatically recharges itself using docking station
      • Controlled by iOS app, Alexa, or remote control
      • One of many varieties offered

      Cons

      • Random mapping versus app-based
      • Higher end models offer water-based mopping, carpet detection, and longer battery life
      • Might disturb pets

      Final Verdict

      The DEEBOT 500 from Ecovacs, or one of its brothers, should be able to keep your floors clean; just choose the right one.

      Master your iPhone in one minute a day: Sign up here to get our FREE Tip of the Day delivered right to your inbox.


      * This article was originally published here